I was in the middle of a frantic weekday dinner prep when my roommate shouted, “You have to try this snack bar thing you keep bragging about!” I laughed, tossed a handful of raw cacao into the blender, and the next thing I knew I was staring at a glossy, dark mixture that smelled like a midnight chocolate factory. The kitchen was alive with the crackle of a low oven, the sweet perfume of maple syrup, and the faint, briny whisper of sea salt that made my nose do a little happy dance. I could hear the faint hum of the refrigerator, feel the cool metal of the baking pan, and see the batter spreading like a midnight river across the parchment. In that chaotic moment, I realized I had stumbled upon something that would forever change my snack game.
Most raw snack bars I’ve tried either crumble like dry sand or stick together like a stubborn lump of gum. This version, however, strikes a perfect balance: the chocolate is velvety, the salt pops like fireworks, and the texture is a satisfying crunch that gives way to a chewy center. I dare you to taste this and not go back for seconds – the salty‑sweet symphony is practically addictive. The secret? A pinch of flaky sea salt added at just the right moment, and a quick flash‑bake that locks in flavor without losing the raw goodness.
I’ll be honest — I ate half the batch before anyone else got a chance to try it, and that’s a confession I’m not ashamed of. Most recipes get this completely wrong by either over‑baking (turning the bars into brittle bricks) or under‑mixing (leaving pockets of dry flour). Here’s what actually works: a gentle melt of coconut oil and maple syrup, a brief bake at 325°F, and a final sprinkle of sea salt that creates a contrast so bold it could win a taste‑test showdown. The result is a bar that’s crisp on the edges, soft in the middle, and has that unmistakable “wow” factor you crave.
Picture yourself pulling this out of the oven, the whole kitchen smelling like a boutique chocolatier’s shop, the bars cooling on a wire rack while the faint crackle of caramelized sugar lingers in the air. The moment you bite into it, the first thing you’ll notice is the snap of the chocolate coating, followed by a buttery melt that’s instantly balanced by a salty kiss. This isn’t just a snack; it’s a mood‑setter, a conversation starter, and a confidence boost in one bite. Okay, ready for the game‑changer? Let me walk you through every single step — by the end, you’ll wonder how you ever made it any other way.
What Makes This Version Stand Out
- Flavor Explosion: The combination of raw cacao, maple syrup, and flaky sea salt creates a sweet‑salty duet that dances on the palate like a well‑rehearsed ballet.
- Texture Harmony: A crunchy oat‑nut base meets a silky chocolate coating, delivering a bite that’s both crisp and melt‑in‑your‑mouth.
- Simplicity: Fewer than ten ingredients, all pantry‑friendly, mean you can throw this together on a weeknight without a grocery run.
- Unique Salt Timing: Adding sea salt after the brief bake preserves its crystalline crunch, preventing it from dissolving into the chocolate.
- Crowd Reaction: Guests often claim they’ve never tasted a snack bar that feels like a gourmet dessert, prompting endless requests for the recipe.
- Ingredient Quality: Using raw, minimally processed cacao and unrefined maple syrup ensures a clean, natural flavor profile without artificial after‑tastes.
- Cooking Method: The flash‑bake technique locks in moisture while giving the exterior a light, caramelized crust.
- Make‑Ahead Potential: These bars keep fresh for up to a week in the fridge, making them perfect for grab‑and‑go mornings.
Alright, let's break down exactly what goes into this masterpiece...
Inside the Ingredient List
The Flavor Base
Raw cacao powder is the heart of this bar. It delivers a deep, earthy chocolate flavor that’s far richer than any processed cocoa. If you skip it, you’ll lose that signature bitterness that balances the sweetness of maple syrup. A good swap is Dutch‑processed cocoa, but expect a slightly smoother, less complex taste. When buying cacao, look for a dark, matte color and a faint, fruity aroma – that signals high quality beans that have been minimally processed.
The Sweetener & Binder
Maple syrup does double duty: it sweetens and binds the dry ingredients together. Its natural caramel notes elevate the overall flavor profile, making the bar taste like a gourmet treat. If you’re allergic to maple or prefer a lower‑glycemic option, try agave nectar or a blend of date paste and a splash of orange juice. The key is to keep the liquid ratio around 1:4 (liquid to dry) so the bars hold together without becoming soggy.
The Texture Crew
Rolled oats and chopped nuts (almonds and cashews) provide that satisfying crunch. Oats add a wholesome, slightly chewy backbone, while the nuts contribute buttery richness and a subtle nutty aroma. If you’re nut‑free, substitute with toasted pumpkin seeds or sunflower seeds; the texture remains, and you’ll get a pleasant, earthy flavor. For the best crunch, toast the oats and nuts lightly before mixing – they’ll release oils that enhance the overall mouthfeel.
The Unexpected Star
Flaky sea salt is the surprise element that turns a good bar into an unforgettable one. Its crystalline structure provides a pop‑and‑crackle sensation that contrasts beautifully with the smooth chocolate. If you don’t have flaky salt, a pinch of finishing kosher salt works, but the texture won’t be as dramatic. Sprinkle the salt after the brief bake to preserve its crunch; adding it too early will dissolve the crystals into the chocolate.
The Final Flourish
A handful of dark chocolate chips (preferably raw or minimally processed) are folded in just before the final bake. They melt slightly, creating pockets of molten chocolate that burst when you bite. If you’re dairy‑free, ensure the chips are vegan; otherwise, you can swap them for chopped dried apricots for a fruity twist. The final dash of vanilla extract amplifies the overall aroma, tying all the flavors together in a harmonious chorus.
Everything's prepped? Good. Let's get into the real action...
The Method — Step by Step
Preheat your oven to 325°F (163°C). While the oven warms up, line a 9×13‑inch baking pan with parchment paper, allowing the paper to hang over the edges for easy removal later. The gentle heat will give the bars a light caramelization without drying them out. Feel the heat radiating from the oven – that’s the first sign you’re on the right track.
Kitchen Hack: Place the parchment paper under a rolling pin and lightly dust it with cocoa powder; this prevents the bars from sticking when you lift them out.In a large mixing bowl, combine 1 cup rolled oats, 1/2 cup chopped almonds, and 1/2 cup chopped cashews. Toast the mixture in the preheated oven for 8‑10 minutes, stirring halfway, until golden and fragrant. You’ll know it’s ready when you hear a faint, nutty crackle and smell a toasted aroma that makes your kitchen feel like a bakery.
While the oat‑nut blend is toasting, melt 1/4 cup coconut oil and 1/4 cup maple syrup together in a saucepan over low heat. Stir constantly until the mixture is smooth and glossy; this should take about 2‑3 minutes. Once melted, remove from heat and whisk in 1 tsp vanilla extract and 1 tsp sea salt (save the flaky salt for later). The mixture should smell like a tropical sunrise – sweet, buttery, with a whisper of salt.
In a separate bowl, sift 1/3 cup raw cacao powder and whisk in a pinch of salt. This step prevents clumps and ensures an even chocolate distribution. If you notice any lumps, gently warm the cacao in the microwave for 5 seconds and stir again. The cacao should have a deep, mahogany color and a faint, earthy scent.
Combine the toasted oat‑nut mixture with the melted coconut‑maple blend, stirring until everything is evenly coated. Then fold in the sifted cacao powder, making sure no dry spots remain. The batter should look thick, glossy, and slightly sticky – think of a rich brownie batter that’s ready to be spread.
Transfer the batter to the prepared pan, spreading it out with a spatula to an even 1/2‑inch thickness. Press down firmly to compact the mixture; this creates a uniform bar that won’t crumble later. The surface should be smooth, with a faint sheen from the coconut oil.
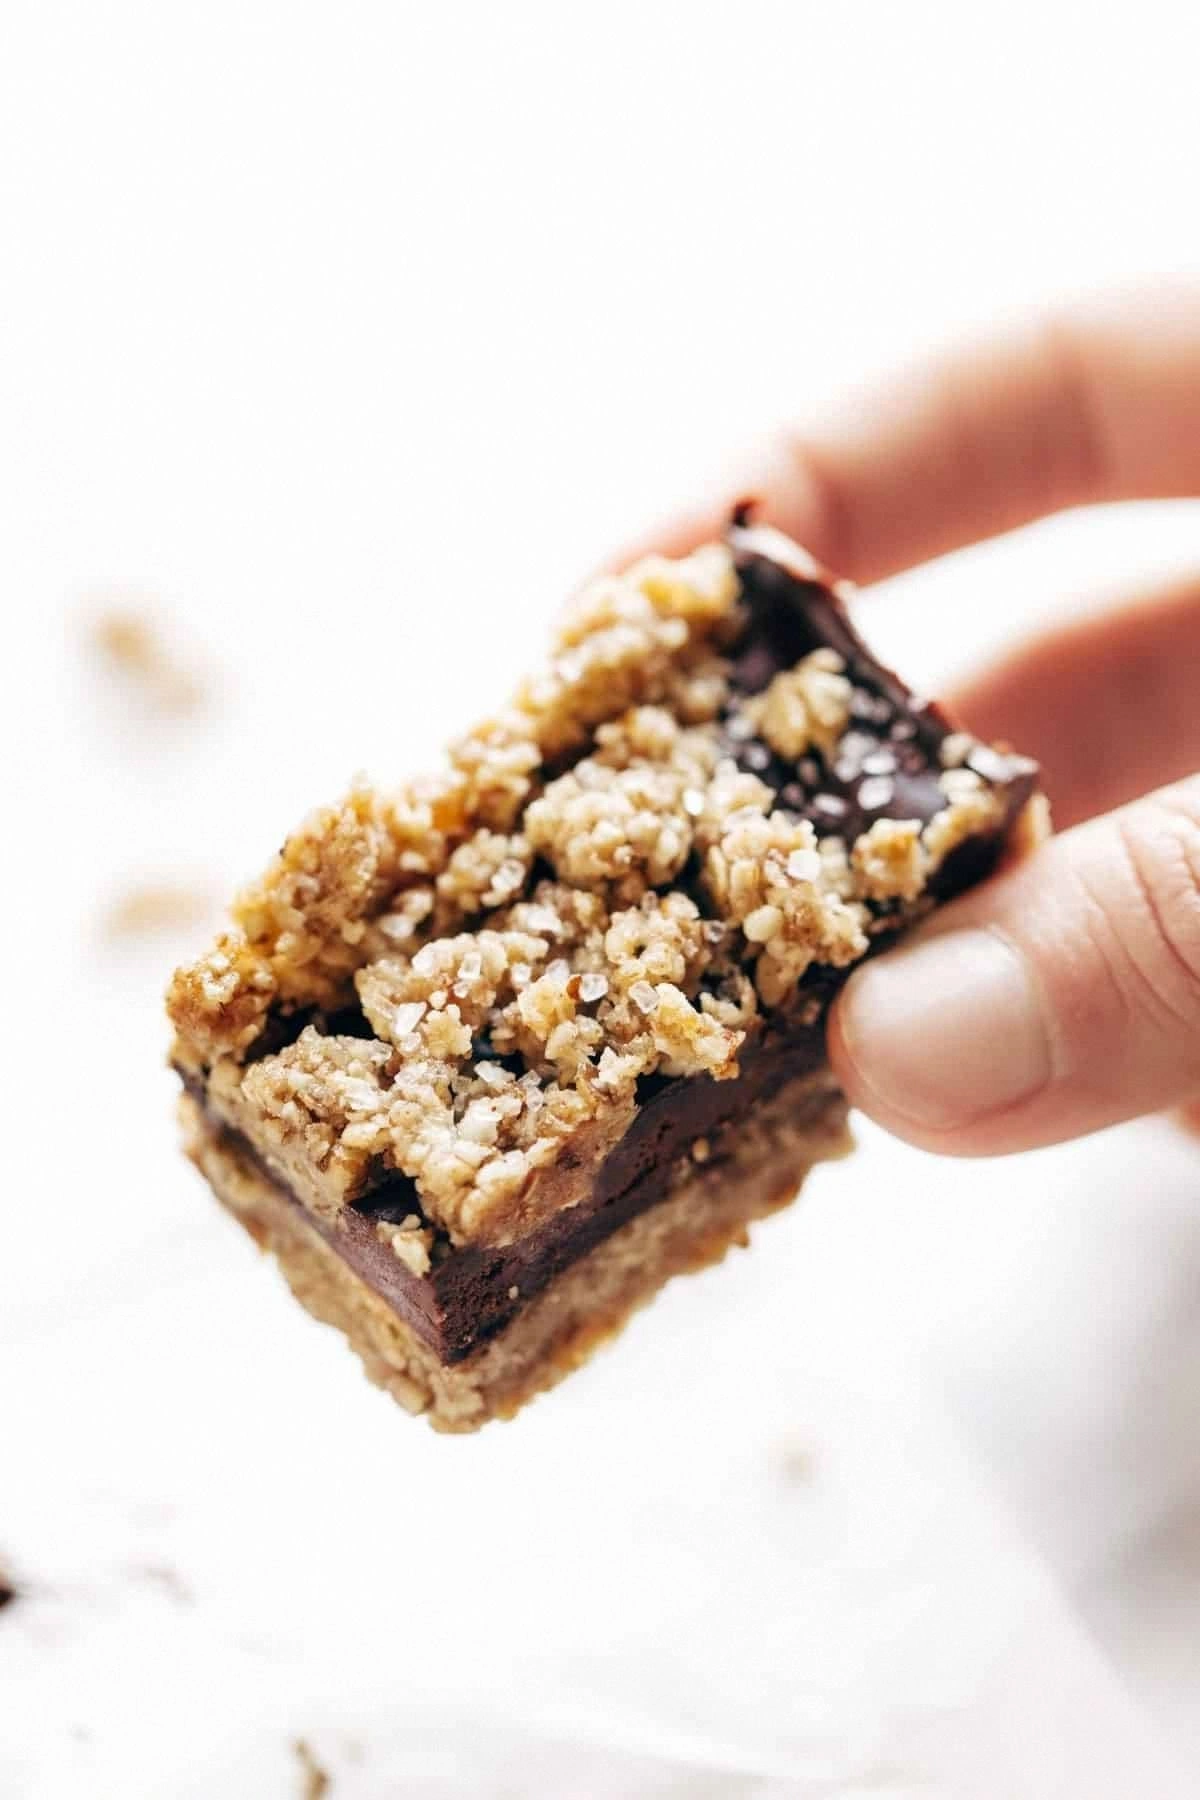
Scatter 1/2 cup dark chocolate chips over the top, pressing them lightly into the batter so they adhere. Then place the pan back in the oven for a quick 12‑15 minute bake. You’ll know it’s done when the edges start pulling away from the parchment and a thin crust forms on the surface.
Watch Out: Do not over‑bake; the bars will become too hard and lose that coveted chewiness.Remove the pan from the oven and immediately sprinkle a generous pinch of flaky sea salt over the warm surface. The residual heat will lightly melt the salt crystals, creating a subtle crust that crackles under your teeth. Let the bars cool in the pan for 10 minutes, then lift them out using the overhanging parchment and transfer to a wire rack.
Allow the bars to cool completely (about 30‑45 minutes). Once cooled, cut them into 12 even squares using a sharp knife that’s been warmed under hot water – this prevents the chocolate from cracking. The final product should have a glossy top, a crunchy edge, and a soft, fudgy center that melts on contact.
Kitchen Hack: Store the cut bars in an airtight container with a slice of bread; the bread will keep them moist without making them soggy.
That's it — you did it. But hold on, I've got a few more tricks that'll take this to another level...
Insider Tricks for Flawless Results
The Temperature Rule Nobody Follows
Never bake at a temperature higher than 350°F for this bar. Higher heat will evaporate the delicate maple syrup, leaving the bars dry and crumbly. Keep the oven at 325°F, and you’ll retain that luscious moisture. I once tried 375°F on a whim, and the bars turned into chocolate‑infused bricks – not exactly snack‑worthy.
Why Your Nose Knows Best
Your sense of smell is the ultimate doneness gauge. When the oat‑nut mixture turns golden and you catch a toasty, buttery scent, it’s ready for the next step. If you rely solely on a timer, you risk over‑toasting. Trust that nutty aroma; it’s the culinary equivalent of a green light.
The 5‑Minute Rest That Changes Everything
After the bake, let the bars rest for exactly five minutes before sprinkling the flaky salt. This short pause lets the interior settle, preventing the salt from sinking into the middle. Skipping this rest leads to uneven salt distribution, and you’ll miss that satisfying crunch on each bite.
The Chocolate Chip Timing Trick
Add the chocolate chips during the final bake, not before. If you fold them in earlier, they’ll melt completely and disappear, losing that delightful burst of molten chocolate. By adding them at the last minute, you preserve pockets of liquid gold that explode when you bite.
The Cool‑Down Flip
Once the bars have cooled on the rack, flip the entire pan upside down for a minute. This releases any trapped steam and prevents sogginess at the bottom. A friend once tried to skip this step and ended up with a soggy base – a lesson learned the hard way.
Creative Twists and Variations
This recipe is a playground. Here are some of my favorite ways to switch things up:
Spicy Chili‑Chocolate
Add 1/2 tsp cayenne pepper to the cacao powder for a subtle heat that pairs beautifully with the sweet maple. The heat awakens the palate, making each bite feel like a surprise party.
Coconut‑Lime Breeze
Replace half of the coconut oil with shredded coconut and add 1 tsp lime zest to the batter. The citrus lifts the chocolate, while the toasted coconut adds an extra layer of crunch.
Nut‑Free Sunrise
Swap the almonds and cashews for toasted pumpkin seeds and sunflower seeds. This keeps the texture intact while catering to nut‑allergy sufferers. The seeds bring a buttery, earthy flavor that’s surprisingly complementary.
Berry‑Infused Delight
Fold in 1/3 cup freeze‑dried raspberries after the batter is mixed. The berries rehydrate slightly during baking, offering a tart contrast that brightens the deep chocolate.
Coffee‑Kick
Stir in 1 tsp instant espresso powder with the cacao. The coffee notes deepen the chocolate flavor, turning the bar into a mocha‑like experience that’s perfect for an afternoon pick‑me‑up.
Storing and Bringing It Back to Life
Fridge Storage
Place the bars in an airtight container and store them in the refrigerator for up to 7 days. The cool environment preserves the chocolate’s glossy sheen and keeps the salt crystals crisp. For an extra moisture shield, add a small paper towel at the bottom of the container.
Freezer Friendly
Wrap each bar individually in parchment paper, then seal them in a zip‑top freezer bag. They’ll last up to 3 months. When you’re ready to enjoy, let them thaw at room temperature for 15 minutes – the texture will be as perfect as fresh‑baked.
Best Reheating Method
To revive that melt‑in‑your‑mouth softness, microwave a single bar for 10‑15 seconds, adding a tiny splash (about 1 tsp) of water to the plate. The steam generated brings the bar back to its original fudgy state without making it soggy.