Picture this: it’s 2 a.m., the house is silent, and you’re standing in front of an open fridge that looks like a desert of leftover veggies. You’ve been daring yourself all day to skip the midnight snack, but the thought of a warm, chocolatey bite is whispering louder than your conscience. I was in that exact spot last week, armed with nothing but a half‑crushed bag of cocoa and a stubborn craving that refused to be ignored. The result? A batch of cookies so good they made me question every other dessert I’ve ever made, and I swear the butter in the kitchen started humming a happy tune.
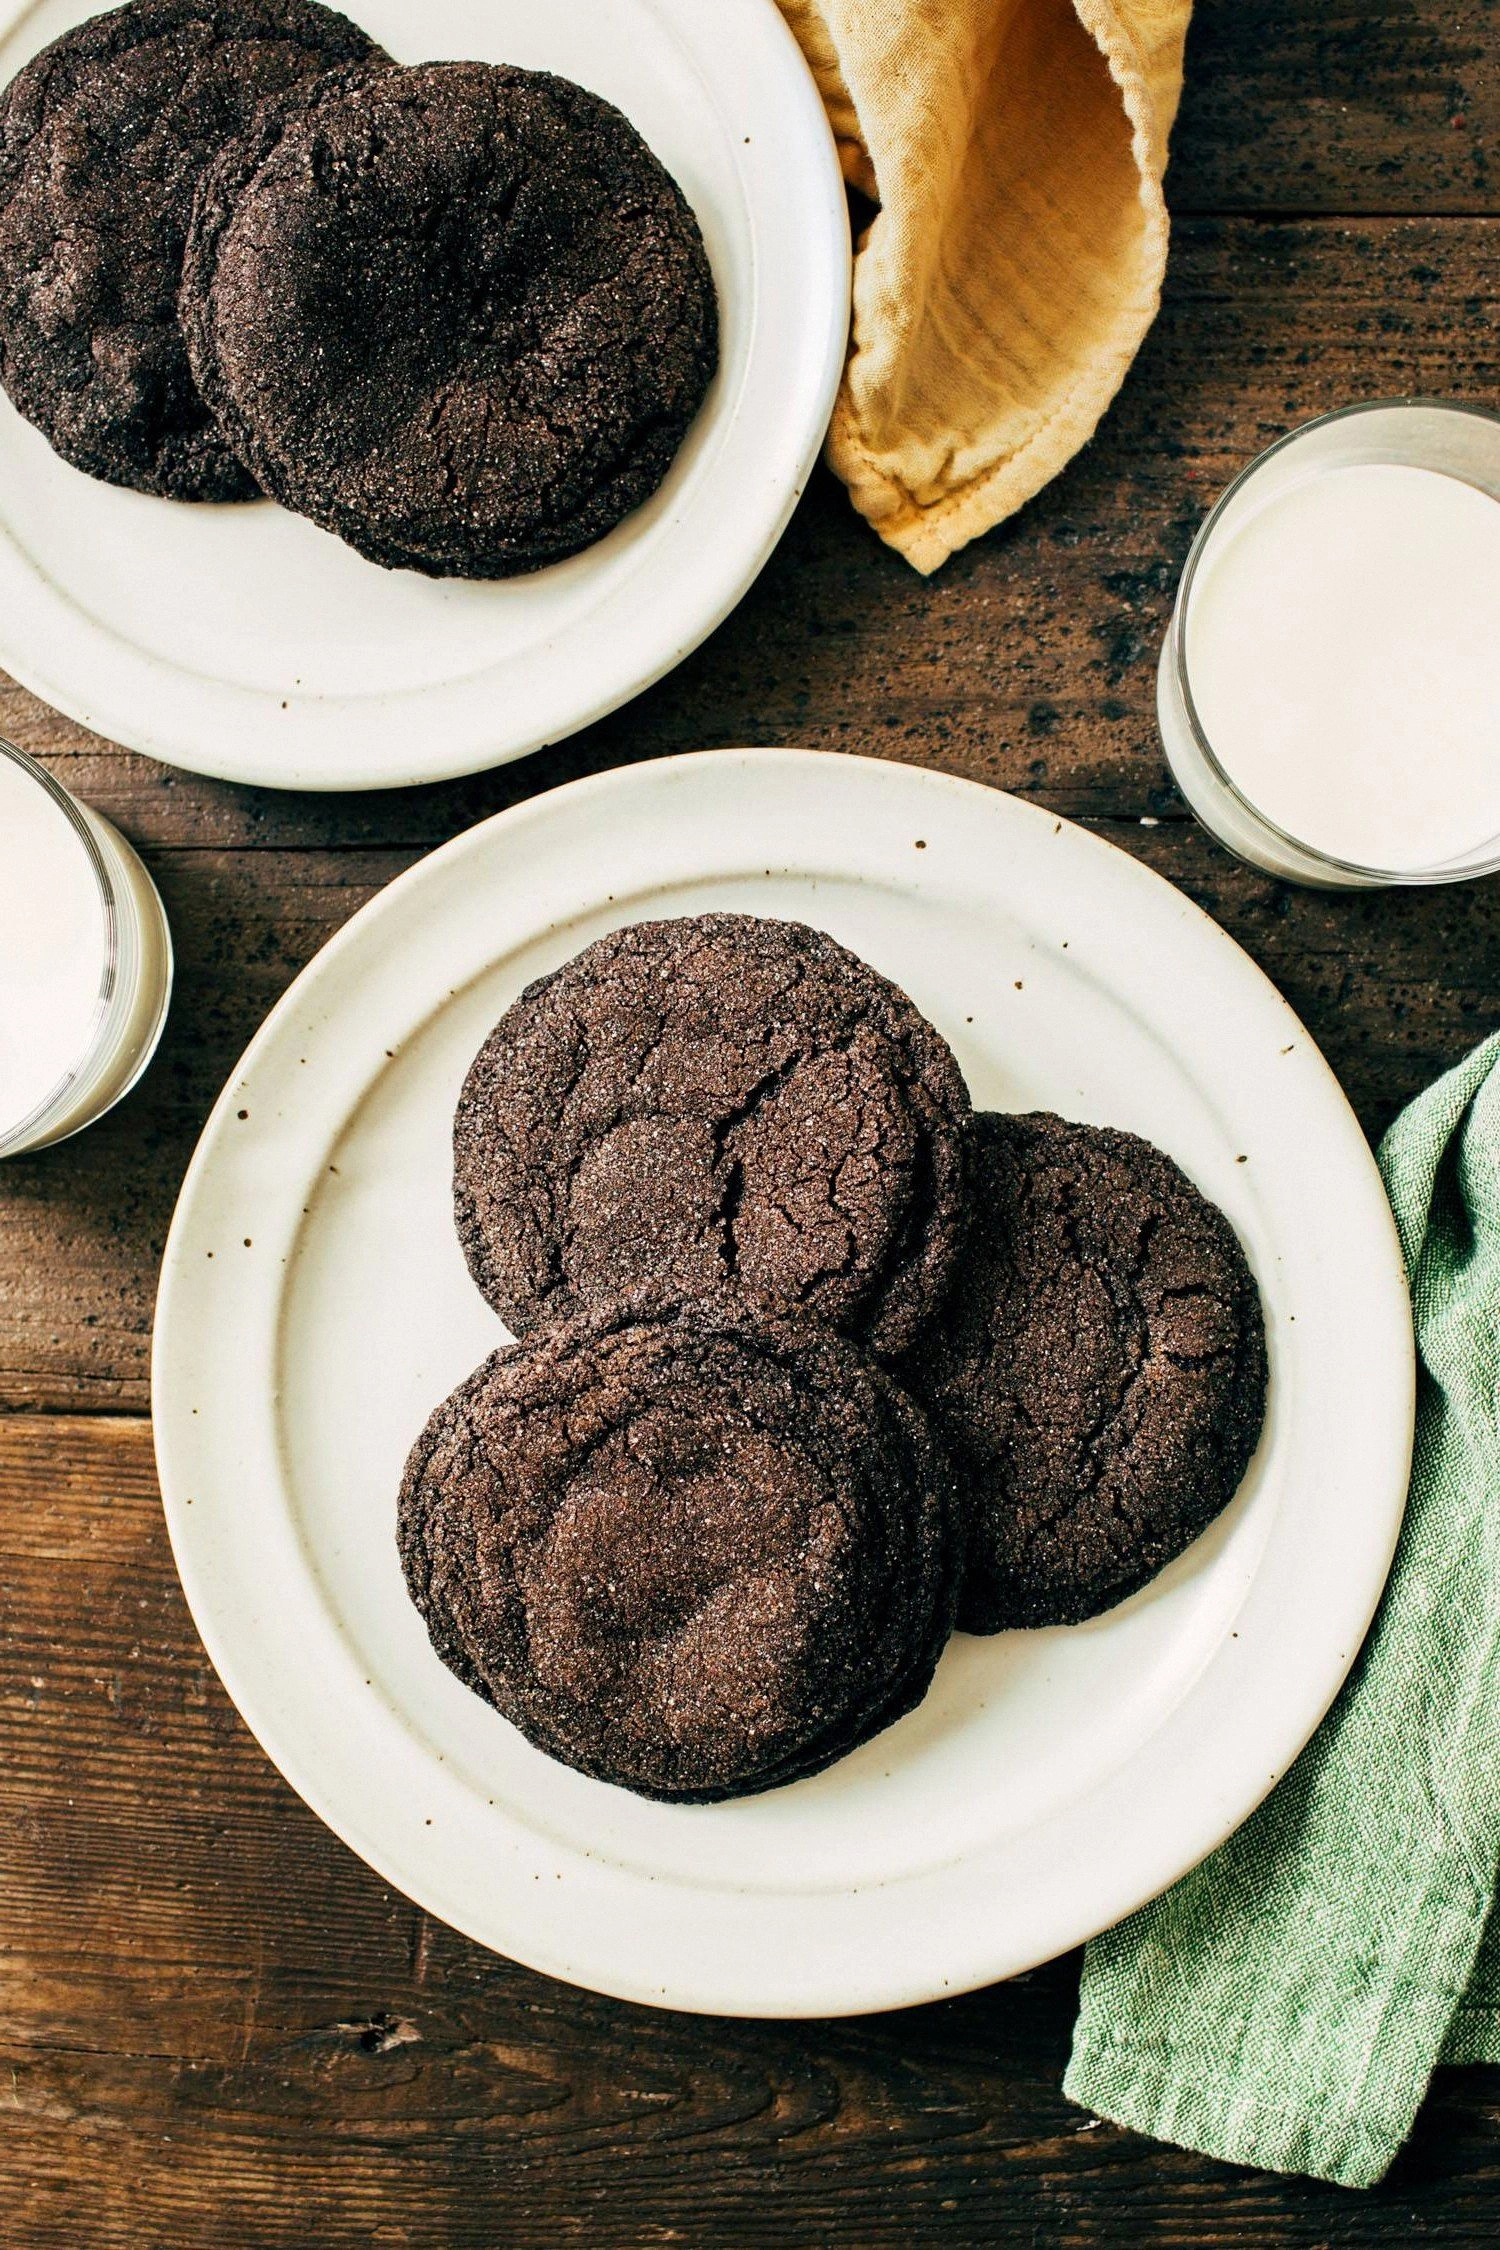
The moment the dough hits the counter, the scent of melted butter and brown sugar mingles with a faint espresso perfume, turning the whole kitchen into a cozy café on a rainy day. You can hear the soft thud of the spoon against the bowl, feel the buttery slickness under your fingertips, and see the glossy swirl of vanilla and cocoa as they fold together like a slow‑motion dance. When you roll each ball in that extra sugar, they glisten like tiny polished gems, promising a crunch that will shatter under your teeth with the same satisfying snap of fresh ice on a hot sidewalk. Trust me, that first bite is a revelation: crisp edges that melt into a fudgy center, a depth of flavor that feels like it was brewed in a secret chocolate laboratory.
Most chocolate‑cookie recipes get this completely wrong—either they’re dry and crumbly, or they’re greasy and flat, or they lack that subtle complexity that makes you want to savor every crumb. What sets this version apart is a daring combination of espresso powder and a pinch of cardamom that adds an unexpected lift, while the extra‑sugar coating creates a caramelized shell that’s nothing short of magical. I dare you to taste this and not go back for seconds; the balance of sweet, bitter, and aromatic spice is so spot‑on that you’ll wonder how you ever settled for bland store‑bought cookies.
Okay, ready for the game‑changer? I’m about to walk you through every single step—by the end, you’ll wonder how you ever made chocolate cookies any other way. From the precise temperature of the butter to the exact moment you know the cookies are ready, I’ve packed this guide with the kind of insider knowledge that turns a good bake into an unforgettable experience. Let’s dive in, because the only thing standing between you and cookie nirvana is a few minutes of your time and a sprinkle of daring.
What Makes This Version Stand Out
- Flavor Depth: A whisper of espresso and a dash of cardamom turn ordinary chocolate into a sophisticated, layered experience that lingers on the palate.
- Texture Contrast: The sugar coating creates a crisp, caramelized exterior while the interior stays soft, chewy, and melt‑in‑your‑mouth.
- Simplicity Meets Science: Only pantry staples are needed, yet each step is calibrated for perfect spread, rise, and crumb structure.
- Ingredient Quality: Using real butter and high‑cocoa‑content powder guarantees a rich, buttery mouthfeel without artificial aftertaste.
- Crowd Reaction: These cookies have a habit of disappearing in minutes, prompting the inevitable “What’s your secret?” from friends.
- Make‑Ahead Potential: The dough can be frozen, and the cookies reheat beautifully, making them ideal for last‑minute gatherings.
- Versatility: Optional espresso and cardamom let you customize the flavor profile without compromising the core chocolate goodness.
- Visual Appeal: The glossy sugar coating gives each cookie a bakery‑level sheen that looks as good as it tastes.
Inside the Ingredient List
The Flavor Base
Butter is the foundation of any great cookie, providing richness and a tender crumb. I use unsalted, room‑temperature butter because it emulsifies with the sugar, trapping tiny air pockets that expand during baking. If you substitute margarine, expect a waxy texture and a loss of that buttery aroma that makes these cookies unforgettable. For the best results, choose a butter with at least 80% fat content—European butter works wonders.
Brown sugar adds moisture and a subtle molasses note that deepens the chocolate flavor. Its fine crystals dissolve slowly, ensuring a moist interior while also contributing to the caramelized crust when rolled in extra sugar. If you only have white sugar, you’ll miss that earthy undertone; a 1‑to‑1 swap will still work but the flavor profile will be flatter.
The Texture Crew
All‑purpose flour provides the structure, but the key is to measure it by weight or spoon‑and‑level it to avoid a dense cookie. Too much flour leads to a cakey result, while too little makes the dough spread uncontrollably. I recommend sifting the flour with cocoa powder and baking soda to incorporate air and ensure an even distribution of leavening.
Baking soda is the silent hero that gives the cookies a gentle rise and a tender crumb. It reacts with the acidity of the brown sugar and espresso powder, creating tiny bubbles that lift the dough without making it puffy. Over‑baking soda can cause a metallic taste, so stick to the exact amount.
The Unexpected Star
Espresso powder is optional but highly recommended; just a teaspoon intensifies the chocolate without adding a coffee flavor. It works by enhancing the bitterness of cocoa, creating a deeper, more balanced taste. If you’re not a fan of coffee, you can replace it with an equal amount of extra cocoa powder, though you’ll lose that subtle depth.
Cardamom, a fragrant spice with citrusy notes, adds an exotic twist that elevates the cookie from ordinary to extraordinary. A pinch (about ¼ teaspoon) is enough to perfume the dough without overwhelming the chocolate. If you’re allergic or prefer a simpler profile, you can omit it entirely.
The Final Flourish
Vanilla extract ties everything together, providing a sweet, aromatic backbone that rounds out the bitterness of cocoa and espresso. I use pure vanilla, not imitation, because the difference in flavor is night and day. For a twist, try a splash of almond extract for a nutty nuance.
Extra sugar for rolling creates that signature crunchy shell. Toss each dough ball in a shallow dish of granulated sugar before baking; the sugar caramelizes, forming a glossy, crackling exterior. If you prefer a softer edge, reduce the coating to half the amount.
Everything's prepped? Good. Let’s get into the real action—mixing, shaping, and baking these beauties to perfection.
The Method — Step by Step
Start by preheating your oven to 350°F (175°C) and lining two baking sheets with parchment paper. While the oven warms, cut the butter into small cubes and let it soften for about 10 minutes; this ensures it blends smoothly with the sugars. The kitchen should start smelling faintly buttery, a promise of what’s to come. Power transition: Okay, ready for the game‑changer? The butter’s temperature is crucial—too cold, and your dough will be lumpy; too warm, and the cookies will spread.
Kitchen Hack: Use a microwave for 5‑10 seconds to soften butter quickly if you’re in a hurry; just don’t melt it.In a large mixing bowl, combine the softened butter with 1 cup of brown sugar. Beat with a handheld mixer on medium speed until the mixture is light, fluffy, and pale—about 2‑3 minutes. You’ll notice the color lightening, a visual cue that the sugar is well‑incorporated and air is trapped. This step is where the cookie gets its tender crumb; skip it, and you’ll end up with a dense, heavy bite.
Add 2 large eggs, one at a time, beating well after each addition. Then stir in 2 teaspoons of vanilla extract, 1 teaspoon of espresso powder, and ¼ teaspoon of cardamom (if using). The batter should become glossy and slightly thick, with a fragrant aroma that hints at the final flavor. Watch Out: Over‑mixing at this stage can develop gluten, leading to tougher cookies.
Watch Out: Adding the eggs too quickly can cause the mixture to curdle; add them slowly and scrape the sides often.Sift together 2 cups of all‑purpose flour, ½ cup unsweetened cocoa powder, 1 teaspoon baking soda, and 1 teaspoon salt into a separate bowl. The sifting aerates the dry ingredients and prevents lumps, ensuring a uniform dough. Gently fold the dry mixture into the wet ingredients using a spatula, stirring just until no flour streaks remain. The dough will look thick and slightly sticky—don’t over‑mix, or you’ll lose that coveted chew.
Cover the bowl with plastic wrap and chill the dough in the refrigerator for at least 30 minutes, preferably an hour. This rest period allows the flour to hydrate fully and the butter to firm up, which controls spread during baking. While you wait, you can pre‑measure the extra sugar for rolling and set out two shallow dishes—one with sugar, the other empty for the shaped balls.
Once chilled, scoop out tablespoon‑sized portions of dough and roll them into smooth balls. Then roll each ball in the extra granulated sugar until fully coated; the sugar should cling like a light dusting of snow. Place the coated balls on the prepared baking sheets, spacing them about 2 inches apart to allow room for expansion.
Kitchen Hack: Lightly spray the sugar‑coated balls with a mist of water before baking; this helps the sugar melt into a thin, glossy crust.Slide the baking sheets into the preheated oven and bake for 12‑14 minutes, or until the edges are set and the tops have a slight crackle. The centers should still look soft; they’ll continue to firm up as they cool. You’ll know they’re done when the sugar coating has caramelized to a light amber and the aroma fills the kitchen like a chocolate‑cinnamon hug.
Remove the cookies from the oven and let them rest on the sheet for 3‑4 minutes before transferring to a wire rack. This short cooling period lets the cookies set without breaking, preserving that delicate crust. As they cool, you’ll hear a faint snap as the sugar coating contracts—a sound that promises a perfect crunch.
Finally, allow the cookies to cool completely on the rack. This is the moment of truth: the exterior should be crisp, the interior chewy, and the flavor complex enough to make you close your eyes and sigh. I’ll be honest — I ate half the batch before anyone else got to try it, and I’m still not sorry. Micro‑challenge: I dare you to taste this and not go back for seconds.
That's it — you did it. But hold on, I've got a few more tricks that'll take this to another level, ensuring every batch is as unforgettable as the first.
Insider Tricks for Flawless Results
The Temperature Rule Nobody Follows
Never bake cookies straight from the fridge at a lower temperature; the sudden temperature change can cause uneven spreading. Instead, let the dough sit at room temperature for 5 minutes after chilling, then bake at a steady 350°F. This tiny adjustment yields a more uniform rise and a consistent texture from edge to center. A friend once tried skipping the room‑temp step and ended up with flat, greasy cookies—a lesson learned the hard way.
Why Your Nose Knows Best
Rely on scent, not just the timer. When the sugar coating begins to caramelize, you'll notice a sweet, nutty aroma that signals the cookies are near perfection. If you smell a faint burnt note, pull them out immediately; the edges will over‑crisp and the interior will stay undercooked. Trusting your nose reduces the risk of overbaking and gives you that perfect golden‑brown finish.
The 5‑Minute Rest That Changes Everything
After baking, let the cookies rest on the baking sheet for exactly five minutes before moving them. This pause allows the steam trapped inside to redistribute, preventing the cookies from cracking or breaking apart. It also gives the sugar coating time to set, resulting in a glossy, crackling surface that shatters delightfully when bitten.
Chill Before You Roll
Chilling the dough not only controls spread but also intensifies the flavor as the butter solidifies and the sugars meld. For an extra flavor boost, wrap the dough tightly and refrigerate it overnight; the overnight rest deepens the espresso and cardamom notes, making each bite more complex.
Double‑Coat for Extra Crunch
If you love an extra‑crunchy exterior, give the dough balls a second light roll in sugar after the first coat, then bake as usual. The additional sugar caramelizes into a thin, crisp shell that adds a satisfying crunch without making the cookie too sweet.
Creative Twists and Variations
This recipe is a playground. Here are some of my favorite ways to switch things up:
Sea Salt Caramel Swirl
After baking, drizzle a thin line of homemade caramel and sprinkle flaky sea salt on top. The salty‑sweet contrast elevates the chocolate, making each bite feel like a gourmet treat.
Nutty Crunch
Fold in ½ cup of toasted chopped hazelnuts or almonds into the dough before chilling. The nuts add texture and a buttery flavor that pairs beautifully with the espresso notes.
Spicy Chili
Incorporate a pinch of cayenne pepper or a dash of chili powder for a subtle heat that awakens the palate. The heat complements the chocolate’s richness without overwhelming it.
White Chocolate & Raspberry
Replace half of the cocoa powder with white chocolate chips and fold in dried raspberry pieces. The tartness of the berries balances the sweetness, while the white chocolate adds a creamy melt.
Holiday Spice
Swap the cardamom for a blend of cinnamon, nutmeg, and cloves for a festive twist that’s perfect for winter gatherings.
Vegan Adaptation
Use coconut oil in place of butter, maple syrup instead of brown sugar, and a flax‑egg mixture (1 tbsp ground flax + 3 tbsp water) for each egg. The texture will be slightly different, but the flavor remains decadent.
Storing and Bringing It Back to Life
Fridge Storage
Place cooled cookies in an airtight container with a slice of bread; the bread releases moisture that keeps the cookies soft for up to a week. If you prefer a crisp edge, store them in a paper bag inside the container.
Freezer Friendly
Layer cookies between parchment sheets and seal them in a zip‑top bag; they freeze beautifully for up to three months. When ready to enjoy, let them thaw at room temperature for 15 minutes, then pop them in a 300°F oven for 5 minutes to refresh the crust.
Best Reheating Method
Preheat a skillet over low heat, add a tiny splash of water (about a teaspoon), and place a cookie in the pan, covering with a lid for 30 seconds. The steam revives the interior while the pan re‑crispes the sugar coating, delivering a just‑baked experience.