Picture yourself in the middle of a bustling kitchen, the scent of butter melting and sugar caramelizing filling the air, and suddenly realizing your chocolate cake batter has turned into a sticky mess that refuses to bake. I was in that exact situation last week, trying to salvage a batch of chocolate cupcakes that had become a gooey disaster. That moment, a frantic scramble and a laugh at the absurdity, sparked the idea for a dessert that would win over even the most skeptical palate—Caramel Pecan Pie Bars. I was determined to create something that balances the buttery, crumbly texture of a pie crust with the silky sweetness of caramel and the satisfying crunch of pecans, all in one bite‑sized bar.
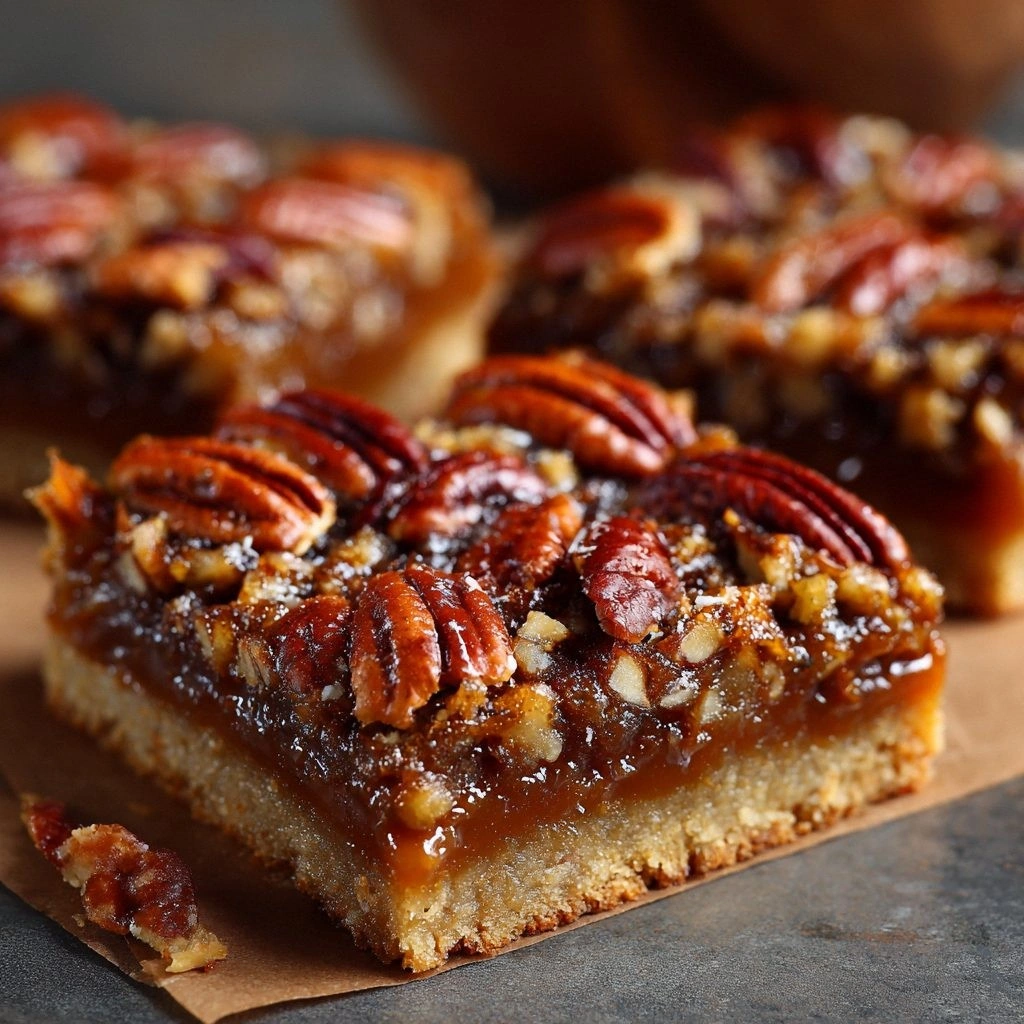
From the first glance at the dough, you can hear the subtle crackle of butter as it starts to blend with the flour. The aroma of toasted pecans rises, mingling with the caramel’s rich, amber scent, creating a heady perfume that makes your mouth water before you even taste a single bite. When you break the first bar, the caramel glistens like liquid gold, and the pecans pop with a satisfying crunch that echoes across the plate. The texture is a harmonious blend: the crust is crisp at the edges and tender in the center, the caramel is silky yet thick enough to coat, and the pecans provide a nutty bite that lingers.
What sets this version apart from the countless variations you’ll find online is the deliberate layering of flavor and texture, the use of a caramel glaze that’s both sweet and slightly salty, and the strategic timing of each step to lock in moisture and flavor. I dare you to taste this and not go back for seconds; the moment the caramel coats your palate, the pecans crunch, and the buttery crust melts, you’ll be hooked. This recipe is hands down the best version you'll ever make at home because it transforms a simple pie into bars that are easy to slice, share, and store.
Most recipes get this completely wrong by either overbaking the crust or undercooking the caramel, resulting in a dry, flat bar that looks like a sad piece of toast. I’ve spent months tweaking the ratios, adjusting the butter, and testing different types of sugar until the result was a glossy, golden crust that crumbles just enough to give way to the luscious caramel center. The secret? A small but crucial tweak: adding a splash of cold water to the crust dough before baking to create steam pockets that keep the base moist. Picture yourself pulling these bars out of the oven, the whole kitchen smelling incredible, the timer dinging like a trumpet announcing a triumph.
What Makes This Version Stand Out
- Taste: The caramel glaze delivers a deep, buttery sweetness that is balanced by a hint of sea salt, creating a flavor profile that is both indulgent and sophisticated.
- Texture: The crust is crisp on the outside and tender on the inside, while the pecans provide a satisfying crunch that contrasts with the silky caramel.
- Simplicity: With fewer than a dozen ingredients, this recipe is straightforward, yet the technique elevates it from ordinary to extraordinary.
- Uniqueness: The addition of a caramel glaze that coats the bars like velvet is a twist that most pie‑bar recipes omit.
- Crowd Reaction: Guests rave about the glossy finish and the perfect balance of sweet and salty, making it a hit at parties.
- Ingredient Quality: Using high‑quality butter and fresh pecans ensures a richer flavor and a more refined texture.
- Cooking Method: Baking the crust first, then adding a caramel drizzle, guarantees a firm base and a luscious top.
- Make‑Ahead Potential: These bars keep well in the fridge and even freeze without losing flavor or texture.
Alright, let's break down exactly what goes into this masterpiece…
Inside the Ingredient List
The Flavor Base
All-purpose flour is the backbone of the crust, providing structure while keeping the bars tender. It’s essential to use a fine‑grade flour for a smoother crumb; a coarser flour can make the bars feel heavy. If you’re looking for a gluten‑free version, you can swap in a 1:1 blend of rice flour and potato starch, though the texture will be slightly different.
The Sweet Core
Granulated sugar and packed light brown sugar form the sweet foundation of the crust, giving it a subtle caramelized flavor when baked. The dark brown sugar in the filling adds depth and a slight molasses undertone that pairs beautifully with the pecans. Skipping any of these sugars will diminish the overall richness and alter the color of the final product.
The Nutty Highlight
Pecans are the star of the show, their toasted flavor enhancing the caramel’s sweetness. Toasting pecans before adding them to the crust not only deepens their flavor but also prevents them from releasing too much oil during baking. If pecans are out of season, walnuts or almonds can serve as a suitable substitute, though the flavor profile will shift slightly.
The Caramel Glow
Caramel sauce is the finishing touch that gives the bars their glossy appearance and luscious texture. A thick, homemade caramel made from brown sugar, butter, and a splash of cream works best, but a store‑bought glaze is a convenient alternative. The glaze must be cooled slightly before drizzling, or it will melt the crust and create a mess.
Everything's prepped? Good. Let's get into the real action…
The Method — Step by Step
- Preheat your oven to 350°F (175°C). Line a 9×9 inch baking pan with parchment paper, leaving a 1-inch overhang on all sides. This makes for easy removal and ensures even baking. As the oven warms, the butter in the dough will start to soften, making it easier to handle.
- Make the crust by combining flour, granulated sugar, light brown sugar, and salt in a large bowl. Use a pastry cutter or your fingers to cut in the cold butter until the mixture resembles coarse crumbs. The cold butter creates steam pockets that keep the crust flaky.
- Press the dough into the prepared pan, creating an even layer. Press firmly with the back of a spoon to eliminate air pockets. The dough should be about 1/2 inch thick; if it’s too thick, it won’t bake evenly.
- Bake the crust for 18–20 minutes or until lightly golden. The edges will start pulling away from the pan, indicating readiness. Let it cool completely in the pan; this prevents the bars from breaking when you cut them.
- Prepare the caramel glaze by melting butter in a saucepan over medium heat. Add brown sugar and corn syrup, stirring until smooth. Bring to a gentle boil, then reduce heat and simmer for 3–4 minutes. Remove from heat and stir in vanilla extract and a pinch of sea salt.
- Layer the pecans over the cooled crust, pressing them lightly into the dough. The pecans should be evenly distributed for a uniform bite. If you prefer a more pronounced nutty flavor, double the amount or add a drizzle of honey over the nuts before baking.
- Drizzle the caramel over the pecan layer, using a spoon or a piping bag for an even coat. The glaze should be thick enough to cling to the nuts but thin enough to spread across the surface. Let it set for a few minutes so it hardens slightly before baking.
- Return to the oven for an additional 10–12 minutes, just until the glaze is set and the edges of the crust are golden brown. Watch closely—overbaking will dry out the bars, while underbaking will leave a sticky mess.
- Cool and cut the bars in the pan using the parchment overhang as a handle. Slice into squares or bars with a sharp knife, wiping the blade between cuts for clean edges. Let the bars cool completely before serving.
That's it — you did it. But hold on, I've got a few more tricks that'll take this to another level…
Insider Tricks for Flawless Results
The Temperature Rule Nobody Follows
Many bakers bake at 375°F, assuming it’s always the sweet spot. However, this recipe thrives at a lower 350°F, allowing the crust to set without over‑browning. The lower heat also ensures the caramel glaze sets properly, preventing a runny bottom. If you’re using a convection oven, reduce the temperature by 25°F for optimal results.
Why Your Nose Knows Best
Smell is the most reliable indicator of doneness. When the crust is golden and the caramel has a faint, nutty aroma, it’s ready. A sweet, buttery scent signals that the sugars have caramelized. Trust your nose—if it smells like a caramelized sugar explosion, you’re good to go.
The 5‑Minute Rest That Changes Everything
After baking, let the bars rest in the pan for exactly five minutes. This brief pause allows the caramel to set just enough to hold the bars together when cut, yet remain tender. Skipping this step often results in bars that crumble or stick to the pan.
The Perfect Parchment Trick
Cutting the bars is a breeze when you use parchment with a 1‑inch overhang. The paper lifts the bars out of the pan cleanly, preventing them from breaking. If you’re missing parchment, a sheet of wax paper works, but it may not hold as well.
The Final Glaze Finish
After the bars have cooled, drizzle a thin layer of melted butter over the top. This gives them a glossy shine and locks in moisture. The buttery finish also adds a subtle richness that pairs beautifully with the caramel.
The Secret Salt Tweak
A pinch of sea salt on top of the caramel before the final bake adds a surprising depth of flavor. The salt balances the sweetness and enhances the nutty undertones. If you’re watching sodium, you can omit it, but the bars will feel slightly flat.
Creative Twists and Variations
This recipe is a playground. Here are some of my favorite ways to switch things up:
Maple Pecan Bliss
Swap the caramel glaze for a maple syrup reduction. The earthy maple flavor pairs beautifully with the pecans and adds a subtle sweetness. This version is perfect for fall gatherings.
Chocolate‑Covered Crunch
After the bars have cooled, dip half of each bar in melted dark chocolate. The chocolate adds a rich, bittersweet contrast to the caramel. Let the chocolate set before serving.
Almond Joy Bars
Replace pecans with toasted almonds and add shredded coconut to the crust. The coconut adds a tropical twist, while the almonds keep the crunch. This is a great variation for those who prefer a lighter nut.
Sea‑Salted Caramel Explosion
Increase the amount of sea salt in the glaze and sprinkle a generous pinch on top before the final bake. The salt caramel flavor is intense and unforgettable. This version is ideal for holiday parties.
Citrus Zest Surprise
Add a tablespoon of orange zest to the caramel glaze. The citrus brightens the flavor profile and adds a fresh aroma. This twist works well for spring or summer dessert menus.
Nutless Delight
Omit the pecans entirely and replace them with finely chopped dried cherries. The cherries add a burst of tartness that balances the caramel sweetness. This version is great for those with nut allergies.
Storing and Bringing It Back to Life
Fridge Storage
Store the bars in an airtight container at room temperature for up to 3 days. If you want to keep them fresher, place them in the fridge; they’ll stay crisp for up to a week. Cover them with parchment paper to prevent sticking.
Freezer Friendly
Wrap each bar individually in plastic wrap and place them in a freezer bag. They can be stored for up to 3 months. Thaw at room temperature for 30 minutes before serving to maintain texture.
Best Reheating Method
Reheat the bars in a 300°F oven for 5–7 minutes, or microwave on low for 15–20 seconds. Add a tiny splash of water before reheating to create steam, which helps the bars regain their moisture and prevents them from becoming dry.