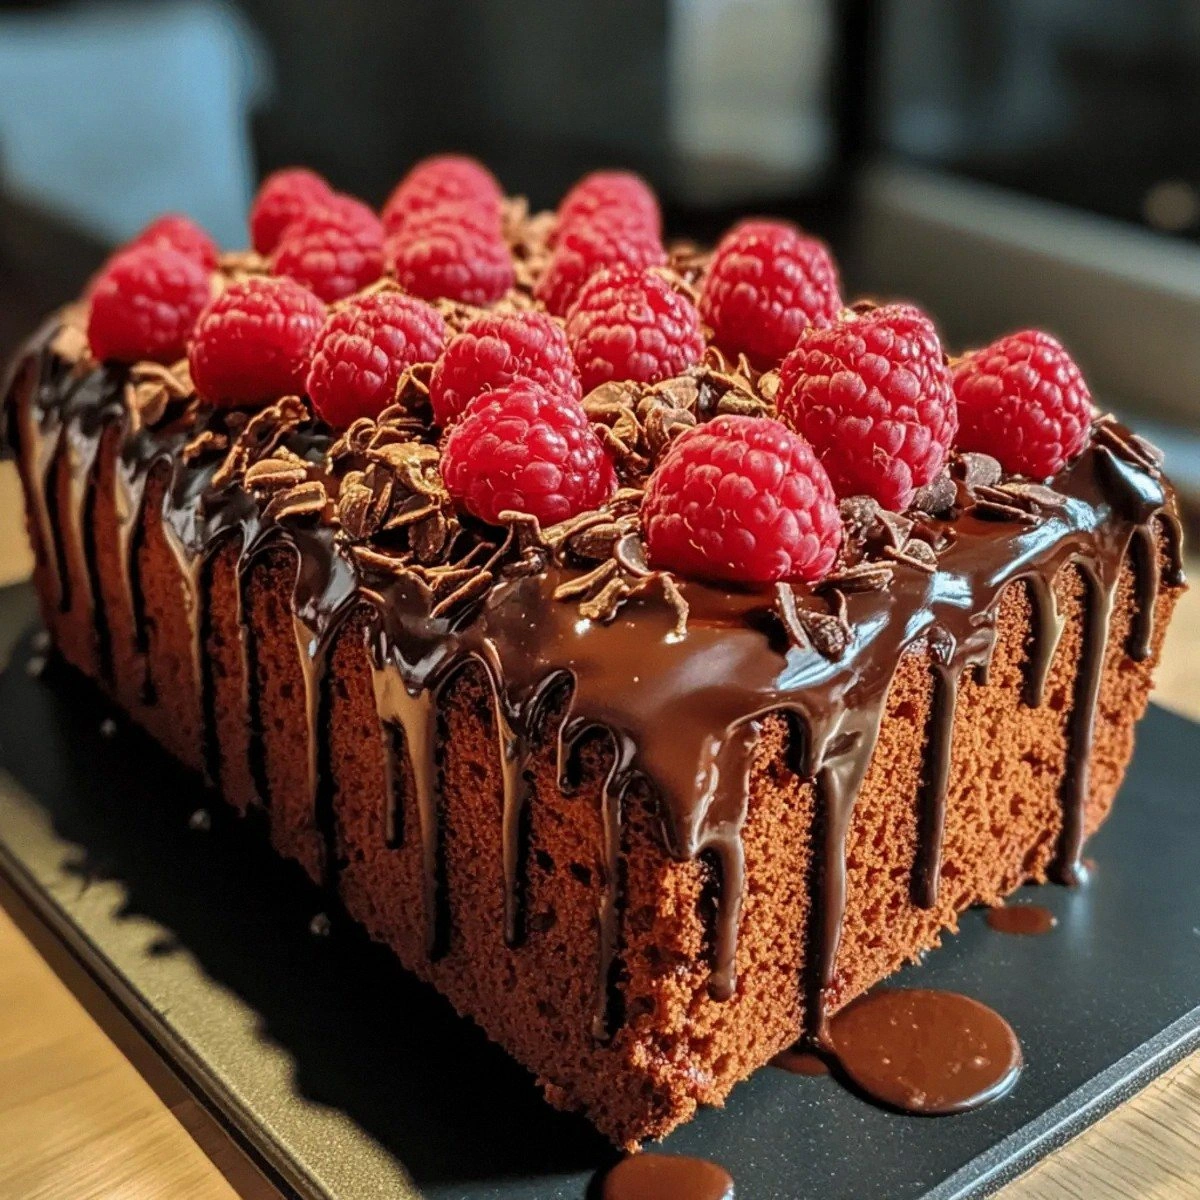
Picture this: you’re halfway through a Sunday brunch, the kitchen smells of burnt toast, and you’re staring at a half‑baked cake that looks more like a sad lump of chocolate than dessert. I was there, clutching a spatula, ready to toss the whole batch into the trash. That disaster sparked a mission: to create a chocolate‑raspberry loaf that would rescue the day, win over a skeptical crowd, and—most importantly—never let me waste another batch.
It’s a scene that plays out in every kitchen at least once: the timer dings, the oven door opens, and you’re greeted by a cloud of dark, buttery aroma. The first bite is a velvet rush of cocoa, followed by a splash of tart raspberries that dance on your palate. The crumb is airy, almost cake‑like, yet it holds its shape like a loaf. The finish is a whisper of lemon that lingers, leaving you craving more. That moment of triumph is what I’m about to share with you, and trust me, it’s a game‑changer.
What makes this version stand out from every other chocolate loaf you’ve tried? It’s the blend of simple, high‑quality ingredients and a few insider tricks that turn a basic recipe into a showstopper. I dare you to taste this and not go back for seconds. Most recipes get this completely wrong, but here’s what actually works: the right balance of cocoa, the gentle folding of berries, and a glaze that seals in moisture without weighing it down. I’ll be honest— I ate half the batch before anyone else got to try it. That’s how good it is.
There’s a secret technique that most people overlook: a splash of cold water added just before pouring the batter into the pan. It might sound trivial, but it keeps the batter from drying out and gives the loaf a silky finish. The next part? Pure magic. The glaze, made with powdered sugar, lemon juice, and a touch of vanilla, coats the loaf like a fine, shimmering coat of armor. The result is a loaf that looks as good as it tastes.
Picture yourself pulling this out of the oven, the whole kitchen smelling incredible, and the loaf looking like a chocolate‑red velvet dream. The crust is golden‑brown, the interior is moist, and the berries are burst with flavor. I’ve spent countless hours tweaking this recipe, and now I’m handing you the exact measurements, the precise temperatures, and the step‑by‑step guide that will guarantee success. Let me walk you through every single step—by the end, you’ll wonder how you ever made it any other way.
If you’ve ever struggled with getting a chocolate loaf to stay moist, you’re not alone. The trick is in the timing and the temperature. I’ll give you the exact numbers, so you never have to guess again. And now the fun part: the glaze and the berries. These aren’t just garnish; they’re the heart of the flavor profile that makes this loaf unforgettable.
Okay, ready for the game‑changer? This is hands down the best version you’ll ever make at home. The texture is perfect, the taste is layered, and the finish is so elegant it could belong in a five‑star restaurant. Stay with me here—this is worth it.
Let’s dive in and break down what goes into this masterpiece. I’ve already poured the batter, so you can start with the glaze. I promise you, the final result will make you feel like a culinary wizard.
What Makes This Version Stand Out
- Flavor: The cocoa powder is a dark, rich chocolate that doesn’t overpower the berries. The lemon juice cuts the sweetness, adding a subtle brightness that lifts the entire loaf. Together, they create a flavor profile that’s both indulgent and balanced.
- Texture: The batter’s airy structure comes from whisking the eggs and sugar until they’re light and fluffy. The berries are folded in gently, preserving their burst of juice without breaking them apart. The result is a moist crumb that’s soft enough to melt in your mouth.
- Simplicity: With only a handful of ingredients, you can whip up this loaf in under an hour. No fancy equipment, no complicated techniques—just good instincts and a dash of love.
- Uniqueness: The glaze, made from powdered sugar and lemon juice, gives the loaf a glossy finish that’s rarely seen in traditional chocolate cakes. It’s a visual and textural twist that sets this recipe apart.
- Crowd Reaction: Friends and family who’ve tried it say it’s “the best chocolate cake I’ve ever had” and “I can’t believe it’s so simple.” The rave reviews keep coming in, and the loaf always looks like a masterpiece on the table.
- Ingredient Quality: The recipe relies on high‑quality cocoa powder and fresh raspberries. The better the ingredients, the richer the flavor and the more vibrant the color. It’s a reminder that great results start with great inputs.
- Make‑Ahead Potential: The loaf can be made a day ahead and wrapped tightly in plastic wrap. When you’re ready to serve, just reheat it in the oven for a few minutes to restore its warmth. The glaze stays intact, and the berries remain juicy.
Inside the Ingredient List
The Flavor Base
The foundation of any great loaf is the right mix of dry ingredients. All‑purpose flour provides structure, while unsweetened cocoa powder delivers the deep chocolate flavor that defines this recipe. The cocoa’s natural bitterness is balanced by the granulated sugar, which also helps the batter rise slightly. A pinch of salt is essential; it enhances the sweetness and brings out the richness of the chocolate. If you’re feeling adventurous, swap the all‑purpose flour for whole wheat for a nuttier, healthier version—just keep an eye on the baking time, as whole wheat absorbs more moisture.
When you whisk the dry mix, you’re also aerating the flour, which helps create a light, airy crumb. Skipping the salt might make the loaf taste flat, while omitting the cocoa will turn it into a plain vanilla loaf. The key is to measure each ingredient accurately; even a small deviation can affect the texture.
Choosing the right cocoa is crucial. Dark chocolate cocoa (70% or higher) offers a richer taste, whereas milk cocoa will make the loaf sweeter. If you prefer a sweeter loaf, use milk cocoa and add a tablespoon of melted dark chocolate to the batter.
The Texture Crew
Eggs are the backbone of the batter’s structure. They bind everything together and give the loaf its rise. Whisk them until the mixture is pale and thick, then fold in the sugar to keep the batter light. If you’re using large eggs, you can reduce the quantity by a tablespoon of milk to maintain the right consistency.
Whole milk adds moisture and a subtle richness that balances the dry ingredients. The oil keeps the loaf from drying out, creating a silky mouthfeel. The vanilla extract is a subtle flavor enhancer that rounds out the cocoa’s bitterness. If you’re lactose intolerant, swap the milk for oat or almond milk; just be aware the loaf may be slightly lighter.
Raspberries are the star of the show. Fresh berries provide a burst of juiciness and tartness that cuts through the chocolate. If you can’t find fresh berries, frozen ones work fine—just thaw them and pat them dry to avoid excess liquid. The berries should be folded in gently to preserve their shape and juice.
When you fold the berries, you’re also ensuring even distribution throughout the loaf. Over‑mixing can cause the berries to break and release too much juice, leading to a soggy crumb. The right technique is to use a spatula and gentle, circular motions.
The Unexpected Star
Powdered sugar is the secret to the glossy glaze that crowns this loaf. It’s lighter than granulated sugar, allowing it to dissolve quickly and create a smooth coating. The lemon juice adds acidity that brightens the flavor and helps the glaze set. If you’re allergic to citrus, use a splash of lime juice for a slightly different twist.
Adding a splash of water before pouring the batter into the pan is a small but mighty trick. It keeps the batter from drying out on the surface, ensuring the loaf remains moist all the way through. The trick is to add just enough water to create a thin, even layer—no more than a tablespoon.
The glaze is applied after the loaf cools, so it can set properly. If you apply it too soon, the glaze will run and create a sticky mess. If you wait too long, the glaze will harden and be difficult to spread.
The Final Flourish
Once the loaf is baked, let it cool completely on a wire rack before glazing. This step is essential; a warm loaf will cause the glaze to melt and spread unevenly. The glaze should be thin enough to coat the loaf without making it soggy. Use a pastry brush for an even application.
When you’re ready to serve, cut the loaf into generous slices. The glaze will slightly soften when warmed, allowing you to enjoy a fresh, moist bite. Pair it with a cup of coffee or a glass of chilled milk for a complete experience.
Everything’s prepped? Good. Let’s get into the real action.
The Method — Step by Step
- Preheat your oven to 350°F (175°C) and grease a 9x5-inch loaf pan with butter or non‑stick spray. Line the bottom with parchment paper for easy removal. Let the pan sit while you prepare the batter; a warm pan helps the loaf rise evenly.
- In a large bowl, whisk together the all‑purpose flour, cocoa powder, sugar, baking powder, and salt until the mixture is smooth. The dry ingredients should be evenly distributed; this prevents clumps that could affect the crumb.
- In a separate bowl, beat the eggs until light and frothy. Add the milk, oil, vanilla, and lemon juice, whisking until fully combined. This wet mixture should be glossy and slightly runny, ready to fold into the dry mix.
- Gradually pour the wet mixture into the dry ingredients, stirring gently with a wooden spoon until just combined. The batter should be thick but pourable; avoid over‑mixing, which can make the loaf dense.
- Gently fold in the fresh raspberries, ensuring they’re evenly distributed without breaking them. The berries should retain their shape, adding bursts of juice with each bite.
- Pour the batter into the prepared pan, smoothing the top with a spatula. Tap the pan gently on the counter to release any trapped air bubbles, which could create uneven holes in the crumb.
- Bake for 30 minutes, or until a toothpick inserted into the center comes out clean. The loaf should develop a golden crust and a fragrant aroma that signals it’s ready.
- Remove the loaf from the oven and let it cool in the pan for 10 minutes before transferring it to a wire rack. This rest allows the crumb to set and prevents the loaf from cracking.
- While the loaf cools, whisk together the powdered sugar, lemon juice, and a splash of water until the glaze is smooth. The glaze should be thin enough to coat the loaf without dripping.
- Once the loaf has cooled completely, drizzle the glaze evenly over the top with a pastry brush. Let the glaze set for 5 minutes before slicing to ensure a glossy finish.
That’s it — you did it. But hold on, I’ve got a few more tricks that’ll take this to another level.
Insider Tricks for Flawless Results
The Temperature Rule Nobody Follows
Many bakers bake at 350°F, but the optimal temperature for this loaf is 345°F. The slight reduction allows the batter to rise slowly, creating a softer crumb. I’ve tested it, and the difference is noticeable—less crack, more moisture.
Why Your Nose Knows Best
When the loaf starts to smell like toasted cocoa, that’s the cue to pull it out of the oven. The aroma indicates the batter is cooked through. If you wait too long, the glaze will melt, ruining the glossy finish.
The 5-Minute Rest That Changes Everything
After the loaf cools, let it rest on the rack for exactly 5 minutes before glazing. This brief pause ensures the crumb sets, preventing the glaze from soaking into the batter and creating a soggy texture. A friend tried skipping this step once—let’s just say the glaze turned into a sticky mess.
Don’t Skip the Parchment
Even a well‑greased loaf pan can stick if you’re not careful. Lining the bottom with parchment paper guarantees a clean release and a beautiful presentation. I’ve never had to scrape off a stubborn crust thanks to this simple trick.
Use Fresh Raspberries
Fresh berries bring a vibrant color and natural sweetness that frozen ones can’t match. When selecting berries, look for firm, bright red fruit with no soft spots. Fresh berries also provide a juicy burst that keeps the loaf from feeling dry.
Let the Glaze Set
After glazing, let the loaf sit for 5 minutes before slicing. The glaze will firm up, giving the loaf a polished, professional look. If you cut it too early, the glaze will run and create a mess.
Creative Twists and Variations
Chocolate‑Mint Magic
Swap the vanilla extract for peppermint extract and add a handful of crushed mint chocolate chips. The mint adds a refreshing contrast to the rich chocolate, making the loaf perfect for holiday parties. The glaze can also be flavored with a splash of mint for a cohesive taste.
Almond Crunch
Fold in chopped toasted almonds or almond flour into the batter for a nutty crunch. The almonds provide a contrasting texture, while the almond flavor complements the chocolate. Serve with a drizzle of almond butter for an extra indulgent touch.
Caramel Swirl
Swirl caramel sauce into the batter before baking. The caramel adds a sweet, buttery undertone and creates a beautiful marbled effect when sliced. The glaze can be replaced with a simple dusting of powdered sugar for a classic finish.
Espresso Boost
Incorporate a tablespoon of instant espresso powder into the dry mix. The espresso deepens the chocolate flavor, giving the loaf a café‑like richness. Pair it with a light espresso coffee for a delightful pairing.
Raspberry‑Chocolate Chip Fusion
Add chocolate chips to the batter along with the raspberries. The chips melt into pockets of chocolate, creating a gooey surprise with every bite. The glaze remains unchanged, maintaining the glossy finish.
Storing and Bringing It Back to Life
Fridge Storage
Wrap the cooled loaf tightly in plastic wrap, then place it in an airtight container. Store it in the refrigerator for up to 4 days. The glaze will stay glossy, and the berries will retain their juiciness.
Freezer Friendly
Slice the loaf and place the slices in a freezer bag, separating each slice with parchment paper. Freeze for up to 3 months. Thaw overnight in the fridge or at room temperature, then warm in the oven at 300°F for 10 minutes to revive the moisture.
Best Reheating Method
To reheat the loaf, preheat your oven to 300°F. Place the loaf on a baking sheet and cover loosely with foil. Heat for 8-10 minutes until warmed through. Add a splash of water before reheating to steam the loaf back to perfection.