I was standing in my kitchen, half‑asleep, when my roommate dared me to “make the most sinful dessert you’ve ever tasted.” I laughed, grabbed a bag of cocoa, and started rummaging through the pantry for anything that could possibly turn a simple cake into a full‑blown love affair. The result? A molten, glossy, caramel‑kissed chocolate cake that practically glows from the inside out. That first bite was like a fireworks display in my mouth—dark chocolate thunder followed by a caramel rain that lingered on the tongue. If you’ve ever stared at a store‑bought cake and thought, “I could do better,” you’ll understand why I’m still buzzing from that moment.
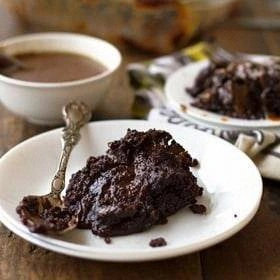
Picture this: the oven door swings open, a warm, sweet perfume erupts, and the cake’s top shimmers like a caramel‑coated mirror. The crust is just the right amount of firm, giving way to a center that oozes with a sauce so velvety it could be mistaken for a chocolate‑infused lava flow. The sound of the fork cutting through is a gentle sigh, the crust cracking ever so slightly, revealing the glossy river beneath. My kitchen felt like a pastry lab, the countertops covered in a dusting of cocoa that clung to my fingertips like a promise.
Most recipes out there either drown the chocolate in sugar or treat caramel as an afterthought, a drizzle you can ignore if you’re in a hurry. This version, however, treats caramel as a co‑star, folding it into the batter, swirling it, and then letting it rise to the surface where it creates those dramatic, glossy ribbons. The secret is a touch of heavy cream that turns the caramel into a glossy glaze that refuses to set, staying perfectly gooey until the very last forkful. I’m about to spill the beans on that technique, and trust me, you’ll want to write it down.
Okay, ready for the game‑changer? I’m going to walk you through every single step — by the end, you’ll wonder how you ever made any other chocolate cake. I dare you to taste this and not go back for seconds. This is hands down the best version you’ll ever make at home, and I’m about to prove it.
What Makes This Version Stand Out
- Gooey Center: The caramel‑infused batter creates a lava‑like core that stays molten, delivering a surprise burst of sweetness with every bite.
- Chocolate Depth: Using both cocoa powder and melted dark chocolate builds a layered flavor that’s rich without being bitter.
- Texture Contrast: A crisp, caramel‑crusted top meets a tender crumb inside, giving you that satisfying snap before the melt.
- Simplicity: Despite the gourmet vibe, the ingredient list is pantry‑friendly and the steps are straightforward.
- Make‑Ahead Magic: You can bake the cake a day ahead, store it, and the caramel will actually improve as it settles.
- Crowd Reaction: Expect gasps, exclamations, and that inevitable “Can I have the recipe?” from anyone within a five‑foot radius.
- Ingredient Quality: A pinch of sea salt on top amplifies the caramel’s sweetness, turning it from sugary to sophisticated.
- Cooking Method: The combination of a high‑heat blast followed by a gentle bake prevents a dry crumb and locks in moisture.
Inside the Ingredient List
The Flavor Base
Cocoa powder is the backbone of any chocolate cake, but here we use a high‑quality Dutch‑process cocoa that brings a deep, earthy richness without the acidity of natural cocoa. It’s the reason the cake feels like a midnight dessert rather than a daytime snack. If you substitute with natural cocoa, add a pinch more baking soda to balance the pH, otherwise the cake may turn slightly sour.
The Texture Crew
All‑purpose flour provides structure, while the combination of butter and buttermilk creates a tender crumb. The butter is softened, not melted, so it can trap air when creamed with sugar, forming tiny pockets that expand during baking. The buttermilk’s acidity reacts with the baking soda, giving the cake a subtle rise and a light, airy texture that contrasts beautifully with the gooey center.
The Unexpected Star
Caramel sauce isn’t just a topping; it’s folded into the batter, creating ribbons that swirl and melt into a glossy river as the cake bakes. The heavy cream added to the caramel ensures it stays liquid, preventing a hard crust that would ruin the gooey effect. If you’re feeling adventurous, swap half the caramel for a salted caramel to add a briny punch.
The Final Flourish
A sprinkle of flaky sea salt on top just before serving amplifies the caramel’s sweetness and adds a subtle crunch. This tiny crystal burst is the culinary equivalent of a plot twist in a thriller—it catches you off guard and makes the whole experience unforgettable. If you’re allergic to salt, a dusting of cocoa powder works as an alternative, though you’ll miss that savory‑sweet balance.
Everything’s prepped? Good. Let’s get into the real action…
The Method — Step by Step
Preheat your oven to 350°F (175°C) and generously grease a 9‑inch springform pan with butter, then line the bottom with parchment paper. The butter not only prevents sticking but also adds a buttery aroma that will mingle with the caramel later. As the oven warms, you’ll hear the faint hum of the heating elements—a comforting reminder that something delicious is about to happen.
In a large bowl, sift together 2 cups of flour, 1 cup of cocoa powder, 1½ teaspoons each of baking soda and baking powder, and ½ teaspoon of salt. Sifting twice, as mentioned earlier, ensures a uniform mixture and eliminates any pesky cocoa clumps that could cause dry pockets. When you whisk the dry ingredients together, you’ll notice a faint chocolatey cloud rising—this is the first whisper of flavor.
Kitchen Hack: Store the sifted dry mix in a zip‑top bag while you prep the wet ingredients; this saves time and keeps your workspace tidy.In a separate bowl, cream 1 cup of softened butter with 1½ cups of granulated sugar and 1 cup of brown sugar until the mixture is pale, fluffy, and smells like a bakery on a Sunday morning. This process incorporates air, which is crucial for the cake’s rise. When you scrape the sides, you’ll see the mixture leave a glossy trail—an indicator that you’ve reached the perfect creaming stage.
Add 4 large eggs one at a time, beating well after each addition. The eggs act as emulsifiers, binding the butter‑sugar mixture with the dry ingredients later on. If the mixture looks a little curdled after the first egg, keep beating—this is normal and will smooth out as you continue.
Stir in 2 teaspoons of vanilla extract and 1 cup of buttermilk, alternating with the dry ingredient mixture you set aside earlier. Begin with a third of the dry mix, then the buttermilk, then another third of the dry, and finish with the remaining dry ingredients. This layering technique prevents over‑mixing and ensures a uniform batter. At this point, the batter should be thick, glossy, and a deep chocolate brown—like liquid midnight.
Gently fold in 1 cup of dark chocolate chips and 1 cup of caramel sauce. The caramel should swirl, creating ribbons that will later melt into the cake’s heart. When you see the caramel streaks, remember: “This next part? Pure magic.”
Watch Out: Do not over‑fold the chocolate chips; they can break and turn the batter gritty, ruining that smooth texture.Pour the batter into the prepared pan, smoothing the top with a spatula. Sprinkle a generous pinch of flaky sea salt over the surface—this tiny crystal will later pop against the sweet caramel, creating a balanced flavor profile. The batter should sit in the pan like a glossy, dark lake, ready for the oven’s heat.
Bake for 30‑35 minutes, or until a toothpick inserted into the edge comes out clean while the center still jiggles slightly. The edges will pull away from the pan, a visual cue that the crust is forming. The kitchen will fill with a deep chocolate‑caramel aroma that makes you want to peek inside the oven—resist the urge, the cake needs its time.
Allow the cake to cool in the pan for 10 minutes, then run a thin knife around the edge and release the springform. Transfer the cake to a wire rack and let it cool completely; this cooling period lets the caramel set just enough to stay fluid but not run off the plate. The final reveal will be a glossy, caramel‑streaked top that shimmers like a mirror.
Serve warm with a scoop of vanilla ice cream or a drizzle of extra caramel. The contrast between hot cake and cold ice cream creates a temperature dance on the palate, while the extra caramel adds a glossy finish. And now the fun part—watch your guests dive in, eyes wide, forks poised.
That's it — you did it. But hold on, I've got a few more tricks that'll take this to another level. Trust me, these little tweaks are the difference between “good” and “legendary.”
Insider Tricks for Flawless Results
The Temperature Rule Nobody Follows
Never bake a chocolate cake at a temperature lower than 350°F. Lower temps cause the batter to set before the caramel can melt, resulting in a dry crumb. I once tried 325°F to “save energy,” and the cake turned into a dense brick. The right heat creates steam inside the batter, puffing it up and keeping the interior molten. Remember, a hot oven is your secret weapon.
Why Your Nose Knows Best
Your sense of smell is the ultimate doneness gauge. Around the 25‑minute mark, you’ll start catching a sweet, buttery caramel note mingling with chocolate. If the scent is faint, give the cake a few more minutes; if it’s strong and the edges are pulling away, it’s time to pull it out. Trust that nose—it’s more reliable than any timer.
The 5‑Minute Rest That Changes Everything
Let the cake sit, uncovered, for five minutes after removing it from the pan. This short rest allows the caramel to settle just enough to create those glossy ribbons without seeping out. Skipping this step leads to a soggy bottom and a less defined caramel swirl. I’ve seen beginners slice right away and end up with a mess; patience is a virtue here.
Salt‑Caramel Balance
A pinch of flaky sea salt on the top isn’t just for show; it cuts through the sweetness and elevates the chocolate’s bitterness. If you’re a salt‑lover, go a touch heavier—just don’t overdo it, or you’ll mask the chocolate. The tiny crystals dissolve slowly as you bite, delivering a burst of savory contrast that makes the dessert unforgettable.
The Double‑Layer Caramel Trick
For an extra gooey core, swirl half of the caramel into the batter, bake, then drizzle the remaining caramel while the cake is still warm. The second addition melts into the already‑set interior, creating a molten river that flows when you cut. This two‑step caramel infusion is the reason my friends claim the cake “never stops giving.”
Creative Twists and Variations
This recipe is a playground. Here are some of my favorite ways to switch things up:
Espresso‑Infused Caramel
Add a tablespoon of finely ground espresso to the caramel sauce before folding it in. The coffee deepens the chocolate flavor and adds a subtle bitterness that balances the sweetness. Coffee lovers will swear this is the ultimate after‑dinner treat.
Nutty Crunch
Stir in ½ cup of toasted chopped hazelnuts or pecans with the chocolate chips. The nuts provide a crunchy contrast to the gooey center, and their natural oils complement the caramel’s richness. It’s perfect for those who love texture variety.
Spiced Autumn
Swap half the cocoa powder for unsweetened Dutch‑process cocoa mixed with a pinch of cinnamon, nutmeg, and a dash of cayenne. The warm spices turn the cake into a cozy, seasonal indulgence that feels like a hug in a slice.
White Chocolate Caramel
Replace the dark chocolate chips with white chocolate chips and use a caramel made with brown butter. The buttery caramel and sweet white chocolate create a dreamy, pastel version that’s perfect for spring celebrations.
Vegan Velvet
Swap butter for coconut oil, use oat milk instead of buttermilk, and replace eggs with a flax‑egg mixture (1 tbsp ground flaxseed + 3 tbsp water per egg). The result is a dairy‑free, egg‑free version that still delivers that coveted gooey center.
Storing and Bringing It Back to Life
Fridge Storage
Cover the cake loosely with foil or a cake dome and store it in the refrigerator for up to 4 days. The caramel will thicken slightly, but a gentle reheat will bring it back to its silky state. Keep it away from strong‑smelling foods to preserve its pure chocolate‑caramel aroma.
Freezer Friendly
Wrap the cooled cake tightly in plastic wrap, then in aluminum foil, and freeze for up to 2 months. When you’re ready to serve, thaw it overnight in the fridge, then let it sit at room temperature for 30 minutes before reheating. The caramel may separate a bit, but a quick stir will reincorporate it.
Best Reheating Method
Place a slice on a microwave‑safe plate, add a tiny splash of water (about a teaspoon), and microwave on 50% power for 30‑45 seconds. The water creates steam, reviving the caramel’s gloss without drying out the cake. Alternatively, warm a whole cake in a 300°F oven for 10 minutes, covered with foil, to revive the entire loaf.