Picture this: I was in the middle of a frantic midnight snack run, the fridge light flickering, and I realized the only thing that could salvage my hunger was a handful of pantry staples. I had shredded coconut, almond flour, protein powder, and a jar of almond butter sitting on the counter like a forgotten treasure. The kitchen smelled of toasted coconut and vanilla, and my stomach was growling louder than a bass drum. I decided to turn this impromptu pantry raid into a culinary masterpiece, because why should gourmet chefs have all the fun? The result? A batch of coconut almond protein balls that will make you question every other snack you’ve ever made.
I’m not just talking about a quick bite; I’m talking about a texture that melts in your mouth like a sugar cloud, a flavor profile that balances the nutty crunch with a sweet whisper of honey, and a protein punch that keeps you energized through the night. The first time I tasted them, I was hit with a burst of tropical sweetness followed by a subtle almond undertone that lingered like a good aftertaste. Most people think protein balls are bland, but this version defies that notion with its silky, chewy consistency. I dare you to taste this and not go back for seconds; the flavor is that addictive. The secret sauce? A meticulous blend of ingredients that work in harmony rather than competing for attention.
What makes this version stand out is the attention to detail in every step, from selecting the right coconut to balancing the sweet and savory notes. I’ve spent months experimenting with ratios, and the final formula feels like a well‑orchestrated symphony where each component plays a perfect note. The result is a snack that satisfies the sweet tooth while delivering a protein boost that keeps you full. If you’ve ever struggled with bland protein treats, you’re not alone—and I’ve got the fix. This recipe is not just a handful of ingredients; it’s a carefully choreographed dance of flavors and textures that will have your taste buds dancing.
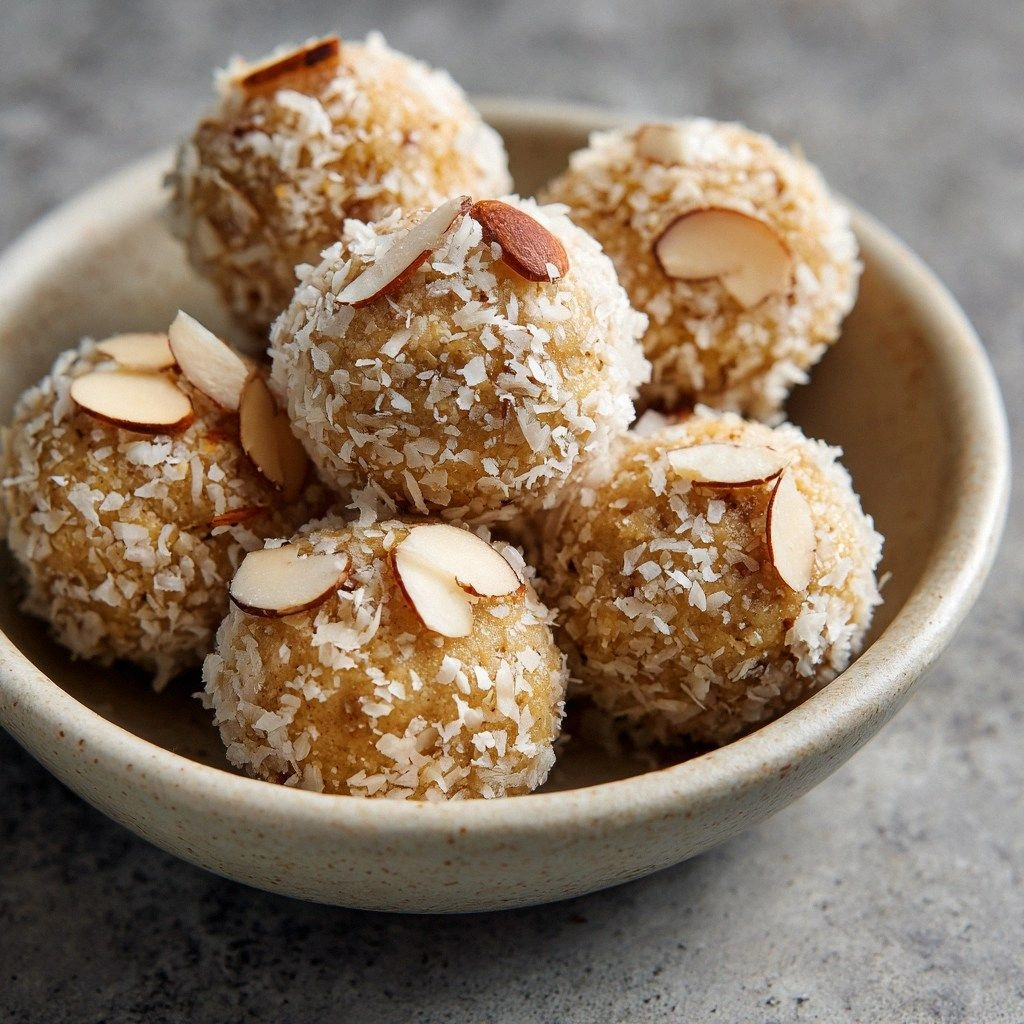
And let’s talk about the “wow” factor: the texture. Imagine biting into a ball that’s crisp on the outside, yet soft and chewy inside, with a subtle crunch from toasted coconut flakes. The edges hold a faint caramelized aroma that’s almost irresistible. Picture yourself pulling this out of the fridge, the whole kitchen smelling incredible, and seeing the bright, glossy finish of the coconut coating. This is hands down the best version you’ll ever make at home. Let me walk you through every single step—by the end, you’ll wonder how you ever made it any other way.
What Makes This Version Stand Out
- Flavor: The combination of vanilla whey protein and almond butter creates a smooth, creamy base that is sweetened naturally by honey, giving the balls a subtle caramel undertone that’s both comforting and sophisticated.
- Texture: The shredded coconut adds a delightful crunch that contrasts with the chewy interior, while the almond flour ensures a dense yet airy mouthfeel that doesn’t feel heavy.
- Protein Power: With 25 grams of protein per serving, these balls are a powerhouse for post‑workout recovery or a mid‑day pick‑up that keeps you full for hours.
- All‑Natural Ingredients: No artificial sweeteners, no trans fats, just wholesome ingredients that you can feel good about eating.
- Versatility: The recipe can be adapted for vegan, keto, or gluten‑free diets by swapping the whey protein for pea or soy protein and using a plant‑based sweetener.
- Make‑Ahead Friendly: Once formed, the balls keep well in the fridge for a week or freeze for up to three months, making them perfect for busy schedules.
- Visual Appeal: The bright, golden coating of toasted coconut gives the balls a beach‑y aesthetic that’s Instagram‑ready.
- Time Efficiency: The entire process takes less than an hour from start to finish, making it a quick yet satisfying treat.
Alright, let’s break down exactly what goes into this masterpiece...
Inside the Ingredient List
The Flavor Base
Shredded coconut is the star of this recipe, providing the essential tropical aroma and a subtle sweetness that balances the protein’s natural earthiness. It also contributes healthy fats and dietary fiber, which help keep you satiated. If you’re looking for an extra kick, lightly toast the coconut in a dry skillet until golden; this releases a nutty aroma that will elevate the flavor profile. Skipping coconut will make the balls bland and flat, losing that signature beach vibe. For an alternative, use desiccated coconut or a mixture of coconut and almond flour to tweak the texture.
The Texture Crew
Almond flour is the backbone that gives the balls their dense yet chewy consistency. It’s also gluten‑free, making the recipe suitable for those with dietary restrictions. The almond flour absorbs the wet ingredients, creating a sticky mixture that’s easy to shape. If you don’t have almond flour, you can replace it with oat flour or chickpea flour, but the final texture will differ slightly—more crumbly or denser, respectively. The key is to keep the ratio of dry to wet ingredients balanced; too much almond flour will make the balls dry.
The Protein Power
Vanilla whey protein powder is the primary protein source, delivering a smooth, sweet flavor that blends seamlessly with the coconut. It also adds a slight thickness that helps bind the mixture together. If you prefer a plant‑based option, swap whey for pea protein or a mixed plant protein blend; just make sure it’s unflavored or has a subtle vanilla note. A higher protein content will increase the chewiness, so keep an eye on the texture as you adjust the amount. The protein powder’s flavor is crucial—if it’s too bitter, the sweetness from honey will be overwhelmed.
The Unexpected Star
Almond butter is the unsung hero that adds richness and a creamy mouthfeel without overpowering the other flavors. It also acts as a natural binder, helping the mixture hold together. If you’re allergic to nuts, you can replace almond butter with sunflower seed butter or cashew butter for a similar consistency. The choice of butter can subtly shift the flavor profile; sunflower seed butter offers a milder taste, while cashew butter gives a slightly sweet undertone. Don’t skip this ingredient—without it, the balls will fall apart.
The Final Flourish
Honey or maple syrup provides the natural sweetener that balances the nutty and protein flavors. It also contributes to the sticky texture that makes the balls hold together. If you’re following a keto diet, you can use a sugar‑free syrup or a low‑glycemic sweetener like stevia, but adjust the quantity to avoid excessive sweetness. The vanilla extract adds a subtle aromatic depth that ties all the components together. A pinch of sea salt enhances the overall flavor profile by balancing the sweetness and bringing out the nuttiness.
Everything's prepped? Good. Let's get into the real action...
The Method — Step by Step
- First, gather all your ingredients and place them in a large mixing bowl. Measure each component precisely; accuracy is key to achieving the right consistency. The bowl should be clean and dry to prevent any excess moisture. Keep the ingredients at room temperature to ensure they blend smoothly. This step sets the foundation for the rest of the process.
- In a separate bowl, whisk together the shredded coconut, almond flour, protein powder, and sea salt. This dry blend should look like a fine, sandy texture. Mixing the dry ingredients first helps distribute the protein evenly throughout the mixture. It also prevents clumps from forming when wet ingredients are added. Once combined, set the dry mix aside.
- Now add the almond butter, honey, and vanilla extract to the dry mixture. Stir with a wooden spoon or silicone spatula until the mixture starts to clump together. The almond butter acts as a binder, while the honey provides moisture. The vanilla extract adds a subtle aroma that elevates the flavor. Keep stirring until the mixture feels cohesive.
- At this point, the mixture should be sticky but manageable. If it’s too sticky, sprinkle a little more almond flour; if it’s too dry, add a splash of honey. The goal is a dough that holds together when pressed between fingers. This step is crucial for ensuring the balls don’t fall apart later. A good test is to form a small ball and press it; if it stays intact, you’re ready to roll.
- Shape the mixture into balls about the size of a walnut, about 2 inches in diameter. Roll each ball between your palms until it’s smooth and round. If you prefer a firmer bite, press the balls lightly to flatten them slightly. The size should be small enough to fit comfortably in your hand, but large enough to provide a satisfying bite.
- Roll each ball in extra shredded coconut to coat the surface. This step adds a crunchy exterior and a golden finish that’s visually appealing. The coconut coating also helps keep the balls from sticking to each other in storage. Toss the coated balls on a parchment‑lined tray and place them in the refrigerator to set.
- Refrigerate the balls for at least 30 minutes, or until firm. This resting period allows the flavors to meld and the texture to firm up. Once chilled, the balls can be served immediately or stored in an airtight container. If you’re in a hurry, you can skip the refrigeration step and enjoy them warm, but they won’t hold together as well.
- Serve the balls on a platter or a bowl; they look as good as they taste. Pair them with a cup of coffee or a glass of almond milk for a balanced snack. The combination of sweet, nutty, and protein-packed flavors is perfect for any time of day. If you’re sharing, the bright coconut coating is a conversation starter.
- If you plan to store them for later, keep the balls in a sealed container at room temperature for up to 3 days, or freeze for up to 3 months. When you’re ready to enjoy, let them sit at room temperature for 10 minutes before eating. This will restore the chewy interior while maintaining the crunchy exterior. Enjoy the burst of flavor and the satisfying protein hit.
That's it — you did it. But hold on, I've got a few more tricks that'll take this to another level...
Insider Tricks for Flawless Results
The Temperature Rule Nobody Follows
If you let the almond butter cool to room temperature before mixing, the mixture will be easier to work with and will not over‑melt the honey. This subtle temperature tweak prevents the balls from becoming too sticky and ensures a smoother texture. A friend tried using cold almond butter and ended up with a crumbly mess; I learned the hard way that temperature matters. Keep the ingredients at the same ambient temperature to maintain consistency.
Why Your Nose Knows Best
As you mix, pay attention to the aroma. A faint vanilla scent indicates the mixture is just right; if it smells overwhelmingly sweet, you’ve added too much honey. The aroma is a reliable indicator of the right balance between sweet and nutty. Trust your nose; it’s a seasoned chef’s secret weapon. When the scent is just right, you’re on the path to perfection.
The 5‑Minute Rest That Changes Everything
After shaping the balls, let them rest on the tray for 5 minutes before rolling in coconut. This brief pause allows the surface to firm slightly, preventing the coating from sticking to the skin of the balls. Many cooks skip this step, resulting in uneven coconut distribution. A quick 5‑minute rest ensures an even coating and a better overall presentation. It’s a small step with a huge payoff.
Use a Silicone Mat for Easy Cleanup
Place a silicone baking mat on your tray before rolling the balls. This not only prevents sticking but also makes cleanup a breeze. The mat can be reused for other recipes, saving you time and effort. If you’re short on space, a parchment paper works too, but a silicone mat is the gold standard for protein ball preparation.
Keep the Balls in an Airtight Container
Storing the balls in a container with a tight seal preserves their freshness and prevents them from absorbing odors from the fridge. A glass jar with a lid or a resealable plastic bag works well. If you’re freezing them, double‑bag to avoid freezer burn. Proper storage keeps the texture intact and the flavor fresh.
Creative Twists and Variations
This recipe is a playground. Here are some of my favorite ways to switch things up:
Chocolate‑Infused Delight
Swap half of the honey for melted dark chocolate and fold in cocoa powder. The result is a rich, chocolatey ball that still retains the coconut crunch. Perfect for chocolate lovers who still want a protein boost. The chocolate adds a slight bitterness that balances the sweetness. Serve with a glass of cold milk for a classic combination.
Citrus Zest Twist
Add a tablespoon of orange zest and a splash of orange juice to the wet mixture. The citrus brightens the flavor profile and gives the balls a refreshing edge. This variation is ideal for spring and summer snacking. The zest also adds a subtle aroma that complements the vanilla. Pair with a light salad for a balanced meal.
Spiced Pumpkin Flavor
Introduce a teaspoon of pumpkin spice and a tablespoon of pumpkin puree. The warm spices create a comforting, autumnal taste that’s surprisingly light. This version works great for fall gatherings or as a holiday treat. The pumpkin puree adds moisture without overpowering the coconut. Sprinkle with toasted pumpkin seeds for extra texture.
Nutty Trail Mix Variation
Mix in chopped walnuts or pecans before forming the balls. The nuts add crunch and a nutty flavor that pairs well with the coconut. This variation turns the balls into a portable snack for hikes or long workdays. The nuts also increase the healthy fat content. Keep the nuts toasted for an extra burst of flavor.
Keto‑Friendly Edition
Replace the honey with a sugar‑free sweetener like erythritol and use a low‑carb protein powder. The result is a low‑glycemic snack that still delivers a satisfying chew. This version is great for those following a ketogenic diet. The texture remains chewy and the coconut coating adds a satisfying crunch. Store in the fridge for up to a week.
Vegan Protein Version
Swap whey protein for pea protein and use maple syrup or agave nectar instead of honey. The vegan version maintains the same protein content while staying plant‑based. The texture is slightly lighter but still chewy. The maple syrup adds a subtle caramel note that complements the coconut. Serve with a vegan yogurt for a balanced snack.
Storing and Bringing It Back to Life
Fridge Storage
Keep the protein balls in an airtight container at room temperature for up to 3 days. The airtight seal prevents the balls from absorbing odors from other foods. If you’re storing them in the fridge, they’ll stay fresh for up to a week. The cool temperature helps maintain the chewy interior while keeping the coconut coating crisp. For best results, let them sit at room temperature for a few minutes before eating.
Freezer Friendly
Place the balls on a parchment paper‑lined tray and freeze for 30 minutes to set them firmly. After the initial set, transfer them to a resealable freezer bag or airtight container. They can be stored for up to 3 months without loss of flavor or texture. When you’re ready to enjoy, let them thaw at room temperature for 10 minutes. This method preserves the original chewiness and coconut crunch.
Best Reheating Method
If the balls have become too firm after refrigeration or freezing, lightly warm them in a microwave for 10-15 seconds. This will soften the interior while keeping the coconut coating intact. Alternatively, place them in a preheated oven at 300°F for 5 minutes. Avoid overheating, as this can dry out the balls. A small splash of water before reheating can create steam, restoring moisture and tenderness.