Picture this: you’re in the middle of a bustling dinner party, the clock’s ticking, and the dessert counter is still a barren canvas. You’ve promised a show‑stopping finale, but the last time you tried a chocolate roll, the batter collapsed, the filling was watery, and the whole thing looked like a sad, flat pancake. I’ve been there, and I’m telling you, that nightmare is about to end. This is the recipe that turned my kitchen chaos into a chocolate masterpiece, and it’s so simple you’ll wonder why you ever struggled before.
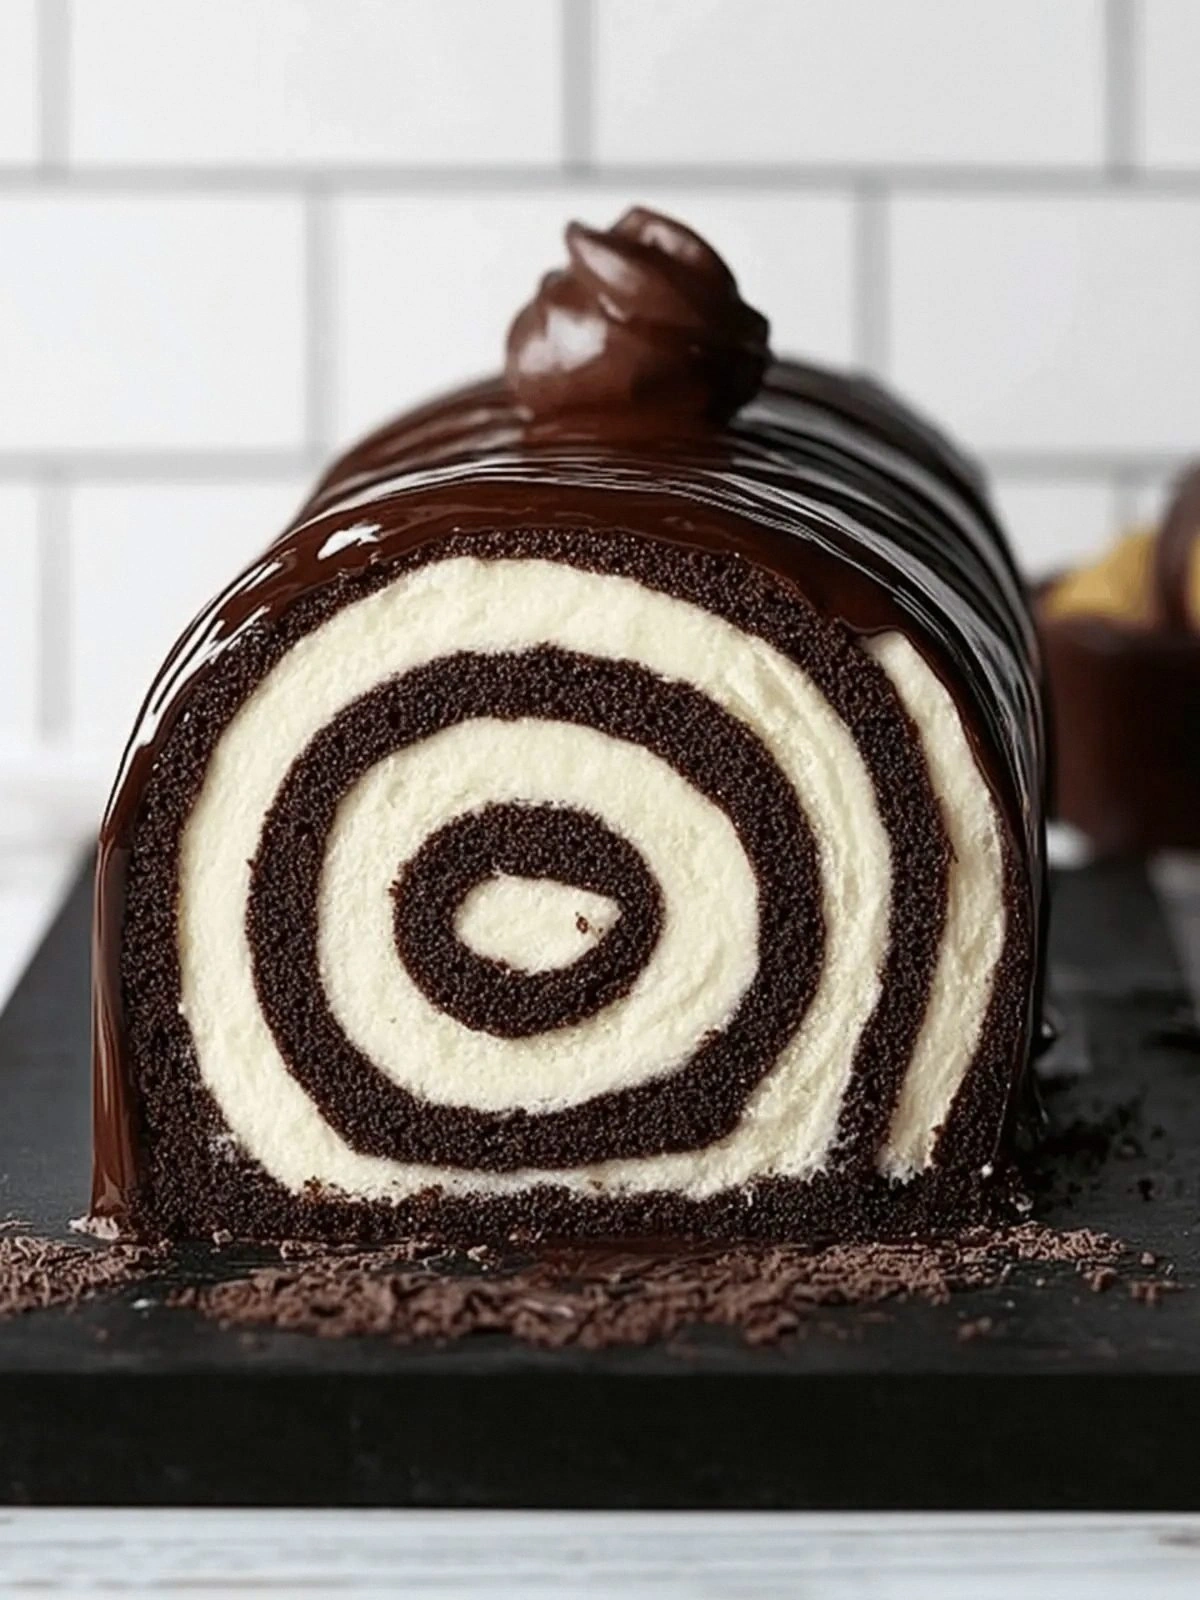
I started with a bold, almost rebellious idea: combine the airy texture of a classic Swiss roll with the decadent richness of mascarpone and a glossy dark‑chocolate ganache. The first time I tried it, the kitchen smelled like fresh coffee and cocoa, the batter glimmered under the oven light, and the finished roll was so silky it slid off the parchment like a slide of velvet. The moment I cut into it, the filling burst with a light, airy mousse that contrasted perfectly with the dense chocolate cake, and the ganache shimmered like liquid midnight. It was a sensory explosion—sweet, slightly bitter, creamy, and utterly unforgettable.
Why does this version stand out from every other chocolate roll you’ve seen? Because it’s built on a foundation of precision, premium ingredients, and a few secret techniques that keep the batter light, the filling luscious, and the ganache silky. I’ve stripped away the guesswork, added a coffee kick for depth, and used mascarpone to elevate the creaminess without overpowering the chocolate. The result is a roll that rises like a cloud, tastes like a chocolate dream, and looks like a work of art. If you’ve ever tried to make a Swiss roll that ends up flat or over‑baked, this recipe is your ticket out of the abyss.
Now, I dare you to taste this and not go back for seconds. Picture yourself pulling the finished roll out of the oven, the whole kitchen smelling incredible, the chocolate glaze glistening like polished obsidian, and your guests gasping in delight. I’ll be honest—half the batch vanished before anyone else could even touch it. But that’s the power of a recipe that’s hands down the best version you’ll ever make at home. Let me walk you through every single step—by the end, you’ll wonder how you ever made it any other way.
What Makes This Version Stand Out
- Airiness: The batter’s delicate folding technique ensures a cake that rises like a cloud, giving the roll a light, airy core that melts in your mouth.
- Depth: Adding instant coffee powder intensifies the chocolate flavor without a bitter aftertaste, creating a layered, complex taste profile.
- Velvet Filling: Mascarpone and whipped cream combine to form a mousse that’s airy yet rich, delivering a luxurious mouthfeel that balances the dense cake.
- Glossy Ganache: The ganache is made with dark chocolate, butter, and a hint of brown sugar, resulting in a glossy finish that’s both visually stunning and decadently sweet.
- Make‑ahead Friendly: The roll can be assembled a day ahead and chilled, allowing flavors to meld while still maintaining a fresh, springy texture.
- Ingredient Quality: Using Dutch‑processed cocoa and high‑fat mascarpone elevates the flavor, ensuring each bite feels indulgent and authentic.
Alright, let's break down exactly what goes into this masterpiece…
Inside the Ingredient List
The Flavor Base
Dutch‑processed cocoa is the backbone of this roll, offering a deep chocolate flavor that’s slightly less acidic than natural cocoa. The instant coffee powder, though small in quantity, brings a subtle bitterness that cuts through the sweetness, creating a more sophisticated profile. If you skip the coffee, the cake will taste flat and overly sweet; keep it for that essential depth.
The Texture Crew
All‑purpose flour and baking powder form the structural framework, while the fine salt balances the sweetness. The eggs are divided: yolks provide richness and structure, while whites bring lift and volume. Whipping the whites to soft peaks before folding them in keeps the batter airy and prevents a dense, cake‑like texture.
The Unexpected Star
Mascarpone cheese is the secret to the roll’s creamy, airy filling. Its high fat content delivers a silky mouthfeel, while its mild tang balances the chocolate’s sweetness. If you can’t find mascarpone, a blend of cream cheese and heavy cream works as a close substitute, but the texture will be slightly denser.
The Final Flourish
The dark chocolate, butter, and brown sugar create a glossy ganache that coats the roll like a velvet blanket. The butter adds shine and a subtle buttery note, while the brown sugar introduces caramel undertones that complement the chocolate. This ganache not only adds flavor but also locks in moisture, keeping the roll fresh for days.
Everything's prepped? Good. Let's get into the real action…
The Method — Step by Step
- Preheat your oven to 200°C (400°F). Line a 23×33 cm (9×13 in) baking sheet with parchment paper, then lightly grease the paper with a small amount of butter. This double‑layer ensures the cake won’t stick and makes rolling a breeze. The oven’s heat will give the batter a quick rise, creating that signature airy texture.
- In a medium bowl, sift together 75 g all‑purpose flour, 24 g Dutch‑processed cocoa, 1 tsp baking powder, ¼ tsp fine salt, and 10 g instant coffee powder. Sifting eliminates lumps and guarantees a smooth batter. The coffee powder is the secret that elevates the chocolate’s depth.
- Separate the eggs. In a large, clean bowl, beat the 4 egg whites on medium speed until soft peaks form. Be careful not to over‑beat; soft peaks keep the batter light. This step is the moment of truth—if the whites are too stiff, the cake will become rubbery.
- In another bowl, whisk the 4 egg yolks with 70 g of the caster sugar until the mixture becomes pale and thick. The sugar dissolves the yolks and creates a silky base. The color shift is a visual cue that the yolks are ready.
- Fold the dry ingredient mixture into the yolk mixture using a spatula. Stir gently until just combined; over‑mixing will develop gluten and ruin the cake’s tenderness. Then fold in the 55 g melted, cooled butter and 7 g pure vanilla extract, creating a cohesive batter. The butter adds richness while the vanilla deepens the chocolate’s aroma.
- Gently fold the beaten egg whites into the batter in two batches. Use a rubber spatula and a folding motion—lift the batter from the bottom of the bowl and turn it over the whites. This technique preserves the air bubbles that give the cake its airy lift.
- Pour the batter onto the prepared sheet, spreading it evenly with a spatula. The batter should be about 2 cm (¾ inch) thick. Bake for 10–12 minutes, or until the edges start to pull away from the parchment and the top is set but still slightly soft. A quick test: insert a toothpick; it should come out with a few moist crumbs, not wet batter.
- While the cake is baking, prepare the filling. In a chilled mixing bowl, whip 250 g heavy cream until soft peaks form. Gradually add 50 g powdered sugar and 7 g vanilla bean paste, continuing to whip until stiff peaks form. The result is a fluffy, airy mousse that will keep the roll moist.
- Once the cake is done, remove it from the oven and let it cool on the sheet for 5 minutes. While it’s still warm, carefully lift it with the parchment paper, then roll it up gently, starting from the short end. The warm cake is pliable and will not crack. Keep the roll on the parchment and let it cool completely on a wire rack.
- To assemble the ganache, melt 340 g dark chocolate, 60 g butter, and 20 g brown sugar together over a double boiler or in the microwave, stirring every 30 seconds. Once melted, stir in 250 g heavy cream until smooth and glossy. Let the ganache cool slightly before brushing it over the rolled cake, creating a shiny, decadent glaze.
- Slice the roll into 1 cm thick pieces, then serve immediately or chill for a more set texture. If you prefer a firmer roll, refrigerate for at least an hour before slicing. The ganache will set into a glossy, firm shell, while the filling remains airy.
That's it—you did it. But hold on, I've got a few more tricks that'll take this to another level…
Insider Tricks for Flawless Results
The Temperature Rule Nobody Follows
Always use room‑temperature butter and heavy cream. Cold ingredients cause the batter to seize and the ganache to split. If you’re in a hurry, let the butter sit at room temperature for 15 minutes, and chill the cream in the freezer for 10 minutes before whipping.
Why Your Nose Knows Best
When the cake is done, let it sit for a minute. The aroma will shift from raw cocoa to a sweet, buttery scent. That scent tells you the cake is perfectly cooked—no more baking, no more under‑baking.
The 5‑Minute Rest That Changes Everything
After you remove the cake from the oven, let it rest on the sheet for 5 minutes before rolling. This rest allows the structure to set, preventing cracks when you roll. If you rush, the warm cake will split or tear.
The Quick Chill Trick
If you’re short on time, place the rolled cake in the freezer for 15 minutes before slicing. This hardens the ganache instantly, making slicing clean and crisp.
The Secret of the Perfect Ganache
Use a double boiler for the ganache to avoid scorching. Stir constantly until the mixture is smooth and glossy. If the ganache is too thick, whisk in a tablespoon of cold heavy cream until it reaches a pourable consistency.
Creative Twists and Variations
This recipe is a playground. Here are some of my favorite ways to switch things up:
Nutty Surprise
Fold 30 g chopped hazelnuts into the batter before baking. The nuts add crunch and a buttery flavor that pairs beautifully with the chocolate.
Citrus Zest
Add the zest of one orange to the batter and a tablespoon of orange liqueur to the ganache. The citrus brightens the chocolate, creating a fresh, lively finish.
Minty Fresh
Replace the vanilla extract with 5 g of peppermint extract and add a few drops of green food coloring to the ganache. The mint gives a cool, refreshing contrast to the rich chocolate.
Caramel Swirl
Swirl 50 g of caramel sauce into the batter before baking, and drizzle a thin caramel glaze over the finished roll. The caramel adds a buttery sweetness that balances the chocolate.
Espresso Explosion
Replace the instant coffee powder with 20 g of finely ground espresso and add a tablespoon of espresso liqueur to the ganache. The espresso deepens the chocolate flavor and gives an adult‑friendly kick.
Storing and Bringing It Back to Life
Fridge Storage
Wrap the rolled cake tightly in plastic wrap and store in the refrigerator for up to 3 days. The chilled environment keeps the ganache firm and the filling moist. When ready to serve, let the cake sit at room temperature for 10 minutes before slicing to soften the ganache slightly.
Freezer Friendly
For longer storage, wrap the roll in parchment and then in foil, and freeze for up to 2 weeks. Thaw overnight in the refrigerator, then let it come to room temperature for 15 minutes before serving. The texture remains silky, and the chocolate glaze stays glossy.
Best Reheating Method
If the roll has cooled and the ganache has hardened, gently warm it in a 60°C (140°F) oven for 5 minutes. Alternatively, place a slice in a microwave on low power for 10 seconds. Adding a tiny splash of water before reheating creates steam, keeping the filling airy and preventing the ganache from becoming too thick.