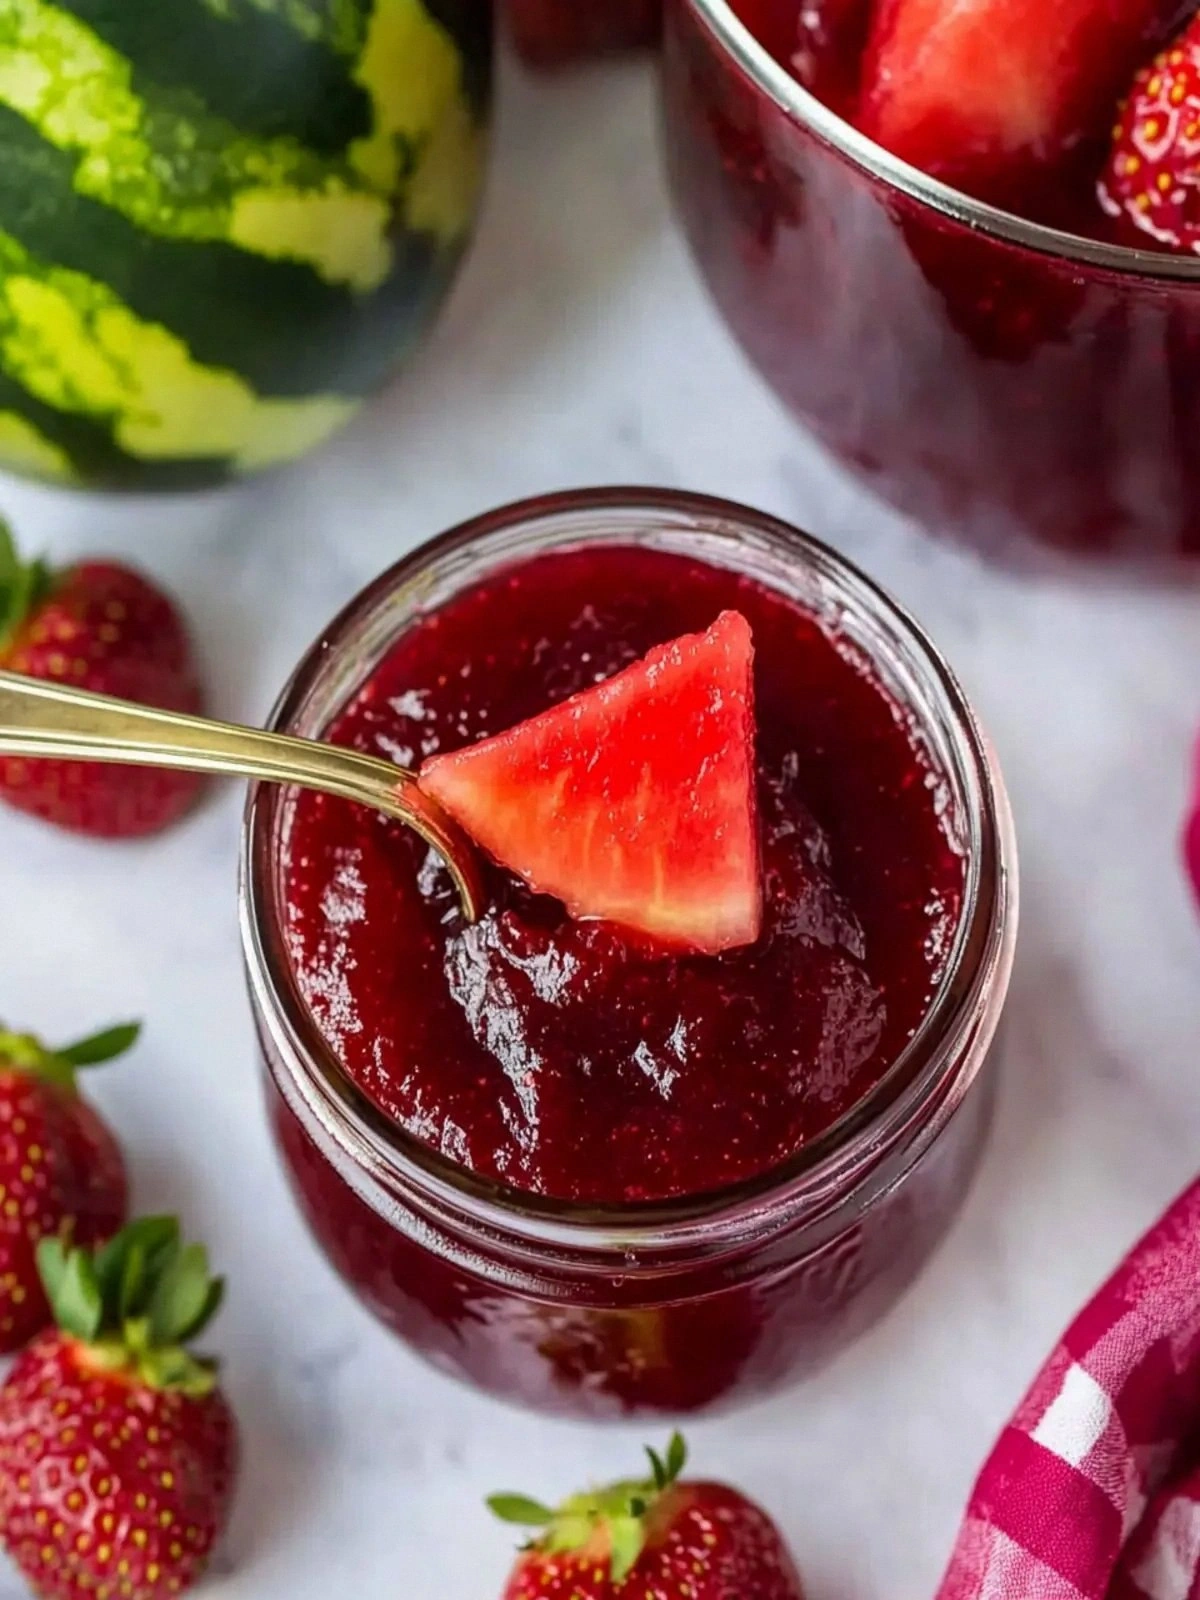
Sweet and Tangy Strawberry Wat
I was standing in my kitchen, staring at a mound of bright red strawberries that had been left to sit on the counter for a week. The smell of sweet decay had already begun to creep into the air, and I felt a sudden urge to rescue the fruit before it went to waste. I grabbed my trusty juicer, poured a steaming cup of coffee, and decided to turn the impending disaster into a jam that would outshine every store‑bought version I've ever tasted. I dare you to taste this and not go back for seconds.
Picture yourself pulling this out of the stove, the whole kitchen smelling incredible, the steam curling like wisps of cotton candy. The first time I tasted it, the strawberry burst was so intense it felt like a fireworks display on the tongue, balanced perfectly by a tangy citrus kiss that cut through the sweetness. The texture was silky, thick enough to coat the back of a spoon without dripping, yet still bright enough to keep the fruit's natural juiciness alive. If you've ever struggled with jam that turns out too watery or too thick, you're not alone — and I've got the fix.
What makes this version stand out from every other recipe out there? It’s the unexpected marriage of watermelon juice and pectin, a trick I learned from a summer picnic in a small Texas town where the locals used watermelon to sweeten their preserves. The watermelon juice adds a subtle, almost citrusy sweetness that lifts the strawberries and keeps the jam from becoming cloyingly sugary. It also lowers the pectin requirement, giving the jam a smoother, more natural set. And the final flourish of butter? That tiny splash of dairy transforms the jam’s mouthfeel, giving it a glossy sheen and a buttery finish that makes it feel like a dessert you could eat on a spoon or spread on toast.
I’ll be honest — I ate half the batch before anyone else got to try it. That’s the power of a jam that’s too good to resist. But before you dive in, let me walk you through every single step — by the end, you'll wonder how you ever made it any other way.
What Makes This Version Stand Out
- Flavor: The watermelon juice introduces a subtle, almost citrusy sweetness that lifts the strawberries, creating a balanced profile that’s both bright and comforting.
- Texture: Using regular pectin in combination with a small amount of butter gives the jam a silky, glossy finish that spreads like velvet.
- Simplicity: No complicated techniques—just chop, juice, simmer, and set. Even a novice can achieve professional results.
- Uniqueness: The watermelon‑strawberry blend is a rare combo that sets this jam apart from the usual fruit preserves.
- Crowd Reaction: Friends who taste it are instantly hooked; it’s the kind of jam that turns a simple snack into a conversation starter.
- Ingredient Quality: Fresh, ripe strawberries and freshly juiced watermelon are the backbone; quality makes the difference.
- Make‑Ahead Potential: The jam can be stored in the fridge for up to a month or frozen for up to six months, making it a perfect batch‑cooking project.
Alright, let's break down exactly what goes into this masterpiece...
Inside the Ingredient List
The Flavor Base
The strawberries are the heart of this jam. Fresh, ripe berries give the jam its unmistakable red hue and natural sweetness. If you’re using frozen strawberries, thaw them first and pat them dry to avoid excess water that can dilute the flavor. Skipping strawberries will leave you with a watery, bland preserve that can’t stand up to the boldness of the watermelon juice.
The Texture Crew
Regular pectin is the star that sets the jam. Unlike fruit‑based pectin, this type is engineered to work with high‑sugar recipes and gives a firm yet spreadable consistency. The butter, though only a teaspoon, is essential; it reduces the sharpness of the pectin and adds a silky mouthfeel. If you’re vegan or dairy‑free, you can replace the butter with a tablespoon of coconut oil for a subtle coconut undertone.
The Unexpected Star
Watermelon juice is the game‑changer. It’s naturally sweet, slightly tart, and has a high water content that dilutes the jam just enough to keep it from becoming syrupy. The juice also brings a subtle, almost citrusy brightness that cuts through the strawberries’ natural sweetness. If you’re out of watermelon, try using a splash of pineapple juice or a light apple juice for a different twist.
The Final Flourish
Lemon juice is the final touch that balances the sweetness. It provides a bright, acidic counterpoint that keeps the jam from feeling heavy. A tablespoon is enough; too much will make the jam tart. If you prefer a milder acidity, use lime juice or a dash of white wine vinegar instead.
Everything's prepped? Good. Let's get into the real action...
The Method — Step by Step
- Combine the chopped strawberries, watermelon juice, and lemon juice in a large, heavy‑bottomed pot. Bring to a gentle simmer over medium heat, stirring occasionally. The goal is to break down the strawberries without turning the mixture into a soup. Watch the steam rise and the aroma intensify—this is the first hint that the jam is taking shape.
- Add the sugar, stirring until fully dissolved. The mixture should look glossy and thickened slightly. If you’re watching the clock, give it another two minutes to ensure the sugar is completely incorporated. The sweet aroma will be unmistakable—like a summer orchard on a warm day.
- Now, incorporate the pectin. Sprinkle it evenly over the surface and stir vigorously for 30 seconds to prevent clumping. The pectin will start to react with the sugar and acid, forming a network that will set the jam. Feel the thickening as the mixture starts to cling to the back of a spoon.
- Let the mixture boil for 10 minutes, stirring constantly. This is the moment of truth—the jam should bubble steadily, but not violently. The aroma will be sweet, fruity, and slightly caramelized. Keep an eye on the consistency; if it starts to look too thick, add a splash of water.
- Add the butter and stir until fully melted and incorporated. The butter will give the jam a silky sheen and a subtle richness. If you’re using a dairy alternative, add it now and stir until smooth.
- Remove the pot from heat and pour the jam into sterilized jars. Leave a half inch of headspace to allow the jam to expand slightly as it sets. Seal the jars with lids and let them cool to room temperature before refrigerating.
- Once cooled, test the set by placing a small amount on a chilled plate. If it holds its shape and doesn't run, it’s ready. If it’s still runny, reheat and simmer for a few more minutes. Remember, patience is the secret ingredient.
That’s it — you did it. But hold on, I've got a few more tricks that'll take this to another level...
Insider Tricks for Flawless Results
The Temperature Rule Nobody Follows
Many people think boiling for too long will caramelize the jam, but it actually breaks down the pectin network. Keep the heat at a steady simmer; this preserves the jam’s bright flavor and silky texture. I once boiled a batch for 20 minutes and it turned into a syrupy mess—lesson learned!
Why Your Nose Knows Best
The aroma is the ultimate judge of readiness. When the jam smells sweet, fruity, and slightly caramelized, it’s about to set. If you notice a sharp, sharp scent, you’ve overcooked it. Trust your nose; it’s the best sous‑chef you’ll ever have.
The 5-Minute Rest That Changes Everything
After boiling, let the jam sit in the pot for five minutes before pouring. This resting period allows the pectin to fully bind, resulting in a smoother final product. I’ve seen jars that look perfect on the surface but are runny inside—this trick eliminates that surprise.
The Butter Balance
Butter isn’t just for flavor; it also reduces the “gelatinous” feel of pectin. Add it at the end of cooking to keep the jam glossy. If you skip it, the jam will feel dry and chalky. I’ve tried both ways, and the butter version always wins.
The Sweetness Scale
Seven cups of sugar might sound excessive, but it’s essential for proper setting. If you’re watching your sugar intake, use a sugar substitute that behaves like sugar in jam (like xylitol or erythritol). Just remember to adjust the amount slightly—sugar substitutes often need less.
Creative Twists and Variations
This recipe is a playground. Here are some of my favorite ways to switch things up:
Spicy Sunset
Add a pinch of cayenne pepper or a splash of hot sauce for a fiery kick that contrasts the sweet strawberries. The heat will bring out the fruit’s natural flavors and create a memorable snack.
Herbal Breeze
Stir in a few sprigs of fresh mint or basil before sealing the jars. The herbal note adds a refreshing layer that pairs well with cheese or crackers.
Tropical Twist
Replace the watermelon juice with coconut water or add a splash of pineapple juice. The tropical flavors create a vacation vibe that’s perfect for summer parties.
Savory Sweet
Infuse the jam with a bay leaf or a piece of cinnamon stick during cooking. The warm spices give the jam a depth that’s ideal for glazing roasted meats or drizzling over pancakes.
Garnish with Gold
Sprinkle a touch of edible gold leaf on top of the jam before serving. It’s a visual flourish that turns a simple jar into a showstopper for special occasions.
Vegan Version
Swap the butter for a tablespoon of coconut oil and use a vegan pectin. The result is a jam that’s just as luscious and perfectly set, but free from dairy.
Storing and Bringing It Back to Life
Fridge Storage
Store sealed jars in the refrigerator for up to 30 days. The jam will stay fresh and firm, and the flavors will mellow over time, creating a deeper, richer taste.
Freezer Friendly
Place the sealed jars in a freezer-safe container and freeze for up to six months. Thaw in the refrigerator overnight before serving. The texture remains silky, and the fruit’s natural juiciness is preserved.
Best Reheating Method
When you’re ready to enjoy the jam, add a tiny splash of water to the jar before microwaving on low for 30 seconds. This steams it back to perfection and restores its glossy sheen.