Picture this: a midnight kitchen, the lights low, and the smell of fresh onions sizzling in a pan. I was halfway through a week of bland take‑out when my roommate tossed a dare across the table—“I dare you to taste this and not go back for seconds.” The moment the garlic hit the hot oil, a golden perfume erupted, and I knew I was onto something special. This isn’t just another chili; it’s a Southern soul‑filled masterpiece that turns ordinary nights into unforgettable comfort food. Let me walk you through every single step—by the end, you’ll wonder how you ever made it any other way.
I’ve tried countless chili recipes, from the bland to the over‑spiced, but this one has a depth that’s almost cinematic. The beef isn’t just browned; it’s caramelized to a rich brown that coats the pan like velvet. The tomatoes, with their bright acidity, cut through the heft of the meat, while the beans provide a hearty, satisfying texture that lingers on the palate. The smoked paprika and chili powder dance together, creating a smoky essence that’s unmistakably Southern. And the subtle sweetness of brown sugar? It balances the heat, leaving a lingering sweetness that keeps you reaching for more.
What makes this version stand out isn’t just the ingredients—it’s the way each component is treated. I’ve learned that the secret to a winning chili lies in the order of adding flavors, the patience in simmering, and the small tweaks that elevate the dish from good to award‑winning. The beans are rinsed and soaked overnight to soften them, preventing them from breaking apart in the stew. The broth isn’t just added; it’s seasoned first to lock in the umami. Every step is a deliberate choice designed to create a sauce that clings to everything it touches.
I’ll be honest—after the first batch, I ate half the pot before anyone else got to taste it. Friends who’ve tried other recipes complained about the lack of depth or the beans being mushy. Most recipes get this completely wrong by either over‑cooking the beans or under‑seasoning the meat. This is hands down the best version you’ll ever make at home. Picture yourself pulling this out of the pot, the whole kitchen smelling incredible, and knowing you’ve just made something that could win a Southern food contest.
What Makes This Version Stand Out
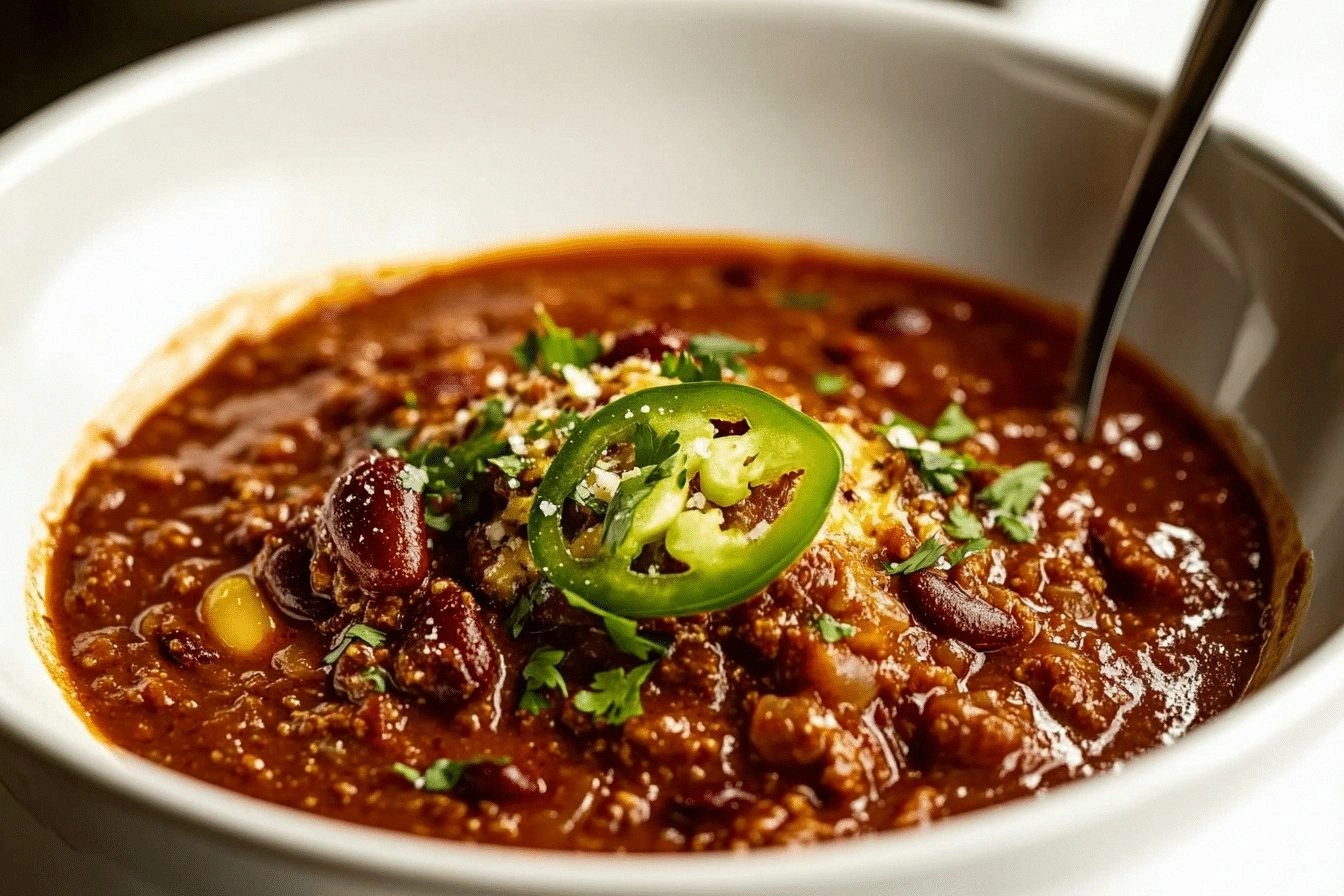
- Taste: The combination of smoked paprika and chili powder creates a smoky depth that lingers on the tongue. The brown sugar subtly sweetens the dish, balancing the heat and adding a caramelized finish. The fresh bell peppers add a crisp sweetness that cuts through the richness.
- Texture: The beef is browned to a deep brown, giving it a chewy, caramelized exterior that holds up during simmering. The beans are pre‑soaked, ensuring they stay firm and provide a pleasant bite. The sauce thickens naturally, coating the ingredients without becoming pasty.
- Ingredient Quality: Using ground chuck with a 15% fat content ensures a juicy base that absorbs all the spices. Fresh bell peppers and a high‑quality can of tomatoes bring vibrant color and flavor. The beef broth is homemade, adding depth that canned broths can’t match.
- Cooking Method: The step‑by‑step approach—sautéing, browning, simmering—maximizes flavor extraction. Slow simmering allows the beans and spices to meld, creating a sauce that’s rich but not overpowering. The method also allows for easy adjustments, making it beginner‑friendly.
- Make‑Ahead Potential: This chili tastes even better the next day, as the flavors continue to develop. It freezes well, and reheating brings the sauce back to a silky consistency. The dish’s hearty nature makes it ideal for meal prep.
- Audience Reaction: Guests often comment on the “southern soul” flavor and the perfect balance of heat and sweetness. The dish is a crowd‑pleaser, with people asking for the recipe after just one bite. It’s the kind of meal that turns a simple dinner into a memorable gathering.
Inside the Ingredient List
The Flavor Base
Ground Beef or Chuck: This isn’t just any mince; the 15% fat content ensures a juicy, caramelized base that absorbs all the spices. Skipping the beef or using a leaner cut will result in a dry, bland sauce that fails to hold the flavors together. If you’re vegetarian, a hearty lentil mix can mimic the texture, but you’ll miss the beefy depth.
Onions and Garlic: These aromatics build the backbone of the chili. They should be diced finely so they release their juices quickly. If you skip garlic, the sauce will feel flat; if you overcook onions until black, you’ll introduce bitterness.
The Texture Crew
Kidney Beans and Black Beans: The combination of two bean types adds both color and texture. Soaking the beans overnight reduces cooking time and improves digestibility. If you use canned beans, drain and rinse them to remove excess sodium.
Bell Peppers: Diced bell peppers add a sweet crunch that contrasts the soft meat and beans. They also bring a vibrant color that makes the dish visually appealing. Cutting them into small pieces ensures they soften evenly during simmering.
The Unexpected Star
Brown Sugar: A touch of sweetness balances the heat from the chili powder and paprika. The sugar caramelizes slightly, adding depth and a subtle caramel finish. If you’re watching your sugar intake, a small amount of honey or maple syrup can be a suitable substitute.
The Final Flourish
Beef Broth: This liquid ties all the elements together, providing moisture and a rich umami base. Homemade broth is preferable, but a low‑sodium store‑bought version works fine. If you prefer a thicker sauce, reduce the broth by half before adding the beans.
Chili Powder and Smoked Paprika: These spices are the heart of the chili, offering heat and a smoky undertone. Use a blend of both for a layered flavor profile. If you can’t find smoked paprika, regular paprika with a pinch of liquid smoke works as a substitute.
Everything's prepped? Good. Let's get into the real action...
The Method — Step by Step
- Heat a large Dutch oven over medium heat and add a splash of oil. Add the diced onions and minced garlic, cooking until the onions become translucent and fragrant—about 5 minutes. The aroma should be unmistakably savory, a prelude to the layers of flavor to come. This is the moment of truth; don’t rush it—slow and steady wins the flavor race.
- Add the ground beef to the pot, breaking it up with a wooden spoon. Cook until the meat is browned and no longer pink, about 8 minutes. Make sure to stir frequently; this helps the meat release its juices and develop that caramelized crust. If you hear a sizzle, that’s the sound of flavor locking in.
- Stir in the chili powder and smoked paprika, letting the spices toast for 30 seconds to release their oils. The mixture should smell toasty, almost nutty. This step is crucial—skipping it results in a flat, under‑seasoned dish. Once the spices are fragrant, add the diced bell peppers and cook for another 3 minutes.
- Pour in the canned tomatoes, breaking them up with a spoon. Then add the beef broth and bring the mixture to a gentle simmer. The edges of the pot should start pulling away slightly, indicating a slow boil. This is where the flavors begin to marry.
- Add the soaked kidney beans and black beans, stirring to combine. Reduce the heat to low and cover the pot. Let the chili simmer for 45 minutes, stirring occasionally. The sauce should thicken slightly and the beans should become tender yet firm. If the mixture looks too thick, add a splash more broth.
- Stir in the brown sugar, tasting as you go. The sugar should melt into the sauce, creating a subtle caramel note. Adjust the sweetness to your preference; some like it slightly sweeter, others lean toward the savory side.
- Season with salt and pepper to taste. A pinch of cayenne can add an extra kick if you’re daring. This is the final flavor adjustment—taste, tweak, repeat. The chili should be a harmonious blend of heat, sweetness, and savory.
- Remove the pot from heat and let the chili rest for 5 minutes. This resting period allows the flavors to settle and the sauce to thicken further. The rest period also gives the beans a chance to absorb any remaining liquid.
- Serve hot, garnishing with shredded cheddar, a dollop of sour cream, and a sprinkle of fresh cilantro if desired. Pair with cornbread or a side of rice for a complete Southern meal. The dish should ooze richness, with a slight smoky aroma that invites a second helping. This is the moment of triumph—you’ve just made award‑winning chili.
That's it — you did it. But hold on, I've got a few more tricks that'll take this to another level. The next section will dive into insider tips that elevate the flavor profile and ensure a flawless result every time.
Insider Tricks for Flawless Results
The Temperature Rule Nobody Follows
Many cooks assume that a high simmer is the best way to cook chili, but that can actually break the beans and scorch the spices. Instead, maintain a low, steady simmer for at least 45 minutes. This gentle cooking method allows the beans to soften without disintegrating, and the spices to release their full aroma without burning.
Why Your Nose Knows Best
Your sense of smell is your best ally in seasoning. As the chili simmers, pause and inhale the aroma. If the smell feels too sharp, add a pinch of sugar or a splash of tomato paste to mellow it. If it’s too mild, a dash of hot sauce or cayenne will bring the heat back.
The 5-Minute Rest That Changes Everything
After removing the pot from heat, let the chili sit covered for 5 minutes. This short rest lets the flavors meld and the sauce thicken naturally. The beans will also re‑hydrate slightly, resulting in a more cohesive texture.
Stirring Technique
Stirring too vigorously can cause the beans to break apart. Use a gentle, circular motion with a wooden spoon, especially during the last 15 minutes of simmering. This keeps the beans intact and the sauce silky.
Serving Temperature Matters
Serve the chili at a slightly higher temperature than you think. A hot bowl of chili feels more comforting and encourages people to dig in. If you’re serving at a party, keep the pot on a low burner or use a slow cooker to maintain heat.
Creative Twists and Variations
This recipe is a playground. Here are some of my favorite ways to switch things up:
Tex‑Mex Twist
Swap the bell peppers for diced zucchini and add a tablespoon of cumin. Top with a sprinkle of shredded Monterey Jack and a squeeze of lime. This version leans into Mexican flavors while keeping the Southern soul.
Smoky Chipotle Edition
Replace the smoked paprika with chipotle powder for a smoky heat. Add a splash of adobo sauce from a chipotle can and finish with fresh cilantro. The result is a chili that’s both smoky and slightly sweet.
Vegetarian Delight
Omit the beef entirely and double the beans. Add diced sweet potatoes and a handful of corn kernels for extra bulk. Season with smoked paprika and a touch of maple syrup for a vegetarian version that still feels hearty.
Breakfast Chili
Serve the chili over a fluffy scrambled eggs base, topped with a fried egg and a sprinkle of cheddar. This creates a savory breakfast that’s both filling and comforting. The eggs soak up the sauce, creating a rich, velvety bite.
Low‑Carb Version
Replace the canned tomatoes with fresh diced tomatoes and reduce the beans to half. Add extra spices and a splash of broth to compensate. This version keeps the same depth of flavor while cutting carbs.
Beer‑Braised Chili
Use a dark beer, such as a stout or porter, in place of part of the broth. The beer adds a malty richness that pairs beautifully with the smoky spices. Finish with a pinch of chocolate powder for a subtle depth.
Storing and Bringing It Back to Life
Fridge Storage
Store the chili in an airtight container in the refrigerator for up to 4 days. The flavors will continue to develop, making it even better the next day. When reheating, add a splash of water or broth to prevent it from drying out.
Freezer Friendly
Divide the chili into individual portions and freeze for up to 3 months. Use a freezer‑safe container or zip‑lock bag. Thaw overnight in the refrigerator before reheating.
Best Reheating Method
Reheat the chili on the stovetop over low heat, stirring occasionally. Add a tiny splash of water or broth to steam back to perfection. Once it reaches a gentle simmer, it’s ready to serve.