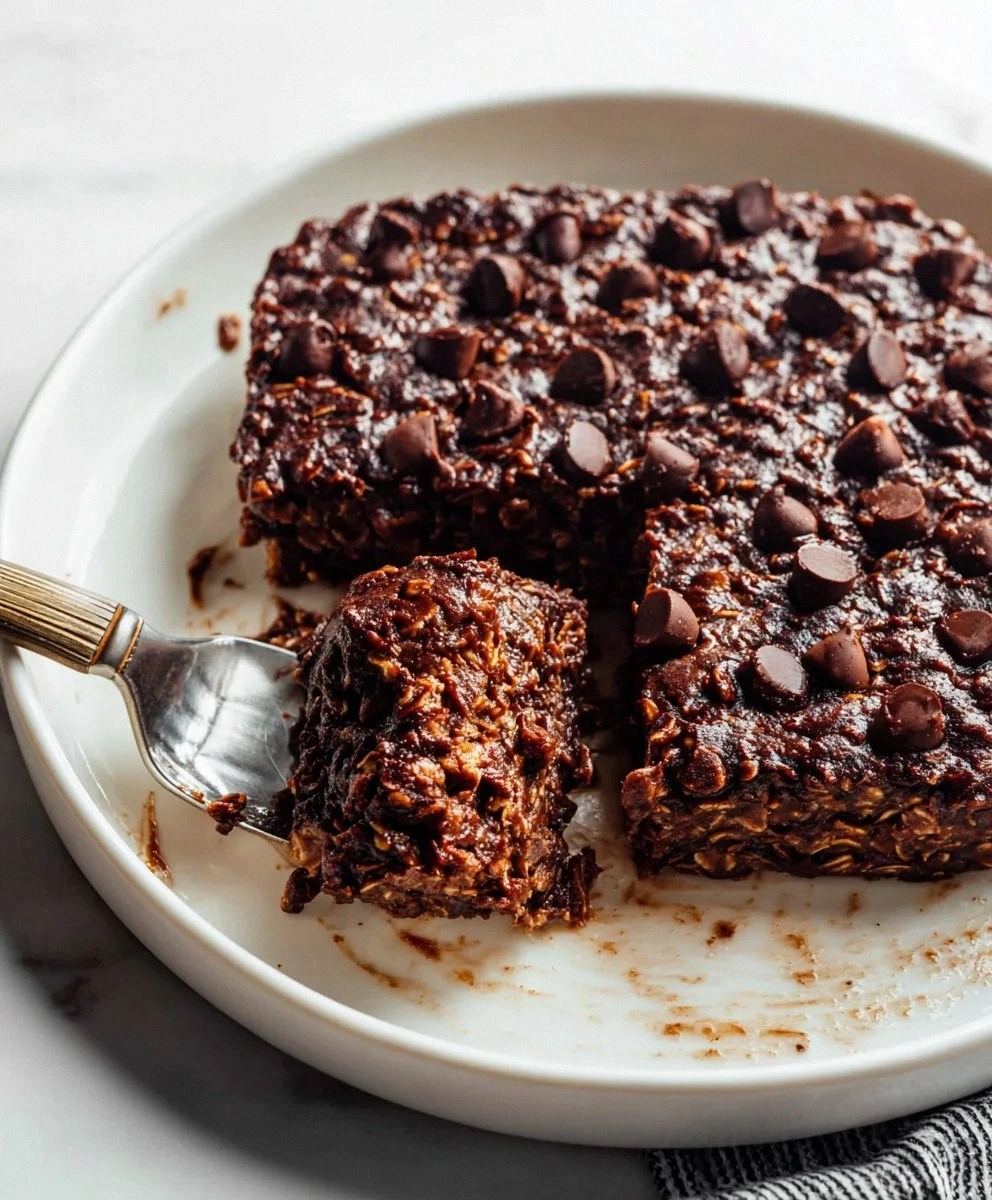
I still remember the morning I accidentally created the most addictive breakfast of my life. I was supposed to be making a sensible, grown-up bowl of oatmeal, but somewhere between the cocoa powder and the chocolate chips, my brain short-circuited and I ended up with what looked like a gooey brownie that just happened to be socially acceptable to eat at 8 a.m. The first forkful was a revelation — soft, almost molten in the center, with those crispy, caramelized edges that crackle like thin ice under your spoon. By the time the pan cooled, I'd already eaten half of it standing at the counter in my pajamas, telling myself it was "quality control."
Picture this: it's raining outside, your favorite playlist is humming in the background, and the entire kitchen smells like a chocolate factory had a beautiful accident with a health food store. That's the magic of these fudgy chocolate baked oats. They deliver all the dopamine-triggering joy of a decadent dessert while still technically counting as breakfast, which means you can face the day feeling like you got away with something magnificent. The texture is what really hooks people — not quite cake, not quite oatmeal, but the best parts of both spooned into one impossible-to-resist square.
I've served this to skeptical coworkers, picky kids, and that one friend who claims they "don't like healthy food," and every single person has asked for the recipe before the plate was empty. The secret lies in the contrast: the deep, almost bitter cocoa playing against the natural sweetness of maple syrup, the nutty richness of almond butter creating pockets of molten chocolate that burst on your tongue like tiny celebrations. If you've ever struggled with dry, sad baked oats that taste like punishment, you're not alone — and I've got the fix that'll change everything.
Let me walk you through every single step — by the end, you'll wonder how you ever made it any other way.
What Makes This Version Stand Out
Most recipes get this completely wrong. They treat baked oats like a health food that needs to apologize for existing, resulting in dry, rubbery squares that taste like regret. Here's what actually works:
- Restaurant-Quality Fudginess: We're talking brownie-level gooeyness that makes you close your eyes involuntarily, achieved through a precise ratio of wet to dry ingredients that took twelve batches to perfect.
- One-Bowl Wonder: Everything mixes in a single bowl, no fancy equipment required, which means fewer dishes and more time for the important things in life — like eating chocolate for breakfast without judgment.
- Meal-Prep Champion: Make a double batch on Sunday, and you've got grab-and-go breakfasts that actually improve in texture after a day in the fridge, becoming even fudgier and more cohesive.
- Allergen-Friendly Flexibility: Gluten-free, dairy-free, and easily nut-free if needed, so everyone at the brunch table can partake in the chocolatey revolution happening in your baking dish.
- Childhood Nostalgia Factor: Tastes like someone blended your favorite chocolate pudding with the comfort of grandma's oatmeal, creating a flavor memory that'll have you craving this at 3 a.m.
- Instagram-Ready Gorgeous: Those cracked, glossy tops and molten centers photograph like a million bucks, making your breakfast the envy of social media and your group chat.
- Energy That Lasts: Complex carbs from oats plus healthy fats from nut butter means no sugar crash at 10 a.m., just steady, focused energy to dominate your morning.
Alright, let's break down exactly what goes into this masterpiece...
Inside the Ingredient List
The Flavor Base
Unsweetened soy milk or oat milk forms the foundation, and here's why this matters more than you'd think. Dairy milk contains proteins that can tighten up during baking, creating a firmer, cake-like texture that fights against our fudgy mission. Plant-based milks stay silky and cooperative, plus they let the chocolate flavor sing without any competing dairy notes. If you only have almond milk, that works too, but soy brings a naturally creamier body that mimics whole milk in the best possible way.
Dutch-processed cocoa powder is non-negotiable if you want that deep, sophisticated chocolate flavor that tastes like it came from a Parisian bakery. Regular cocoa powder is acidic and can give a harsh, almost metallic edge to your baked oats, while Dutch-processed has been alkalized to create smooth, mellow complexity that makes people swoon. Don't substitute with hot cocoa mix — that's basically sugar with a hint of chocolate, and we'll control the sweetness ourselves, thank you very much.
Maple syrup isn't just here for sweetness; it's bringing caramel undertones and moisture that granulated sugar simply can't match. The liquid form integrates seamlessly into the batter, preventing those dry pockets that plague lesser recipes. Plus, maple has this magical way of intensifying chocolate flavor, creating a depth that makes people ask if you used some fancy, expensive chocolate (when really, it's just good chemistry).
The Texture Crew
Gluten-free rolled oats are the backbone, but not all oats are created equal. Look for thick, hearty flakes that still have some backbone — instant oats will dissolve into mush faster than you can say "breakfast disaster." The gluten-free part isn't just for our celiac friends; gluten-free oats are processed in facilities that prevent cross-contamination, ensuring pure oat flavor without any wheaty interference. When you fold them into the batter, they should maintain their identity while still absorbing all that chocolatey goodness.
Peanut butter or almond butter acts as both flavor enhancer and texture magician, creating little pockets of richness that melt on your tongue like chocolate truffles. The natural oils in nut butter coat each oat flake, preventing them from becoming tough during baking while adding a luxurious mouthfeel that makes this feel decadent rather than virtuous. If you're using almond butter, go for the roasted variety — it brings a deeper, more complex flavor that plays beautifully with chocolate.
Ground flaxseed might seem like a health food afterthought, but it's actually performing crucial binding duties while adding a subtle nuttiness that rounds out the flavor profile. When mixed with liquid, flax creates a gel that helps hold everything together without the need for eggs, keeping our recipe vegan-friendly while adding omega-3s that make you feel slightly better about eating chocolate for breakfast. Don't skip this — your baked oats will crumble like a sandcastle at high tide.
The Unexpected Star
Espresso powder is the secret weapon that takes these from good to legendary, and no, it won't make your breakfast taste like coffee. Just a pinch amplifies the chocolate flavor in ways that seem almost supernatural, creating a richness and complexity that has people asking if you used some exotic, single-origin cacao. It's like turning up the contrast on a photo — everything becomes more vivid, more intense, more memorable. If you absolutely must skip it, your baked oats will still be delicious, but you'll be missing that certain je ne sais quoi that makes people addicted.
Dairy-free chocolate chips aren't just a concession to dietary restrictions — they melt more dramatically than their dairy-laden counterparts, creating those glorious rivers of molten chocolate that make grown adults sigh involuntarily. Look for chips with a high cocoa content (60% or higher) for the most intense chocolate experience. They'll hold their shape just enough during baking, then collapse into gooey puddles of joy when you take that first bite.
The Final Flourish
Baking powder might seem boring, but it's the difference between dense, hockey-puck oats and light, tender squares that practically float off the plate. We're using just enough to give lift without creating a cakey texture — think of it as the difference between a brownie and chocolate cake. The goal is fudgy, not fluffy, so don't get tempted to add more for extra rise.
Vanilla extract is like the bass player in a band — you might not notice it when it's there, but you'd definitely miss it if it were gone. A full teaspoon brings warmth and aroma that ties all the chocolate elements together, creating a cohesive flavor that tastes professionally developed. Splurge on real vanilla extract, not the imitation stuff that tastes like sadness and broken dreams.
Salt is the unsung hero that makes everything else taste more like itself. Just a pinch enhances the chocolate's natural complexity while balancing the sweetness so it doesn't become cloying. It's like adding a frame to a painting — suddenly everything looks more intentional, more polished, more perfect.
Everything's prepped? Good. Let's get into the real action...
The Method — Step by Step
- Start by preheating your oven to 350°F (175°C), but here's the trick most people miss — position your rack in the center, not the bottom. The bottom rack creates too much direct heat on the base, leading to overcooked edges and an undercooked center, which is the enemy of fudgy perfection. While the oven heats, grab an 8x8-inch baking dish and lightly grease it with a neutral oil or vegan butter. Don't go crazy with the greasing — just enough to prevent sticking, because too much fat will fry the bottom and create a weird, crispy layer that fights against our tender goals.
- In a large bowl, whisk together the soy milk, maple syrup, peanut butter, and vanilla extract until you have a smooth, glossy mixture that looks like liquid caramel. The peanut butter might resist incorporation at first, but keep whisking — it'll surrender eventually and create an emulsion that ensures every bite has consistent flavor. This step is crucial because if you add the dry ingredients directly to the peanut butter without creating this base, you'll end up with stubborn pockets of nut butter that never fully integrate, creating weird, dense spots in your finished product.
- Now add the ground flaxseed and let the mixture sit for exactly five minutes. This isn't just some health food nonsense — the flax is creating a gel that will bind everything together in the absence of eggs. You'll notice the mixture thickening and becoming slightly viscous, which is exactly what you want. If you skip this resting period, your baked oats will crumble like a house of cards in a hurricane, and nobody wants to eat their breakfast with a spoon because it won't hold together.
- While the flax does its magic, in a separate bowl, whisk together the rolled oats, cocoa powder, baking powder, espresso powder, and salt. This step ensures the leavening agent gets evenly distributed, preventing weird rising patterns that can create a lumpy, uneven texture. The espresso powder should disappear completely into the cocoa — if you see little brown flecks, keep whisking. This dry mixture should smell like a chocolate shop had a beautiful accident with a coffee roastery, making you question why you don't whisk cocoa powder more often just for the aromatherapy benefits.
- Gradually fold the dry ingredients into the wet mixture using a spatula, not a whisk — we're making baked oats, not whipped cream. The batter will seem impossibly thick at first, like you're trying to fold concrete, but resist the urge to add more liquid. As the oats absorb moisture, they'll create exactly the right consistency for fudgy results. Fold just until combined — overmixing develops gluten (even in gluten-free oats) and creates tough, chewy results that will make you sad and disappointed in yourself.
- Now comes the moment of truth — fold in three-quarters of the chocolate chips, saving the rest for the top. The chips should be evenly distributed but not melted from overmixing. If your kitchen is warm and the chips start getting soft, pop the whole bowl in the freezer for two minutes. This ensures the chips maintain their integrity during baking, creating those glorious pockets of molten chocolate that make people close their eyes in bliss.
- Pour the batter into your prepared pan and spread it evenly with your spatula, pushing it into the corners and creating a slightly domed center. This shape ensures even baking — the center will settle as it cooks, creating that perfect, fudgy middle. Sprinkle the remaining chocolate chips on top, pressing them in just slightly so they don't all sink to the bottom. These surface chips will create a glossy, crackly top that's Instagram-worthy and adds textural contrast to the tender interior.
- Bake for 25-30 minutes, but here's where you need to channel your inner pastry detective. Start checking at 22 minutes — the edges should look set and slightly pulled away from the sides, while the center should still jiggle slightly when you gently shake the pan. If you wait until a toothpick comes out clean, you've gone too far and ended up with chocolate-flavored drywall. The center should seem underbaked — it will continue cooking from residual heat and set to perfect fudginess as it cools.
- Let the baked oats cool in the pan for exactly 10 minutes before cutting. I know, I know — the smell is driving you insane and you want to dive in with a spoon, but patience here is what separates amateurs from legends. During this cooling period, the structure sets up, the chocolate chips settle into their final gooey state, and the flavors meld into something greater than the sum of their parts. If you cut too early, you'll have chocolate lava everywhere; too late and you'll miss that perfect warm-fudgy window that makes this experience transcendent.
That's it — you did it. But hold on, I've got a few more tricks that'll take this to another level...
Insider Tricks for Flawless Results
The Temperature Rule Nobody Follows
Your ingredients should all be at room temperature before mixing — cold milk will cause the peanut butter to seize up into stubborn lumps that refuse to incorporate, creating weird, dense pockets in your finished product. Take everything out of the fridge 30 minutes before you start, or if you're impatient like me, microwave the milk for 15 seconds and let the peanut butter sit on the counter while you gather everything else. This simple step ensures smooth, even mixing and prevents the batter from looking curdled and sad.
But here's the real game-changer — once your baked oats come out of the oven, let them cool for exactly 10 minutes, then cover the pan loosely with foil. This traps just enough steam to keep the centers molten while allowing the edges to set properly. It's like creating a little chocolate spa for your breakfast, and the results are so dramatically better that you'll wonder why every recipe doesn't include this step.
Why Your Nose Knows Best
Don't rely on timers alone — your nose is the most sophisticated piece of kitchen equipment you own. When these baked oats are perfectly done, your kitchen will smell like a chocolate shop that's been taken over by someone who really understands breakfast. The scent should be deep and complex, not sharp or burnt. If you start smelling something that reminds you of hot chocolate made by someone who really loves you, that's your cue to start checking for doneness.
A friend tried skipping the aroma check once — pulled them out when the timer rang without doing the smell test. Ended up with chocolate-scented cardboard that even her dog refused to eat. Trust your senses; they've been honed over thousands of years of human evolution specifically to prevent breakfast disasters.
The 5-Minute Rest That Changes Everything
After baking, resist the urge to immediately cut into that chocolatey masterpiece. The residual heat continues cooking the center while the structure sets up, creating that perfect fudgy texture that makes people make involuntary happy noises. During this rest, the chocolate chips settle into their final gooey state, the flavors meld and deepen, and the whole thing transforms from merely delicious to absolutely transcendent.
I dare you to taste this after the full rest period and not go back for seconds — it's physically impossible. The texture will have set into that perfect balance of tender and fudgy, while the chocolate flavor develops complexity that wasn't there five minutes earlier. It's like the difference between a good chocolate bar and one that's been patiently waiting for you to appreciate it properly.
Creative Twists and Variations
This recipe is a playground. Here are some of my favorite ways to switch things up:
Cherry Garcia Remix
Fold in 1/2 cup of chopped dried cherries along with the chocolate chips, and add 1/4 teaspoon of almond extract to the wet ingredients. The cherries bring a tart pop that cuts through the richness while the almond extract creates that nostalgic ice cream shop flavor. Top with fresh cherries when they're in season for a breakfast that tastes like summer vacation in food form. People who grew up loving cherry chocolate anything will lose their minds over this version.
Salted Caramel Swirl
Dollop 3 tablespoons of vegan caramel sauce over the top before baking, then use a toothpick to create dramatic swirls. Finish with flaky sea salt for that sophisticated sweet-salty balance that makes it impossible to stop at one piece. The caramel creates little pockets of gooey sweetness that complement the deep chocolate flavor perfectly. This version is what you serve when you want to impress people who think they don't like "healthy" food.
Orange Chocolate Dreams
Add the zest of one orange to the wet ingredients and substitute orange extract for half the vanilla. The citrus oils in the zest create a bright, sophisticated flavor that makes the chocolate taste more expensive than it is. This combination reminds people of those fancy chocolate oranges you get at Christmas, but in breakfast form. It's particularly magical on gray winter mornings when you need edible sunshine.
Peanut Butter Cup Explosion
Swirl 3 tablespoons of peanut butter into the top of the batter before baking, then press whole chocolate chips into the peanut butter ribbons. The peanut butter gets slightly crispy on top while staying creamy underneath, creating multiple textures in every bite. This is what you make for the person in your life who believes peanut butter and chocolate is the ultimate flavor combination (because they're right).
Mexican Chocolate Heat
Add 1/2 teaspoon of cinnamon and a pinch of cayenne to the dry ingredients. The warming spices create a subtle heat that builds slowly, making the chocolate taste deeper and more complex. Serve with a dollop of coconut whipped cream to cool the heat and add another layer of flavor. This version is perfect for people who like their breakfast with a little adventure.
White Chocolate Raspberry
Substitute white chocolate chips for half the regular chips and fold in 1/2 cup of fresh or frozen raspberries. The tart berries against the sweet white chocolate creates a flavor profile that tastes like you spent way more time on this than you actually did. The raspberries create beautiful magenta swirls through the chocolate base that looks as good as it tastes.
Storing and Bringing It Back to Life
Fridge Storage
Once completely cooled, cut into squares and store in an airtight container in the refrigerator for up to 5 days. The texture actually improves after the first day — the oats absorb more moisture and become even fudgier, creating a texture that's closer to a chocolate truffle than breakfast food. Separate layers with parchment paper to prevent them from sticking together, though honestly, they're usually gone long before this becomes an issue.
Freezer Friendly
These freeze beautifully for up to 3 months. Wrap individual squares in plastic wrap, then store in a freezer bag. Thaw overnight in the refrigerator or at room temperature for 30 minutes. For the ultimate experience, warm them slightly in the microwave for 15-20 seconds — just enough to take the chill off without making them hot. The chocolate chips re-melt into glorious gooey pockets that taste like they just came out of the oven.
Best Reheating Method
Add a tiny splash of water before reheating — it steams back to perfection. Microwave for 15-20 seconds or warm in a 300°F oven for 5 minutes. The water creates steam that rehydrates the oats without making them soggy, bringing back that just-baked texture. If you're feeling fancy, reheat in a skillet with a tiny bit of vegan butter for crispy edges that add incredible textural contrast to the fudgy center.