I still remember the night I was standing in my cramped kitchen, staring at a bag of frozen chicken tenderloins that had been sitting in the freezer for what felt like a decade. I had a craving for something crispy, cheesy, and utterly comforting, but every recipe I found was either too bland or too complicated. I was determined to turn that desperation into a culinary triumph, and what emerged was a dish that has become the cornerstone of my weekly dinner plans. Picture this: golden, crunch‑laden tenders, a silky cheese sauce that clings to every bite, and bacon that adds a smoky, savory punch. If you’re ready to upgrade your comfort food game, buckle up, because we’re about to dive into the ultimate version of crack chicken tenders.
Imagine the aroma of garlic powder and onion powder dancing in the air as you drizzle olive oil over the chicken. The sizzle that follows is like a tiny fireworks show, signaling that the magic is beginning. The moment the cheese starts to melt into a glossy, velvety coating, you’ll hear the faint hiss of steam—a sound that promises indulgence with every bite. And as you lift the first tender, the crunch is crisp, the edges golden, and the interior tender, delivering a texture contrast that feels like a well‑orchestrated symphony. That instant, that first bite, is the moment you’ll tell yourself, “I dare you to taste this and not go back for seconds.”
I’ve spent months tweaking the proportions, experimenting with different cheeses, and finding the perfect balance of seasoning. The result? A dish that’s hands down the best version you’ll ever make at home. I’ve even found myself sneaking a second batch before anyone else gets a taste. Most recipes get this completely wrong, but here’s what actually works: a simple seasoning blend, a creamy cheese sauce that coats like velvet, and bacon that adds that smoky crunch. Picture yourself pulling this out of the oven, the whole kitchen smelling incredible, and knowing that you’ve just created something that will become a staple for weeks to come. Stay with me here—this is worth it.
Let me walk you through every single step — by the end, you’ll wonder how you ever made it any other way.
What Makes This Version Stand Out
- Taste: The blend of ranch seasoning, sharp cheddar, and creamy cream cheese creates a flavor profile that’s rich, tangy, and comforting all at once. It’s the kind of taste that makes you reach for more, even when you’re already full.
- Texture: The chicken remains juicy inside while the coating turns irresistibly crisp. The cheese sauce’s silky consistency melts into the tender’s interior, creating a mouth‑watering contrast.
- Ingredient Quality: Using fresh, high‑quality bacon and real cheddar ensures depth of flavor that pre‑packaged mixes can’t match. The bacon’s smoky undertones elevate the entire dish.
- Convenience: The entire recipe takes less than an hour from start to finish, yet feels indulgent enough to impress guests or satisfy a midnight craving.
- Versatility: It’s a crowd‑pleaser that works for parties, family dinners, or a quick weekday meal. The flavor profile is adaptable to different spice levels or dietary tweaks.
- Make‑Ahead Potential: The cheese mixture can be pre‑made and chilled, while the chicken can be marinated overnight, saving you time on busy nights.
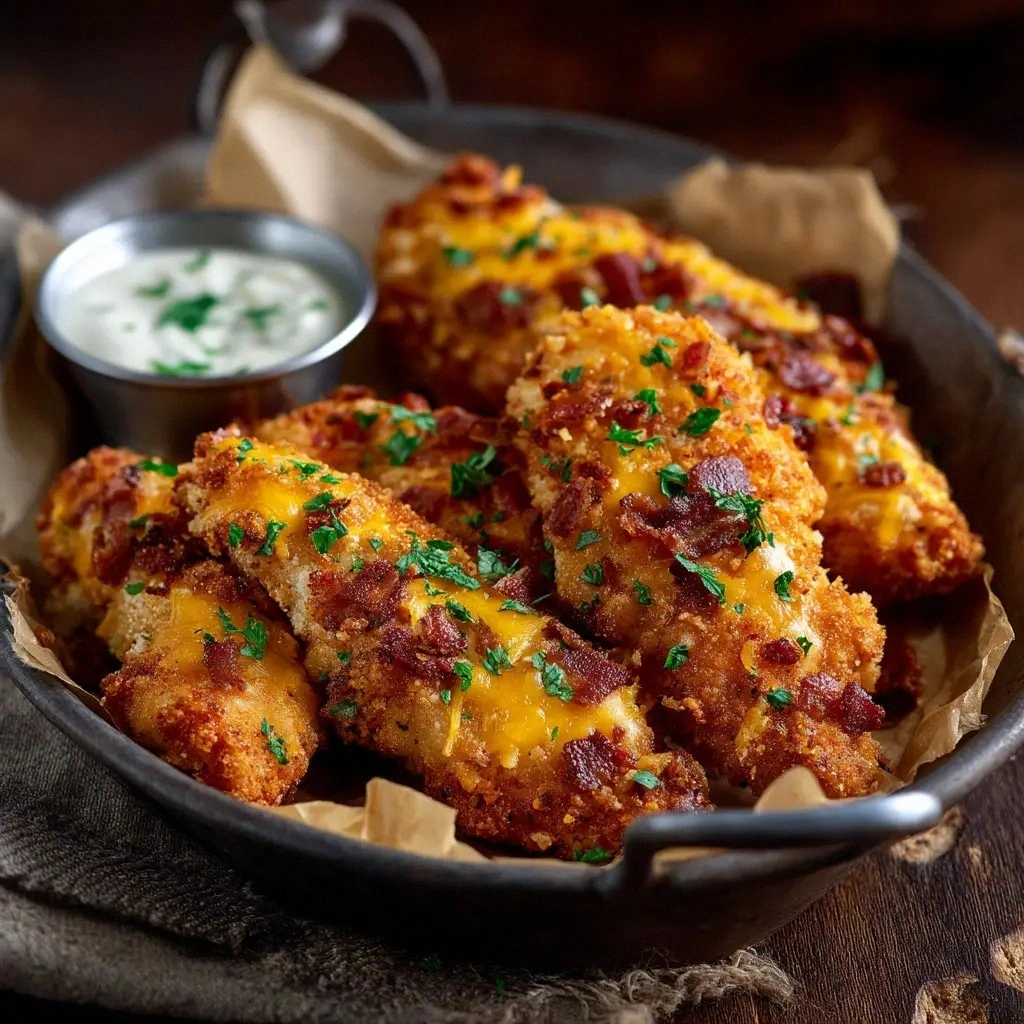
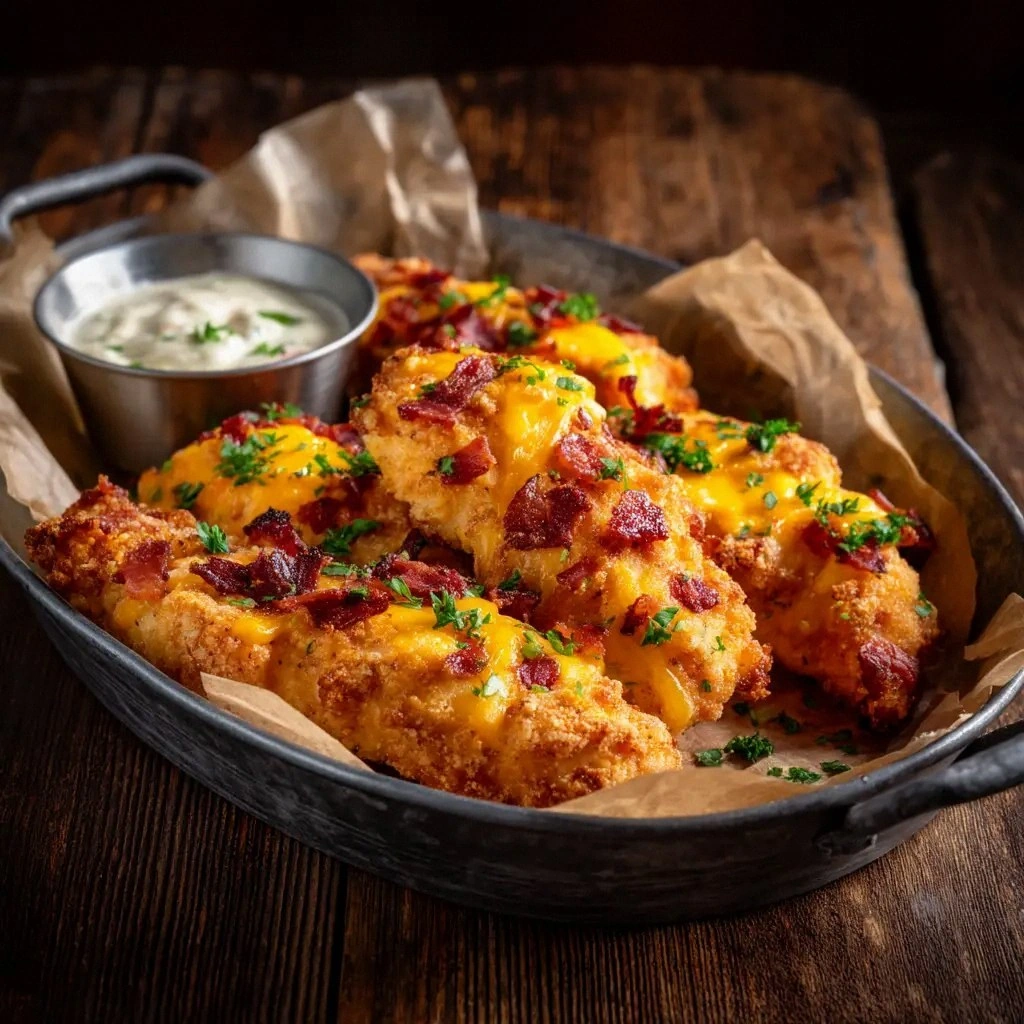
- Visual Appeal: The golden crust, melted cheese glaze, and peppered bacon bits make for a dish that’s as pleasing to the eye as it is to the palate.
- Budget‑Friendly: Despite its gourmet feel, the ingredients are affordable, making this a high‑value comfort dish.
Alright, let's break down exactly what goes into this masterpiece...
Inside the Ingredient List
The Flavor Base
Olive oil is the unsung hero that brings everything together, providing a silky canvas for the seasonings to shine. Garlic powder and onion powder infuse the chicken with aromatic depth, while a pinch of salt and black pepper enhance the natural flavors. If you skip the seasoning blend, the dish will taste flat and uninspired, lacking that savory lift that makes every bite memorable.
The Texture Crew
The chicken tenderloins themselves are the star of the show. Fresh, firm chicken retains its juiciness, whereas older or frozen meat can become rubbery. Marinating the tenderloins in olive oil and seasonings for at least 15 minutes helps the flavors penetrate and keeps the meat tender during cooking.
The Unexpected Star
Cream cheese is the secret to that luxuriously smooth, velvety coating that clings to each tender. It melts into a silky sauce that balances the sharpness of cheddar and the smokiness of bacon. If you skip it, the sauce will be thin and watery, and the tenders will lack that decadent mouthfeel.
The Final Flourish
Bacon adds a savory, smoky crunch that elevates the dish from simple to unforgettable. Cooked bacon should be crisp yet pliable, so it can be chopped into bite‑sized pieces without falling apart. A dry ranch seasoning packet ties all the elements together, providing a tangy, herbaceous backdrop that brings the flavors to life.
Everything's prepped? Good. Let's get into the real action...
The Method — Step by Step
- First, preheat your oven to 400°F (200°C). While the oven heats, pat the chicken tenderloins dry with paper towels to ensure a crisp exterior. Toss the chicken in a large bowl with olive oil, garlic powder, onion powder, salt, and black pepper until each piece is evenly coated. This step is crucial; a well‑seasoned chicken will have a deeper flavor profile.
- Lay the seasoned tenderloins on a parchment‑lined baking sheet in a single layer. Bake for 12–15 minutes, flipping halfway through, until the edges are golden and the internal temperature reaches 165°F (74°C). The goal is a crispy crust that still keeps the inside juicy.
- While the chicken bakes, melt the cream cheese in a small saucepan over medium heat, stirring constantly to prevent scorching. Once the cream cheese is smooth, fold in the shredded cheddar and dry ranch seasoning until the mixture is silky and well‑combined. This sauce will coat each tender like a velvety blanket.
- Remove the chicken from the oven and let it rest for 2 minutes; this helps the juices redistribute. In the meantime, crumble the cooked bacon into bite‑sized pieces and set aside. Bacon adds that smoky crunch that makes this dish unforgettable.
- Brush or drizzle the cheese sauce over the hot chicken tenders, ensuring every surface is coated. The sauce should be thick enough to cling but still pourable enough to cover each piece. If you find the sauce too thick, add a splash of milk or a bit more cream cheese.
- Scatter the bacon pieces evenly over the sauce‑covered chicken. The bacon will melt slightly, creating a savory glaze that adds both flavor and texture. This step is where the dish truly transforms into a gourmet experience.
- Return the chicken to the oven for an additional 5 minutes, just long enough to melt the cheese sauce into a golden glaze. Keep a close eye on the temperature; you want a beautiful crust without burning.
- Remove the chicken from the oven and let it rest for another minute. Sprinkle sliced green onions over the top for a fresh, herbal finish. Serve immediately while the cheese is still molten and the bacon is crisp.
That's it — you did it. But hold on, I've got a few more tricks that'll take this to another level...
Insider Tricks for Flawless Results
The Temperature Rule Nobody Follows
Many cooks bake at 375°F, but 400°F is the sweet spot for a crisp crust while keeping the inside moist. The higher temperature creates a Maillard reaction that gives the chicken a golden, caramelized surface. If you bake too low, the tenders can end up soggy and the cheese sauce may not set properly.
Why Your Nose Knows Best
Close your eyes and sniff the chicken as it cooks. A subtle, buttery aroma signals the perfect moment to flip the tenders. If you notice a faint burnt smell, the pan is too hot, and you’ll need to lower the heat or rotate the baking sheet.
The 5‑Minute Rest That Changes Everything
Letting the chicken rest for 5 minutes after baking allows the juices to redistribute, preventing a dry bite. The rest period also gives the cheese sauce time to thicken slightly, ensuring it coats the chicken evenly when you add the bacon.
The Crumbly Bacon Secret
To get bacon that’s crisp yet not too greasy, cook it in a cold pan and then finish in the oven at 400°F for a few minutes. This method removes excess fat while preserving the smoky flavor, giving the dish a clean, crunchy texture.
The Green Onion Finale
Sliced green onions add a bright, fresh contrast to the rich, cheesy base. They also provide a subtle onion flavor that cuts through the heaviness of the sauce. Sprinkle them just before serving for maximum freshness.
Creative Twists and Variations
This recipe is a playground. Here are some of my favorite ways to switch things up:
Spicy Jalapeño Kick
Add finely chopped jalapeños to the cheese sauce for a fiery punch. The heat pairs beautifully with the smoky bacon, creating a dish that satisfies both the sweet and the spicy.
Mediterranean Twist
Replace the ranch seasoning with a blend of oregano, thyme, and lemon zest. Swap the cheddar for feta and sprinkle chopped kalamata olives on top for a Mediterranean flavor profile.
Vegan Version
Use plant‑based chicken strips, dairy‑free cream cheese, and vegan cheddar. Substitute bacon with crispy tempeh or smoked tofu for the smoky crunch. The result is a plant‑based delight that still delivers on flavor.
Breakfast Bonanza
Serve the tenders with a side of scrambled eggs and hash browns. Top with a drizzle of hot sauce or a sprinkle of fresh herbs for a hearty breakfast that feels like a treat.
Gluten‑Free Upgrade
Use a gluten‑free flour blend to coat the chicken before baking, or simply bake the chicken without any coating. The result is a gluten‑free version that still has that crispy exterior and creamy interior.
Dessert‑Inspired Sweet & Salty
Add a dash of brown sugar to the cheese sauce and top the finished dish with a drizzle of honey. The sweet caramel notes contrast the savory bacon, creating a unique flavor experience.
Storing and Bringing It Back to Life
Fridge Storage
Store the cooked tenders in an airtight container in the refrigerator for up to 3 days. Keep the cheese sauce separate to prevent it from soaking into the chicken. Reheat in the oven at 350°F until warmed through, about 10 minutes.
Freezer Friendly
Pack the tenders in a single layer on a baking sheet, freeze until solid, then transfer to a freezer bag. They’ll stay fresh for up to 2 months. Thaw in the refrigerator overnight before reheating.
Best Reheating Method
Add a tiny splash of water to the cheese sauce before reheating to restore its silky texture. Microwave on medium for 1 minute, then stir; or bake at 350°F for 8–10 minutes. The result is a reheated dish that tastes almost brand‑new.