I was halfway through a chaotic Sunday dinner when the kitchen clock started ticking down the seconds to a disastrous overcooked casserole. The pot was boiling over, the cheese was clumping like a stubborn lump of guilt, and my family’s hungry faces were a reminder that culinary catastrophes happen to the best of us. I grabbed the Instant Pot, flipped the switch, and whispered a prayer for a miracle. The moment the timer chirped, I tasted a burst of velvety, perfectly melted cheese that made me feel like I’d just discovered a hidden treasure in my own kitchen.
Imagine the aroma of sharp cheddar and creamy mozzarella swirling around you, the sound of bubbling milk, and the sight of golden, buttery breadcrumbs that crackle when they hit the pan. The texture is a harmonious blend of al dente pasta, silky sauce, and a crispy finish that shatters like thin ice when you bite into it. The flavor is rich yet balanced, with a subtle peppery kick that wakes the palate without overpowering the cheeses. The heat is comforting, the smell is inviting, and the overall experience feels like a hug from your favorite aunt—only with less drama and more cheese.
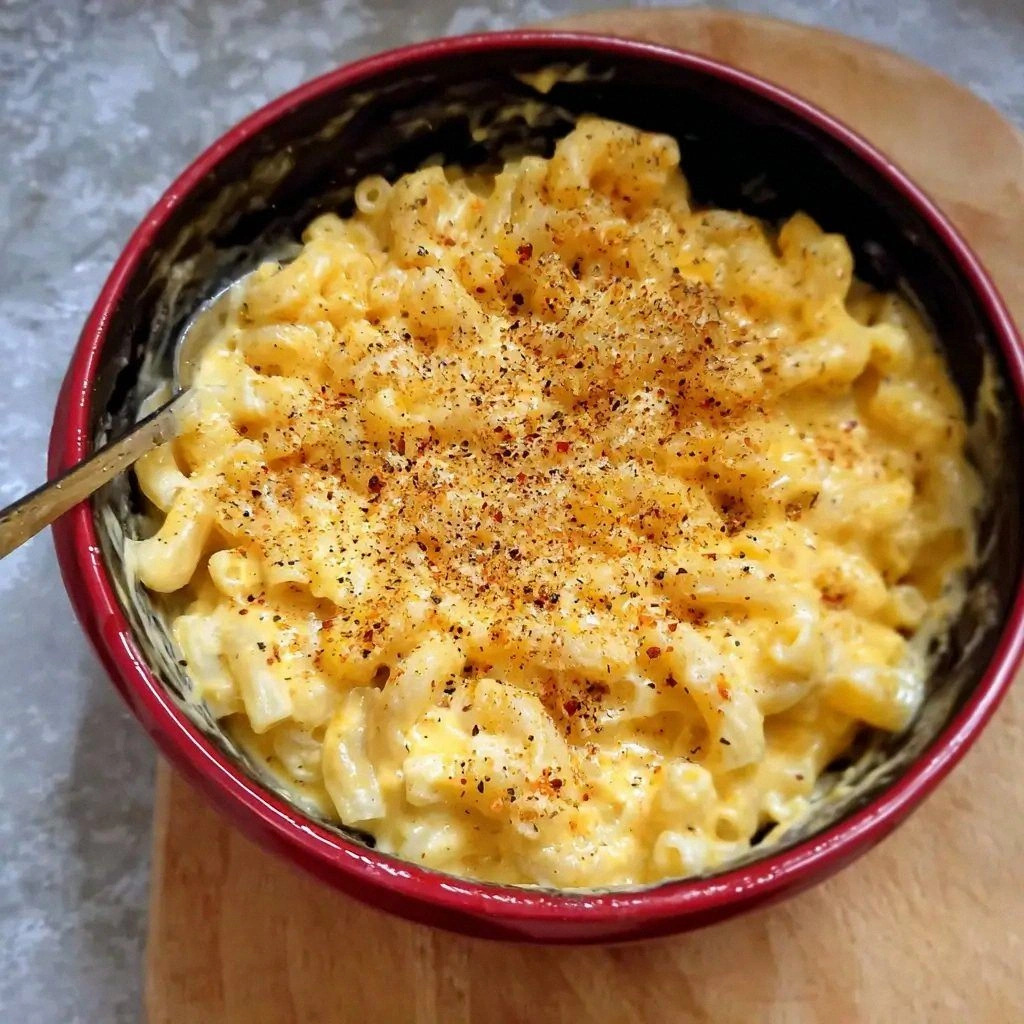
This isn’t just another mac and cheese; it’s the definitive Instant Pot version that turns a humble dish into a showstopper. The secret? A layered cheese strategy that creates a silky coating on each noodle, a quick‑pressure technique that locks in moisture, and a finishing breadcrumb crunch that adds texture and visual appeal. Most recipes get this completely wrong by mixing all the cheeses at once or overcooking the pasta. Here, the cheese is added in stages to preserve flavor and texture. The result is a dish that’s creamy, indulgent, and still light enough to serve for dinner or a comforting lunch.
I dare you to taste this and not go back for seconds. Picture yourself pulling this out of the pot, the whole kitchen smelling incredible, and watching the steam rise like a cloud of buttery clouds. If you’ve ever struggled with the classic “cheese too clumpy” problem, you’re not alone—and I’ve got the fix. Let me walk you through every single step—by the end, you’ll wonder how you ever made it any other way.
What Makes This Version Stand Out
- Taste: The triple‑cheese blend delivers a layered flavor profile that evolves with each bite—from sharp cheddar to mellow mozzarella to nutty parmesan. Each cheese melts at a different temperature, creating a silky, velvety coating that clings to the pasta.
- Texture: The Instant Pot locks in moisture while preventing the pasta from becoming mushy. The result is al dente noodles surrounded by a creamy sauce that doesn’t separate.
- Speed: From prep to finish, the entire process takes under an hour, making it a perfect solution for busy week‑night dinners.
- Versatility: Whether you’re feeding a family of four or prepping leftovers for the next day, the recipe scales up or down without compromising flavor.
- Crispy Finish: The breadcrumb topping adds a delightful crunch that contrasts with the silky sauce, elevating the dish from comfort food to gourmet.
- All‑in‑One: The Instant Pot eliminates the need for a separate stovetop or oven, simplifying cleanup and reducing the chance of overcooking.
Alright, let's break down exactly what goes into this masterpiece…
Inside the Ingredient List
The Flavor Base
Whole milk and heavy cream form the backbone of the sauce, providing a rich, velvety texture that carries the cheeses. Whole milk adds body, while heavy cream boosts the creaminess and helps prevent the sauce from separating. Together, they create a sauce that coats the pasta like silk, ensuring every bite is a melt‑in‑your‑mouth experience. If you’re watching calories, you can swap the heavy cream for half‑and‑half, but the sauce will be slightly lighter.
The Texture Crew
Elbow macaroni is the star of the show because its ridges hold sauce and its shape resists overcooking. Using a high‑quality, whole‑wheat or protein‑fortified pasta adds a nutty flavor and a boost of fiber. If you prefer a different shape, try cavatappi or shells—they’ll hold the sauce just as well. Avoid instant or pre‑cooked pasta; the pressure cooking step will cook the noodles to perfection.
The Unexpected Star
Breadcrumbs might seem like an afterthought, but they’re the secret to that coveted crunch. Toasted breadcrumbs add texture and a nutty undertone that complements the cheeses. If you’re gluten‑free, use almond or coconut flour breadcrumbs, or sprinkle a handful of crushed pretzels for a different crunch. The breadcrumbs also help absorb excess moisture, keeping the dish from becoming soupy.
The Final Flourish
Fresh parsley not only brightens the dish visually but also adds a fresh, herbal note that cuts through the richness of the cheeses. A splash of lemon zest or a pinch of cayenne pepper can elevate the flavor profile further, adding a subtle zing. For a smoky twist, sprinkle a dash of smoked paprika over the top before broiling. These final touches transform a simple comfort dish into a gourmet experience.
Everything’s prepped? Good. Let’s get into the real action…
The Method — Step by Step
- Gather and Measure: Before you even touch the pot, lay out all ingredients on your counter. This saves time and ensures you’re not scrambling for a missing spice halfway through. It also gives you a chance to appreciate the colors and textures before the cooking begins.
- Turn on Sauté: Set the Instant Pot to sauté mode, add the butter, and let it melt until it turns a light golden hue. The butter’s fat content helps carry the garlic powder and creates a subtle nutty aroma that signals the sauce is ready to absorb flavors.
- Infuse the Garlic: Sprinkle the garlic powder over the melted butter and stir for 30 seconds. The heat releases the garlic’s oils, giving the sauce a gentle, aromatic base that doesn’t overpower the cheeses.
- Add Pasta: Toss in the elbow macaroni, stirring to coat each piece in butter. This step prevents the noodles from sticking together and gives them a subtle, toasted flavor before the pressure cooking.
- Pour the Dairy: Add the whole milk, heavy cream, salt, pepper, and paprika. Stir until the mixture is evenly distributed; you should see a slight sheen forming on the surface of the liquid. This creates a silky base that will carry the cheeses.
- Pressure Cook: Secure the lid, set the valve to sealing, and cook on high pressure for 5 minutes. The Instant Pot will bring the mixture to a gentle boil, cooking the pasta while keeping the sauce from scorching.
- Quick Release: Once the timer beeps, perform a quick release by carefully turning the valve to venting. This stops the cooking process immediately and prevents the pasta from becoming mushy. Don’t let the steam escape too slowly; you’re aiming for a crisp finish, not a soggy one.
- Stir in Cheeses: Open the pot, add the cheddar, mozzarella, and parmesan. Stir vigorously until the cheeses melt into a smooth, glossy sauce that clings to every noodle. The heat from the pot is just enough to melt the cheeses without scorching them.
- Finish with Breadcrumbs: Sprinkle the breadcrumbs over the top and switch the Instant Pot back to sauté mode. Let them toast for 2-3 minutes, stirring occasionally, until they’re golden brown and fragrant. The breadcrumb layer adds a satisfying crunch and a buttery, nutty flavor that contrasts beautifully with the creamy sauce.
- Serve Immediately: Transfer the mac and cheese to a serving dish, drizzle with fresh parsley, and enjoy while it’s hot and bubbling. If you prefer a crispier top, slide the dish under a preheated broiler for 1-2 minutes—just watch it closely to avoid burning.
Insider Tricks for Flawless Results
The Temperature Rule Nobody Follows
The Instant Pot’s “Keep Warm” mode is a secret weapon. After the final sauté, switch the pot to keep warm for 5-10 minutes. This allows the flavors to meld and the sauce to thicken without overcooking the pasta. It also gives the breadcrumbs a chance to crisp up slightly while the cheese continues to melt.
Why Your Nose Knows Best
Before you add the cheeses, pause and inhale the aroma of the sautéed garlic and butter. If the scent feels off or burnt, it’s a sign the butter might have browned too much. Adjust the heat or add a splash of milk to restore balance. Your nose is a reliable guide to avoid a burnt, bitter sauce.
The 5‑Minute Rest That Changes Everything
After the pressure release, let the pot sit for 5 minutes before opening. This resting period allows the residual heat to finish cooking the pasta and lets the sauce thicken naturally. It also reduces the chance of splattering when you stir in the cheeses.
Use a Silicone Spoon for Mixing
A silicone spoon or spatula is ideal for stirring the cheese into the sauce. It resists heat, doesn’t scratch the inner pot, and helps prevent the cheese from clinging to the sides. A wooden spoon can cause the cheese to stick and create uneven melting.
Add a Splash of Lemon Juice
A teaspoon of fresh lemon juice added after the cheeses melt brightens the dish and cuts through the richness. It also helps the cheeses stay glossy rather than becoming opaque. This small tweak transforms the sauce from indulgent to refreshing.
Creative Twists and Variations
This recipe is a playground. Here are some of my favorite ways to switch things up:
Spicy Cajun Mac
Add a teaspoon of Cajun seasoning and a dash of hot sauce to the milk mixture before cooking. The spicy kick pairs perfectly with the smoky breadcrumb topping, creating a dish that’s both comforting and adventurous.
Vegan Creamy Mac
Swap the dairy for coconut milk, use vegan cheddar and mozzarella, and replace the breadcrumbs with crushed almond flour. The result is a silky, dairy‑free version that still delivers the classic mac and cheese experience.
Sausage & Pepper Mac
Sauté sliced Italian sausage and diced bell peppers before adding the pasta. The savory sausage and sweet peppers add depth and make the dish hearty enough for a main course.
Mushroom & Truffle Mac
Sauté sliced mushrooms with a splash of white wine, then stir them into the sauce. A drizzle of truffle oil before serving elevates the dish to a decadent, restaurant‑style experience.
Cauliflower Mac
Replace half the pasta with cauliflower florets. The cauliflower absorbs the sauce beautifully and adds a subtle, earthy flavor that keeps the dish lighter.
Herb‑Infused Mac
Add a handful of chopped fresh herbs—basil, oregano, thyme—when you add the cheeses. The herbs release their aroma and flavor, creating a fresh, vibrant finish.
Storing and Bringing It Back to Life
Fridge Storage
Cool the mac and cheese to room temperature, then transfer it to an airtight container. Store in the refrigerator for up to 3 days. The sauce will thicken slightly, but it remains creamy and flavorful.
Freezer Friendly
For longer storage, portion the dish into freezer‑safe containers and freeze for up to 2 months. Thaw overnight in the refrigerator before reheating. The texture may change slightly, but the flavor stays intact.
Best Reheating Method
Reheat in the microwave on medium power for 2-3 minutes, stirring halfway through. Add a splash of milk or cream to loosen the sauce, then finish on the stovetop with a quick sauté to re‑crisp the breadcrumbs. The dish will taste as good as when it was first made.