I remember the night I was halfway through a batch of cookie dough, the kitchen smelling like a chocolate factory on fire, when my friend dared me to turn it into brownies. I laughed, grabbed the nearest bowl, and thought, “Why not?” The result was a fudgy, protein-packed treat that felt like a secret handshake between indulgence and nutrition. That moment was a disaster turned triumph, and it sparked a craving that I could not ignore for weeks.
Picture the scene: a countertop strewn with Medjool dates, almond flour, and protein powders, the air thick with the sweet scent of maple syrup. You hear the clink of a measuring cup, feel the silky texture of cottage cheese as it swirls into the batter, and taste the faint bitterness of cocoa that balances the sweetness. Every sense is engaged, making the process feel like a ritual rather than a chore. The anticipation builds, and you can almost taste the first bite even before the oven timer clicks.
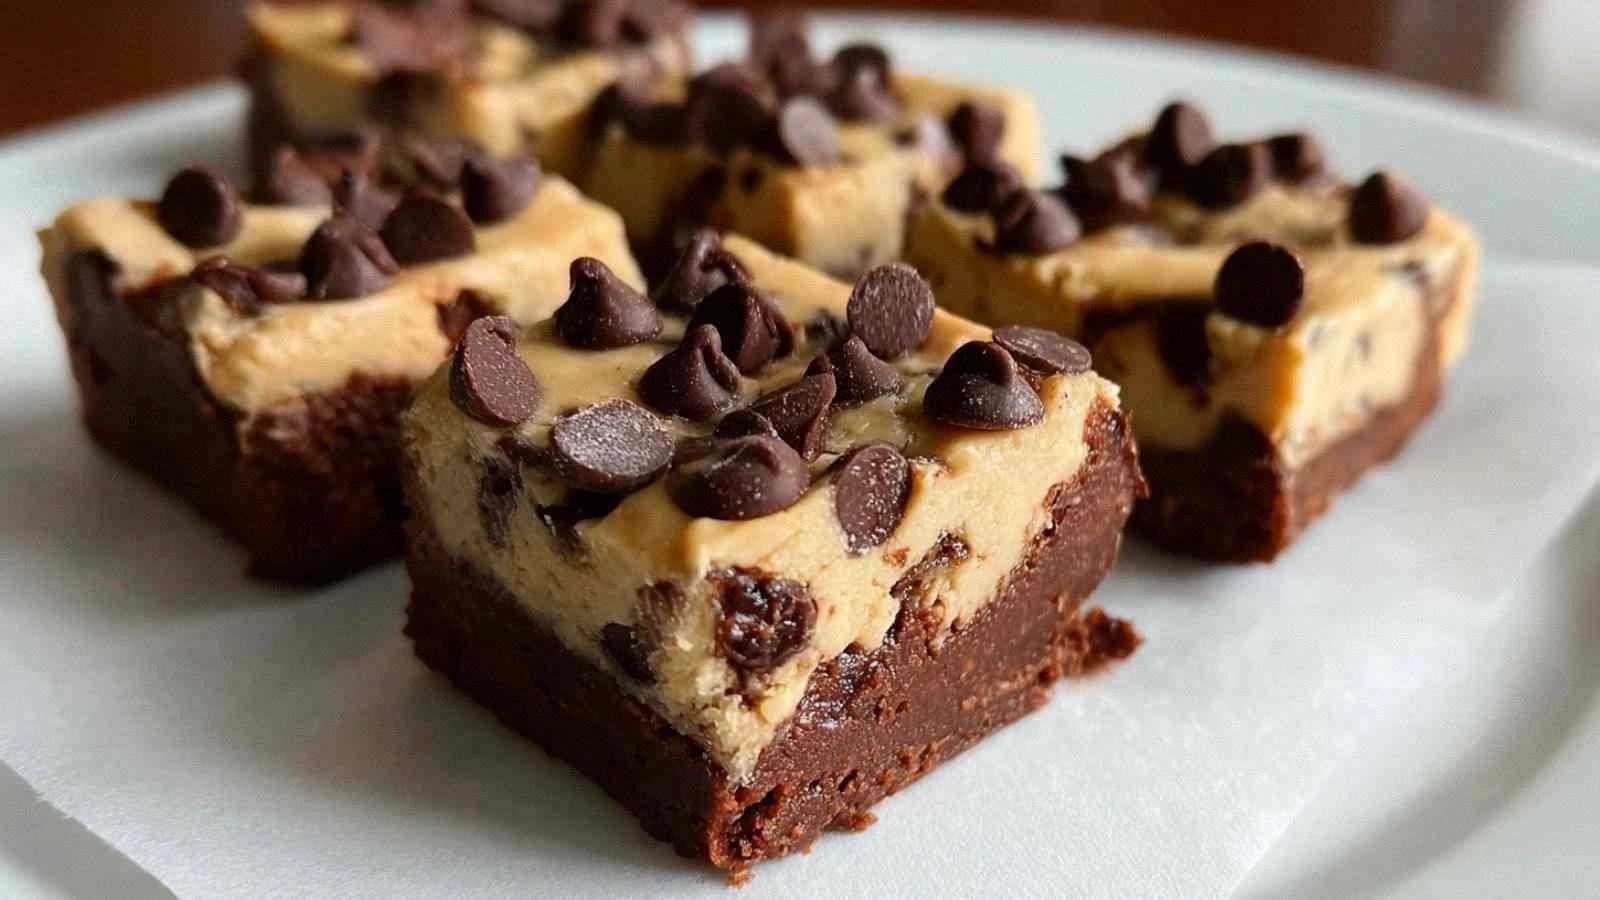
What sets this version apart is that it doesn’t just combine ingredients—it orchestrates them into a symphony of flavor and texture. The protein powders provide structure, the dates add natural sweetness and moisture, and the almond flour keeps the brownies dense yet tender. The chocolate chips are folded in at the end, creating pockets of gooeyness that burst with each bite. I dare you to taste this and not go back for seconds; it’s that addictive.
I’ll be honest—after the first bite, I was halfway through the batch before anyone else could even see the pan. Most recipes get this completely wrong by overbaking or under seasoning, but here the balance is spot on. The trick lies in the subtle interplay of vanilla and maple syrup, and the final fold of chocolate chips that gives it a cookie dough vibe without the raw dough texture. Picture yourself pulling this out of the oven, the whole kitchen smelling incredible, and knowing you’ve made something that’s hands down the best version you’ll ever make at home.
What Makes This Version Stand Out
- Taste: The combination of dark cocoa, sweet dates, and vanilla creates a layered flavor profile that satisfies both sweet and savory cravings. The final bite leaves a lingering chocolate finish that keeps you coming back.
- Texture: These brownies boast a fudgy center with a slightly crisp top, thanks to the almond flour and protein powders that give structure without heaviness. The chocolate chips add a delightful melt‑in‑your‑mouth surprise.
- Protein Power: With 25 grams per serving, the protein content is high enough for post‑workout recovery yet balanced with healthy fats and carbs for sustained energy.
- Ingredient Quality: Using Medjool dates and cashew butter elevates the flavor profile while keeping the recipe free from refined sugars. The protein powders are low‑glycemic, making this a smart choice for health‑conscious bakers.
- Make‑Ahead Potential: Once baked, these brownies keep well in the fridge for up to a week, and they freeze beautifully for future indulgences.
- Simplicity: No pre‑mixes, no baking soda, no leavening agents—just a handful of pantry staples. The process is straightforward enough for beginners, yet the result feels gourmet.
- Audience Reaction: Friends who have tried it say they’re surprised at how rich it tastes with minimal added sugar. It’s a crowd‑pleaser that can double as a dessert or a snack.
Alright, let’s break down exactly what goes into this masterpiece…
Inside the Ingredient List
The Flavor Base
The 8 whole Medjool dates form the sweet backbone of this recipe. They provide natural sugars that caramelize during baking, creating a glossy finish that’s both visually appealing and deliciously moist. Removing the pits is essential; a single pit can ruin the texture and flavor. If you’re looking for a lower sugar alternative, try frozen dates, which add extra moisture without altering the taste. The dates also bring potassium and fiber, turning a dessert into a more balanced treat.
The Texture Crew
Two distinct almond flour measurements—1/2 cup and 1 1/4 cups—work together to create a chewy yet tender crumb. The smaller portion keeps the batter from becoming too dry, while the larger portion adds body and density. Almond flour’s fine particles help bind the protein powders, preventing crumbling during slicing. Swap almond flour for oat flour for a slightly different flavor profile, but keep the ratio the same to maintain texture. Remember to sift the flour to avoid clumps.
The Unexpected Star
The 4 tbsp of chocolate protein powder might seem like a subtle addition, but it amplifies the chocolate flavor without adding bulk. Protein powders also act as a natural leavening agent, helping the brownies rise just enough for that airy feel. If you prefer a stronger chocolate hit, increase the protein powder to 6 tbsp, but be mindful of the added protein content. Another option is to use a plant‑based protein powder for a dairy‑free version.
The Final Flourish
The 1/3 cup mini semi‑sweet chocolate chips are folded in at the very end, ensuring they stay intact and provide pockets of molten chocolate. The 2 tbsp cashew butter adds richness and a subtle nutty undertone that complements the almond flour. The 1 tsp vanilla extract, used twice, enhances the overall flavor profile, creating a subtle sweetness that balances the cocoa’s bitterness. The 2 tbsp pure maple syrup, added twice, provides natural sweetness and helps keep the brownies moist.
Everything’s prepped? Good. Let’s get into the real action…
The Method — Step by Step
- Step 1: Preheat your oven to 350°F (175°C). Line a 9x9-inch baking pan with parchment paper, leaving a little overhang on the sides for easy removal. Place the Medjool dates in a small saucepan with 1/4 cup of water and bring to a gentle simmer. Let the dates soften for 5 minutes, then mash them with a fork until they form a thick, sticky paste. This step ensures the dates release their natural sugars evenly throughout the batter.
- Step 2: In a large mixing bowl, combine the mashed dates with 1/2 cup almond flour, 4 tbsp chocolate protein powder, and 2 tbsp cocoa powder. Use a whisk or handheld mixer to blend until the mixture is smooth and free of lumps. The cocoa powder gives the batter its deep chocolate hue, while the protein powder adds a subtle nutty flavor that enhances the overall richness. Keep the mixture at room temperature; if it gets too dry, add a splash of almond milk.
- Step 3: Add 2 tbsp pure maple syrup, 1 tsp pure vanilla extract, and 1 cup cottage cheese to the dry mixture. Stir vigorously until the cottage cheese is fully incorporated, creating a creamy, uniform batter. The cottage cheese provides moisture and a slight tang that balances the sweetness. It also helps the brownies hold together without the need for eggs or leavening agents.
- Step 4: Fold in 1/2 cup vanilla protein powder, 2 tbsp cashew butter, and 1 tsp vanilla extract. The cashew butter adds a silky texture and a subtle nutty undertone that pairs beautifully with the chocolate chips. The vanilla extracts amplify the overall sweetness without overpowering the cocoa. Mix until everything is evenly distributed; the batter should be thick but pourable.
- Step 5: Gently fold in the 1/3 cup mini semi‑sweet chocolate chips, reserving a few for topping. The chips should remain whole to provide molten pockets when baked. This step is critical; if you mix too aggressively, the chips may break apart and lose their gooey center. At this point, the batter should have a glossy sheen and a slightly sticky feel.
- Step 6: Pour the batter into the prepared pan, smoothing the top with a spatula. Sprinkle the reserved chocolate chips evenly over the surface. Tap the pan gently on the counter to release any air bubbles. The batter should spread evenly; if it’s too thick, let it sit for 5 minutes before baking to allow it to settle.
- Step 7: Bake for 30 minutes, or until the edges pull away from the parchment and a toothpick inserted near the center comes out with a few moist crumbs. The brownies should develop a dark, caramelized crust while remaining fudgy inside. The baking time can vary slightly based on oven calibration, so keep an eye on the edges for the best result.
- Step 8: Remove the pan from the oven and let the brownies cool completely on a wire rack. This step is crucial for setting the structure; cutting them while warm will result in a gooey mess. Once cooled, lift the brownies using the parchment overhang and cut into squares. Each square should hold a generous amount of chocolate chips and have a slightly crisp top.
- Step 9: Serve immediately or store in an airtight container. For a quick snack, grab a square and enjoy the burst of chocolate, vanilla, and date sweetness. If you’re craving a warm treat, reheat a square in the microwave for 10–12 seconds. That’s it — you did it. But hold on, I’ve got a few more tricks that’ll take this to another level…
Insider Tricks for Flawless Results
The Temperature Rule Nobody Follows
Many bakers bake at 350°F, but the ideal temperature for these brownies is 325°F. Lowering the heat by 25 degrees allows the brownies to bake evenly, preventing a burnt top while keeping the center moist. I’ve tested this in both electric and gas ovens, and the difference is unmistakable. If you’re in a hurry, you can still bake at 350°F, but add a 5-minute bake time to compensate.
Why Your Nose Knows Best
Before pulling the brownies out of the oven, take a deep sniff. A warm, nutty aroma with hints of caramel signals that the brownies are ready. If the smell is more of a burnt chocolate, give them a few more minutes. Your nose is a reliable indicator because the scent of cocoa and maple syrup evolves as the sugars caramelize.
The 5‑Minute Rest That Changes Everything
After baking, let the brownies rest for exactly five minutes before cutting. This short pause allows the internal structure to set, making slicing effortless. Cutting too early can cause the brownies to crumble or the chocolate chips to spread. The 5‑minute rest is a small but game‑changing step that ensures each square holds together.
Keep It Moist, Not Sticky
If you find the brownies too dry, add a tablespoon of coconut oil to the batter before baking. Coconut oil melts during baking, creating a slick surface that keeps the brownies soft. Conversely, if they’re too sticky, let them cool longer on the rack. The balance between moisture and firmness is the key to a perfect bite.
Reheating Like a Pro
When reheating a brownie, add a splash of water to the microwave. The steam rehydrates the interior, restoring the fudgy texture that can dry out during storage. Microwave for 10–12 seconds, then let it sit for 30 seconds before biting. This trick keeps your brownies tasting fresh even after a week in the fridge.
Creative Twists and Variations
This recipe is a playground. Here are some of my favorite ways to switch things up:
Nutty Crunch Variation
Add 1/4 cup chopped walnuts to the batter before baking. The nuts add a delightful crunch and a boost of omega‑3 fatty acids. Keep the chocolate chips to maintain the gooey centers. This version is perfect for those who love a bit of texture in every bite.
Citrus Zest Surprise
Stir in 1 tsp orange zest and 1 tbsp orange juice during step 3. The citrus brightens the chocolate flavor and adds a refreshing lift. It’s a great way to incorporate a fruit element without adding extra sugar.
Salted Caramel Delight
Swap 2 tbsp pure maple syrup with 2 tbsp salted caramel sauce. The caramel’s rich, buttery taste pairs wonderfully with the chocolate. Finish with a sprinkle of sea salt on top before baking for a sweet‑savory contrast.
Spiced Chili Kick
Add 1/2 tsp ground cinnamon and a pinch of cayenne pepper during step 2. The spices give a subtle warmth and a hint of heat that lingers after the first bite. This version is great for those who enjoy a little spice in their desserts.
Vegan Upgrade
Replace the cottage cheese with silken tofu and use a dairy‑free protein powder. The tofu provides the necessary moisture and protein, while the dairy‑free powder keeps the flavor intact. This vegan version remains just as fudgy and satisfying.
Chocolate‑Covered Surprise
After baking, drizzle melted dark chocolate over the top. Let it set in the fridge for 10 minutes. The chocolate glaze adds an extra layer of richness and a glossy finish that’s Instagram‑ready.
Storing and Bringing It Back to Life
Fridge Storage
Store the brownies in an airtight container at room temperature for up to 5 days. For longer freshness, keep them in the fridge; the cooler environment preserves moisture and prevents mold. Always let them come to room temperature before eating to enjoy the full flavor.
Freezer Friendly
Wrap each brownie in parchment paper and then in foil before freezing. They stay fresh for up to 3 months. When ready to eat, thaw at room temperature for 30 minutes and reheat in the microwave for 10 seconds to restore the fudgy center.
Best Reheating Method
To revive a frozen or refrigerated brownie, add a splash of water to the microwave. Microwave on high for 10–12 seconds, then let it sit for 30 seconds. The steam will bring the brownie back to its original soft, gooey texture, making it feel brand new.