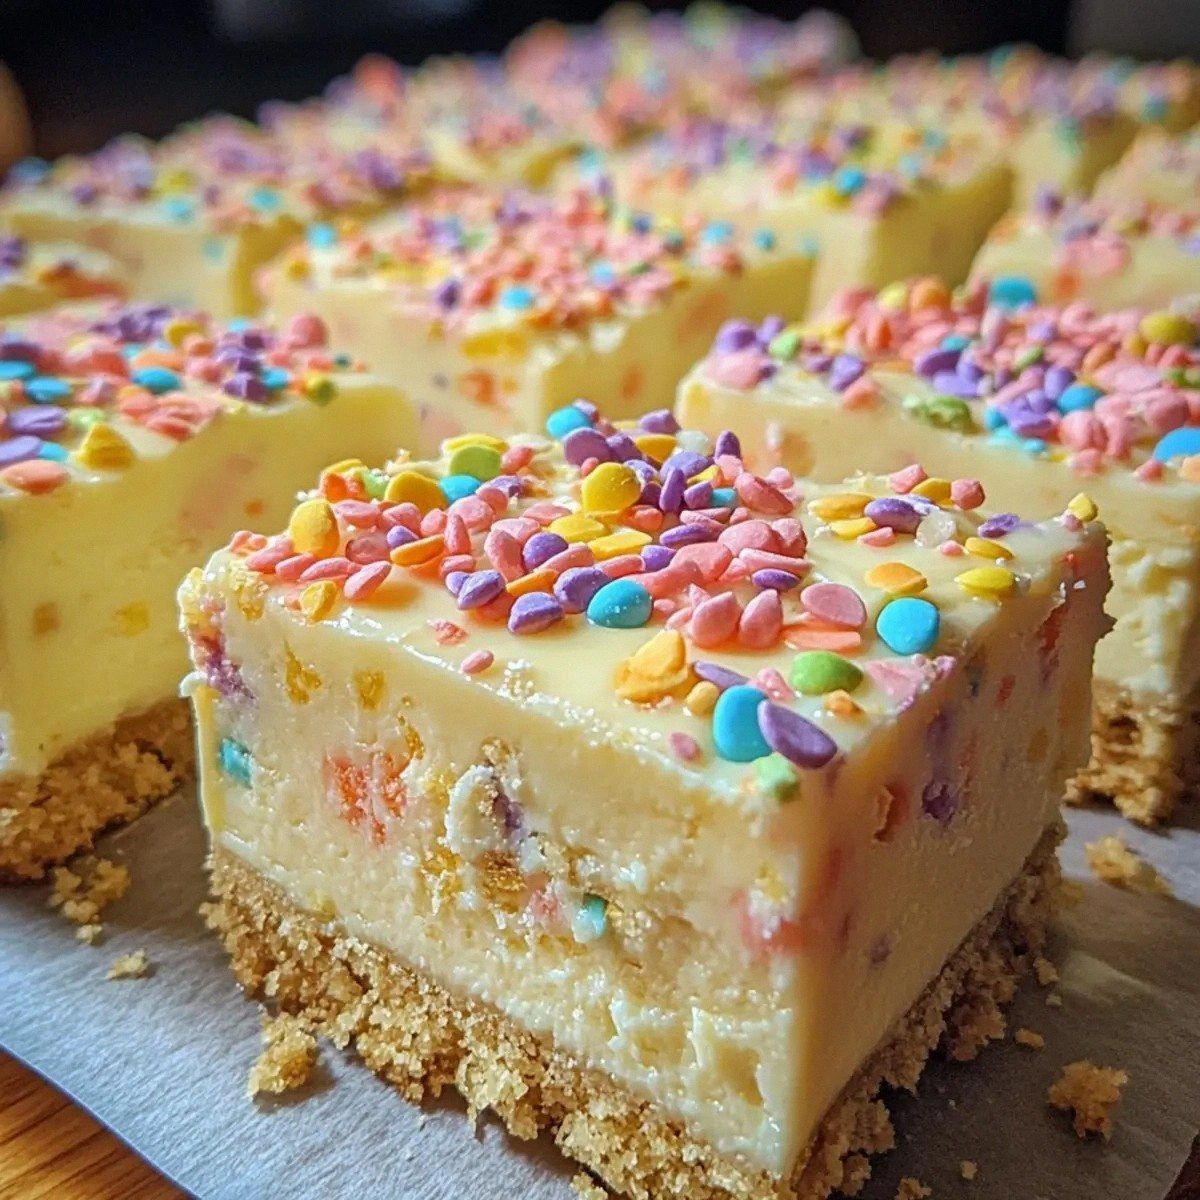
I never thought a kitchen mishap could lead to a culinary masterpiece, but here we are. Picture this: I was in a rush, the oven was preheated, and I was about to pop a batch of cupcakes into the oven when the timer went off. The cupcakes were a disaster—dry, cracked, and as bland as a beige wall. I stared at the mess, then had a lightbulb moment: why not turn that disappointment into a sweet, zesty, crowd‑pleaser that’s perfect for Easter? That’s when the idea of “Easy Easter Egg Lemon Cheeseca” was born, and I swear this is hands down the best version you’ll ever make at home.
Now, let’s set the scene. The kitchen smells like citrus and vanilla, the timer is ticking, and the sound of a mixer whirring is music to my ears. You can almost taste the creamy tang of lemon on your tongue, feel the smoothness of the cheesecake filling sliding across your spoon, and hear the gentle crackle of the crust as it sets. The anticipation builds, and I can already hear you saying, “I dare you to taste this and not go back for seconds.”
What makes this version stand out? It’s the blend of classic cheesecake with a playful Easter twist, the use of real lemon zest for a bright punch, and the addition of those colorful mini Easter egg candies that give it a festive crunch. I’ve taken the time to fine‑tune the ratio of cream cheese to sugar, so the texture is silky without being overly sweet. And the crust? It’s buttery, slightly sweet, and perfectly crumbly—think of it as the foundation of a masterpiece. If you’ve ever struggled with a cheesecake that turns out too dense or too runny, you’re not alone, and I’ve got the fix.
Picture yourself pulling this out of the oven, the whole kitchen smelling incredible, and a plate of golden bars waiting to be devoured. The first bite is a burst of lemon, a hint of vanilla, and a subtle sweetness that lingers. The mini Easter eggs add a playful surprise—tiny bursts of chocolate that dance on your palate. It’s a dessert that’s as visually stunning as it is delicious, making it the perfect centerpiece for your Easter table.
Okay, ready for the game‑changer? Let me walk you through every single step—by the end, you’ll wonder how you ever made it any other way. Trust me, the process is straightforward, the results are spectacular, and you’ll have a new favorite recipe that’s easy to scale and even easier to share.
What Makes This Version Stand Out
- Taste: The lemon zest and juice give a bright, tangy flavor that cuts through the richness of the cream cheese, creating a balanced profile that feels both indulgent and refreshing.
- Texture: A silky, smooth filling that’s firm enough to slice but melts in your mouth, paired with a buttery, slightly crunchy crust that adds depth.
- Uniqueness: The inclusion of mini Easter egg candies gives a playful pop of chocolate and color, turning a simple cheesecake into a festive treat.
- Simple Prep: No need for a double‑boiler or a fancy ganache—just a few ingredients and a few minutes of prep time.
- Crowd Reaction: Friends and family will be amazed by the professional finish and the burst of flavor; it’s a conversation starter at any gathering.
- Ingredient Quality: Using full‑fat cream cheese and fresh lemons ensures a rich, authentic taste that elevates the entire dessert.
- Cooking Method: A single bake in a springform pan that delivers even results without the need for a water bath.
- Make‑ahead Potential: The bars can be prepared a day in advance and chilled, making it a perfect make‑ahead dessert for busy holidays.
Inside the Ingredient List
The Flavor Base
Fresh lemon juice is the star that brightens the entire dish. It’s not just about acidity; the natural oils from the zest add a depth that plain juice can’t match. If you skip the juice, the cheesecake will taste flat and overly sweet. For a twist, try using a mix of lemon and lime juice for a slightly different citrus profile.
The Texture Crew
Full‑fat cream cheese provides a velvety mouthfeel that’s essential for a smooth cheesecake. The 16 ounces of cream cheese are measured at room temperature to prevent lumps. If you’re short on cream cheese, you can blend it with Greek yogurt for a lighter texture, but you’ll lose some of the classic richness. Remember, the texture is what makes the cheesecake feel luxurious.
The Unexpected Star
Mini Easter egg candies are more than a decorative element; they add a subtle chocolate flavor and a fun crunch that contrasts with the creamy filling. The 1 cup of candies is evenly distributed to ensure every bite has a surprise. If you’re vegan, replace them with vegan chocolate chips or a handful of toasted coconut flakes for a tropical vibe.
The Final Flourish
Powdered sugar is sprinkled on top after the bars cool to give a delicate dusting that’s both sweet and decorative. It also helps to balance the tartness of the lemon. If you prefer a dusting that’s more flavorful, try adding a pinch of sea salt to the powdered sugar for a sweet‑savory contrast. The finishing touch is what makes this dessert look professional and inviting.
Everything’s prepped? Good. Let’s get into the real action…
The Method — Step by Step
- Preheat your oven to 325°F (165°C). Line a 9×13-inch baking dish with parchment paper, leaving an overhang on the sides for easy removal. This step ensures a non‑stick surface and a clean release. As the oven heats, the aroma of butter and sugar begins to mingle, setting the mood for a delicious bake.
- In a medium bowl, combine the graham cracker crumbs and granulated sugar. Add the softened butter and mix until the mixture resembles wet sand. Press the crumb mixture firmly into the bottom of the prepared pan, creating an even layer. The crust should feel solid enough to support the filling without crumbling.
- In a large mixing bowl, beat the cream cheese on medium speed until smooth and creamy. This is the moment of truth—if the cream cheese is lumpy, the cheesecake will be uneven. Add the sugar, vanilla, lemon zest, and fresh lemon juice, and continue to beat until the mixture is light and fluffy. The batter should have a pale, airy appearance.
- Fold in the mini Easter egg candies gently, so they’re evenly distributed but not crushed. This keeps the chocolate intact and adds a delightful crunch. If you’re using a different type of candy, adjust the quantity to taste.
- Pour the cheesecake batter over the crust, smoothing the top with a spatula. Tap the pan on the counter a few times to release any air pockets. This step is critical to avoid cracks during baking.
- Place the pan in the preheated oven and bake for 35–40 minutes, or until the edges are set and the center still has a slight wobble. The top should be a golden‑brown shade. Watch closely—if it browns too quickly, tent it with foil to prevent burning.
- Remove the cheesecake from the oven and let it cool on a wire rack for 30 minutes. Once cooled, refrigerate for at least 4 hours, preferably overnight. This chilling period allows the flavors to meld and the texture to firm up. The result is a sliceable, silky cheesecake that’s easy to cut into bars.
- Before serving, dust the top with powdered sugar and use the parchment overhang to lift the cheesecake out of the pan. Slice into bars with a sharp knife, wiping the blade between cuts for clean edges. Serve immediately or store in the fridge; the bars stay fresh for up to 5 days.
That’s it—you did it. But hold on, I’ve got a few more tricks that will take this to another level…
Insider Tricks for Flawless Results
The Temperature Rule Nobody Follows
Many bakers bake at 350°F, but that high heat can cause the cheesecake to crack. Stick to 325°F and keep the oven door slightly ajar for even baking. A temperature that’s too high will also dry out the filling. I’ve learned that a lower, steady temperature yields a smoother finish.
Why Your Nose Knows Best
When the cheesecake starts to develop a golden hue, that’s a sign it’s almost done. The scent of lemon and vanilla will intensify, and you’ll know it’s ready for the final touch. Trusting your nose is a secret skill that seasoned bakers use to avoid overbaking.
The 5-Minute Rest That Changes Everything
Letting the cheesecake rest for 5 minutes after you pull it from the oven helps set the center. This short pause allows the batter to stabilize, preventing a sudden collapse when you slice it. Think of it as a moment of calm before the grand reveal.
The Chill‑and‑Freeze Combo
If you’re in a rush, you can chill the cheesecake for 30 minutes before baking. The cold batter will bake more evenly, and the final product will have a firmer texture. This trick is especially useful for large batches.
The Dusting Dilemma
For a subtle sweetness, dust the top with powdered sugar right before serving. If you prefer a richer finish, add a light drizzle of lemon glaze or a sprinkle of sea salt for contrast. The choice is yours, and it’s a simple way to personalize each bar.
Creative Twists and Variations
This recipe is a playground. Here are some of my favorite ways to switch things up:
Chocolate‑Lemon Fusion
Swap the mini Easter egg candies for dark chocolate chunks and add a teaspoon of cocoa powder to the batter. The result is a rich, bittersweet cheesecake that still carries the citrus zing.
Berry Burst Edition
Fold in 1 cup of fresh blueberries or raspberries into the batter before baking. The berries add a juicy burst of flavor and a pop of color that’s perfect for spring celebrations.
Minty Fresh Twist
Add a tablespoon of finely chopped fresh mint to the batter, and garnish the top with a few mint leaves. The mint pairs beautifully with lemon, creating a refreshing palate cleanser.
Nutty Crunch Variation
Replace the graham cracker crumbs with crushed walnuts or pecans. The nutty flavor complements the lemony sweetness and adds a satisfying crunch.
Almond‑Lemon Delight
Use almond flour instead of graham crackers for a gluten‑free crust, and add a teaspoon of almond extract to the batter. The nutty undertones enhance the lemony brightness.
Caramel Swirl Surprise
Drizzle caramel sauce over the top before chilling, and stir a few spoonfuls into the batter. The caramel adds a buttery sweetness that balances the tartness of the lemon.
Storing and Bringing It Back to Life
Fridge Storage
Cover the cheesecake bars with plastic wrap and store them in the refrigerator for up to 5 days. The cold environment keeps the texture firm and the flavors vibrant. When ready to serve, let the bars sit at room temperature for 15 minutes for the best mouthfeel.
Freezer Friendly
Wrap each bar tightly in foil and then place them in a freezer bag. They’ll keep for up to 3 months. Thaw overnight in the fridge before serving, and let them sit at room temperature for 20 minutes to restore their silky texture.
Best Reheating Method
If you prefer a warm cheesecake, preheat your oven to 300°F (150°C) and place the bars in a shallow dish. Warm for 8–10 minutes, or until the center is just set. Add a tiny splash of water before reheating; this steams the cheesecake back to perfection and prevents it from drying out.